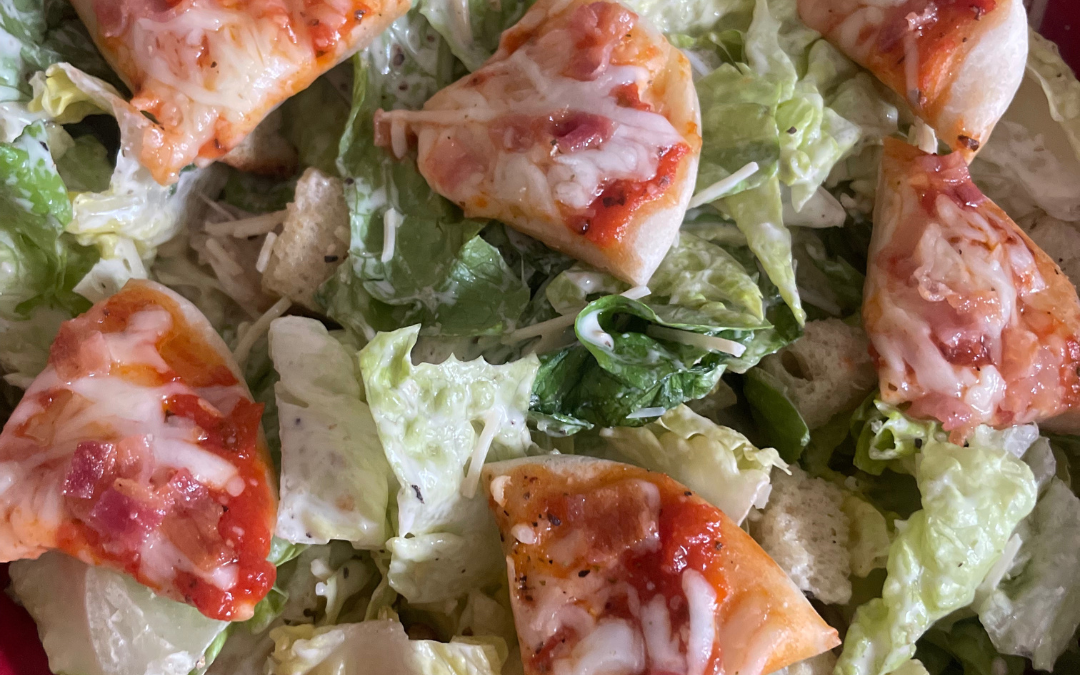
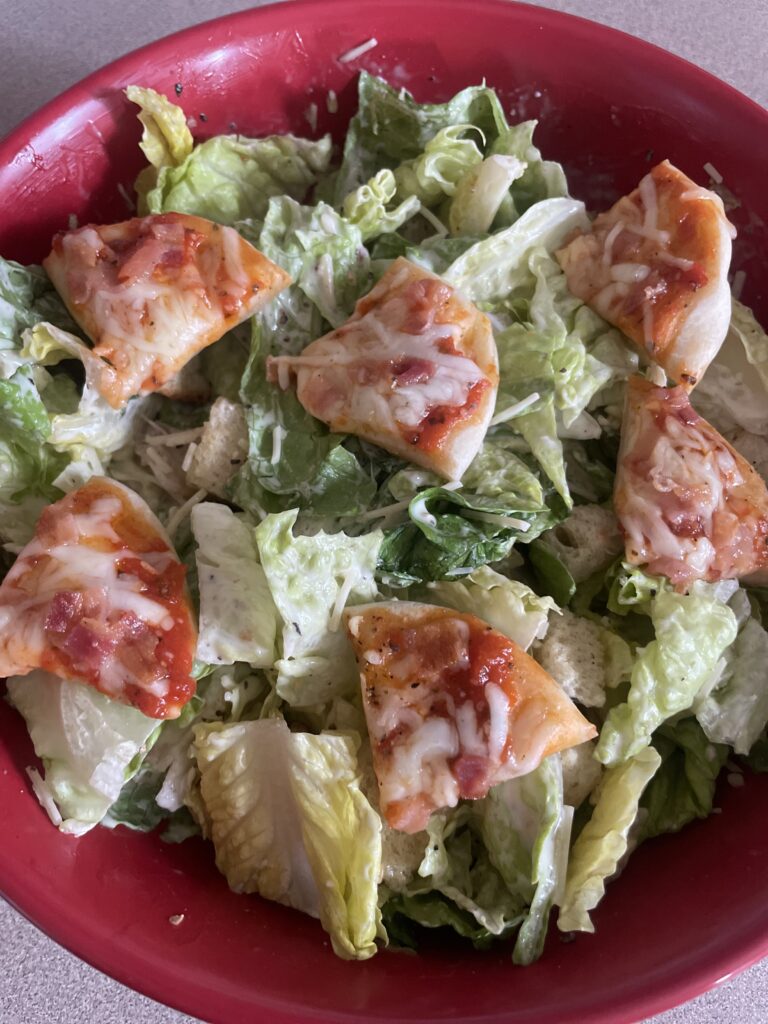
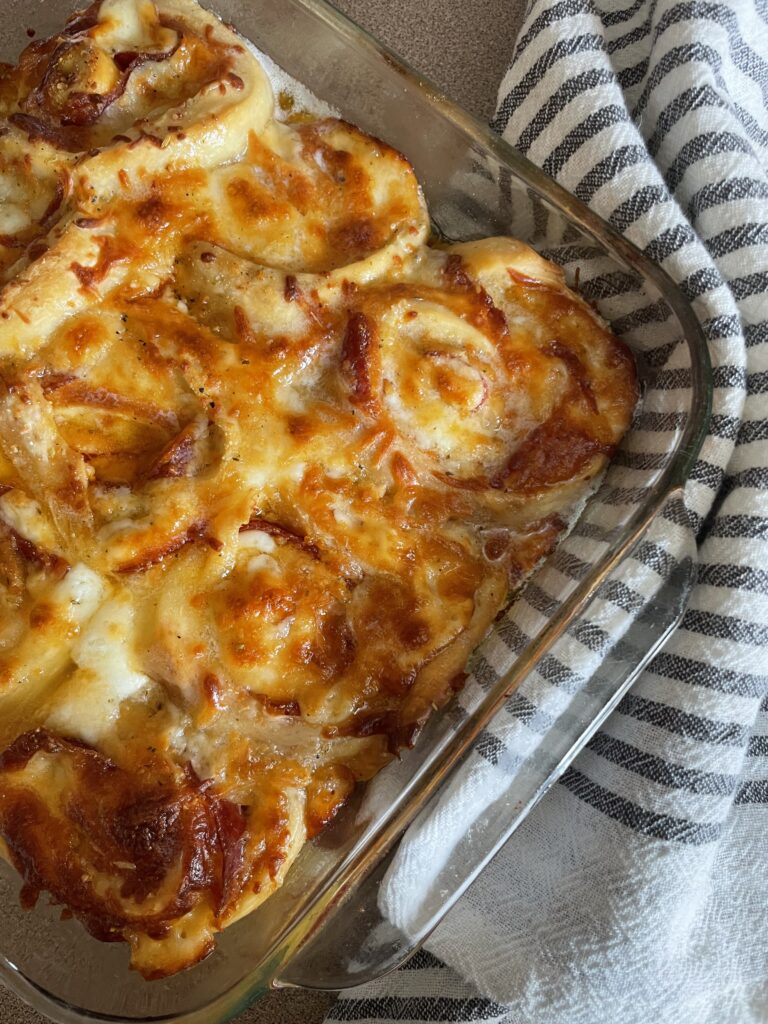
There’s something about girl dinner that just gets us—low-stress, high-satisfaction meals that hit all the right notes without requiring a ton of effort. This one combines the crunch of Caesar salad with the warm, cheesy goodness of mini pizzas, and trust me—it’s a vibe.
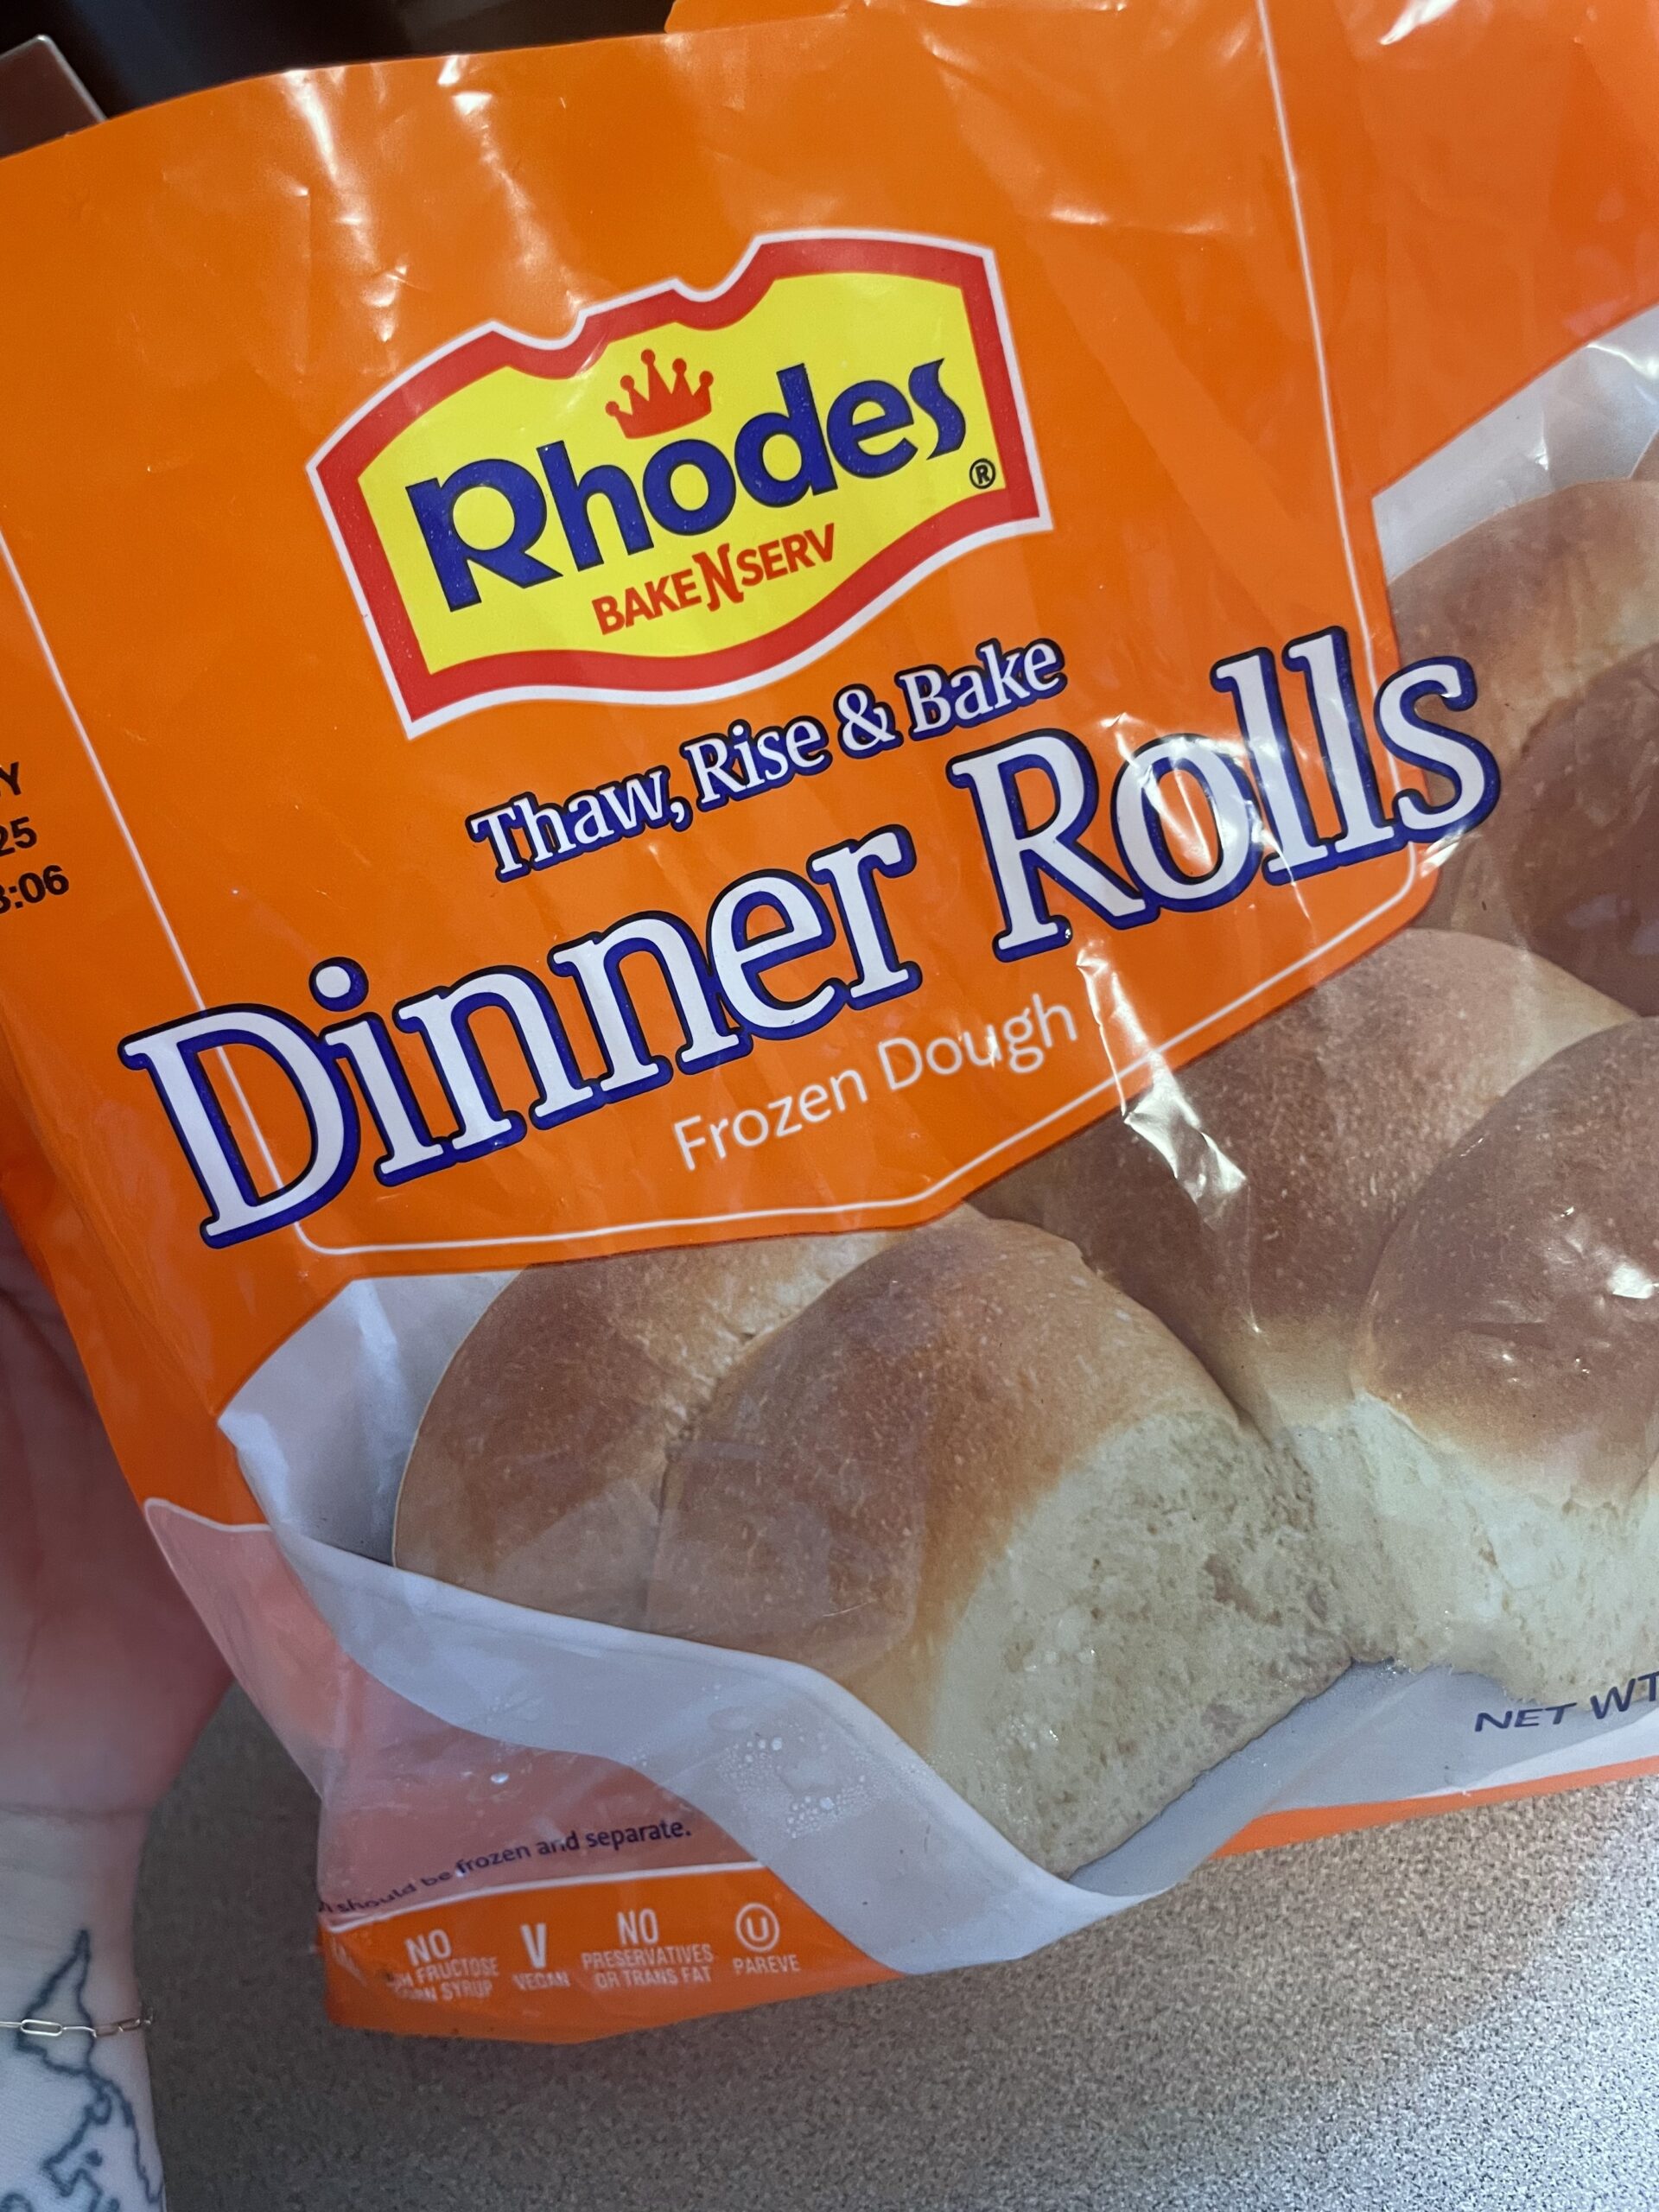
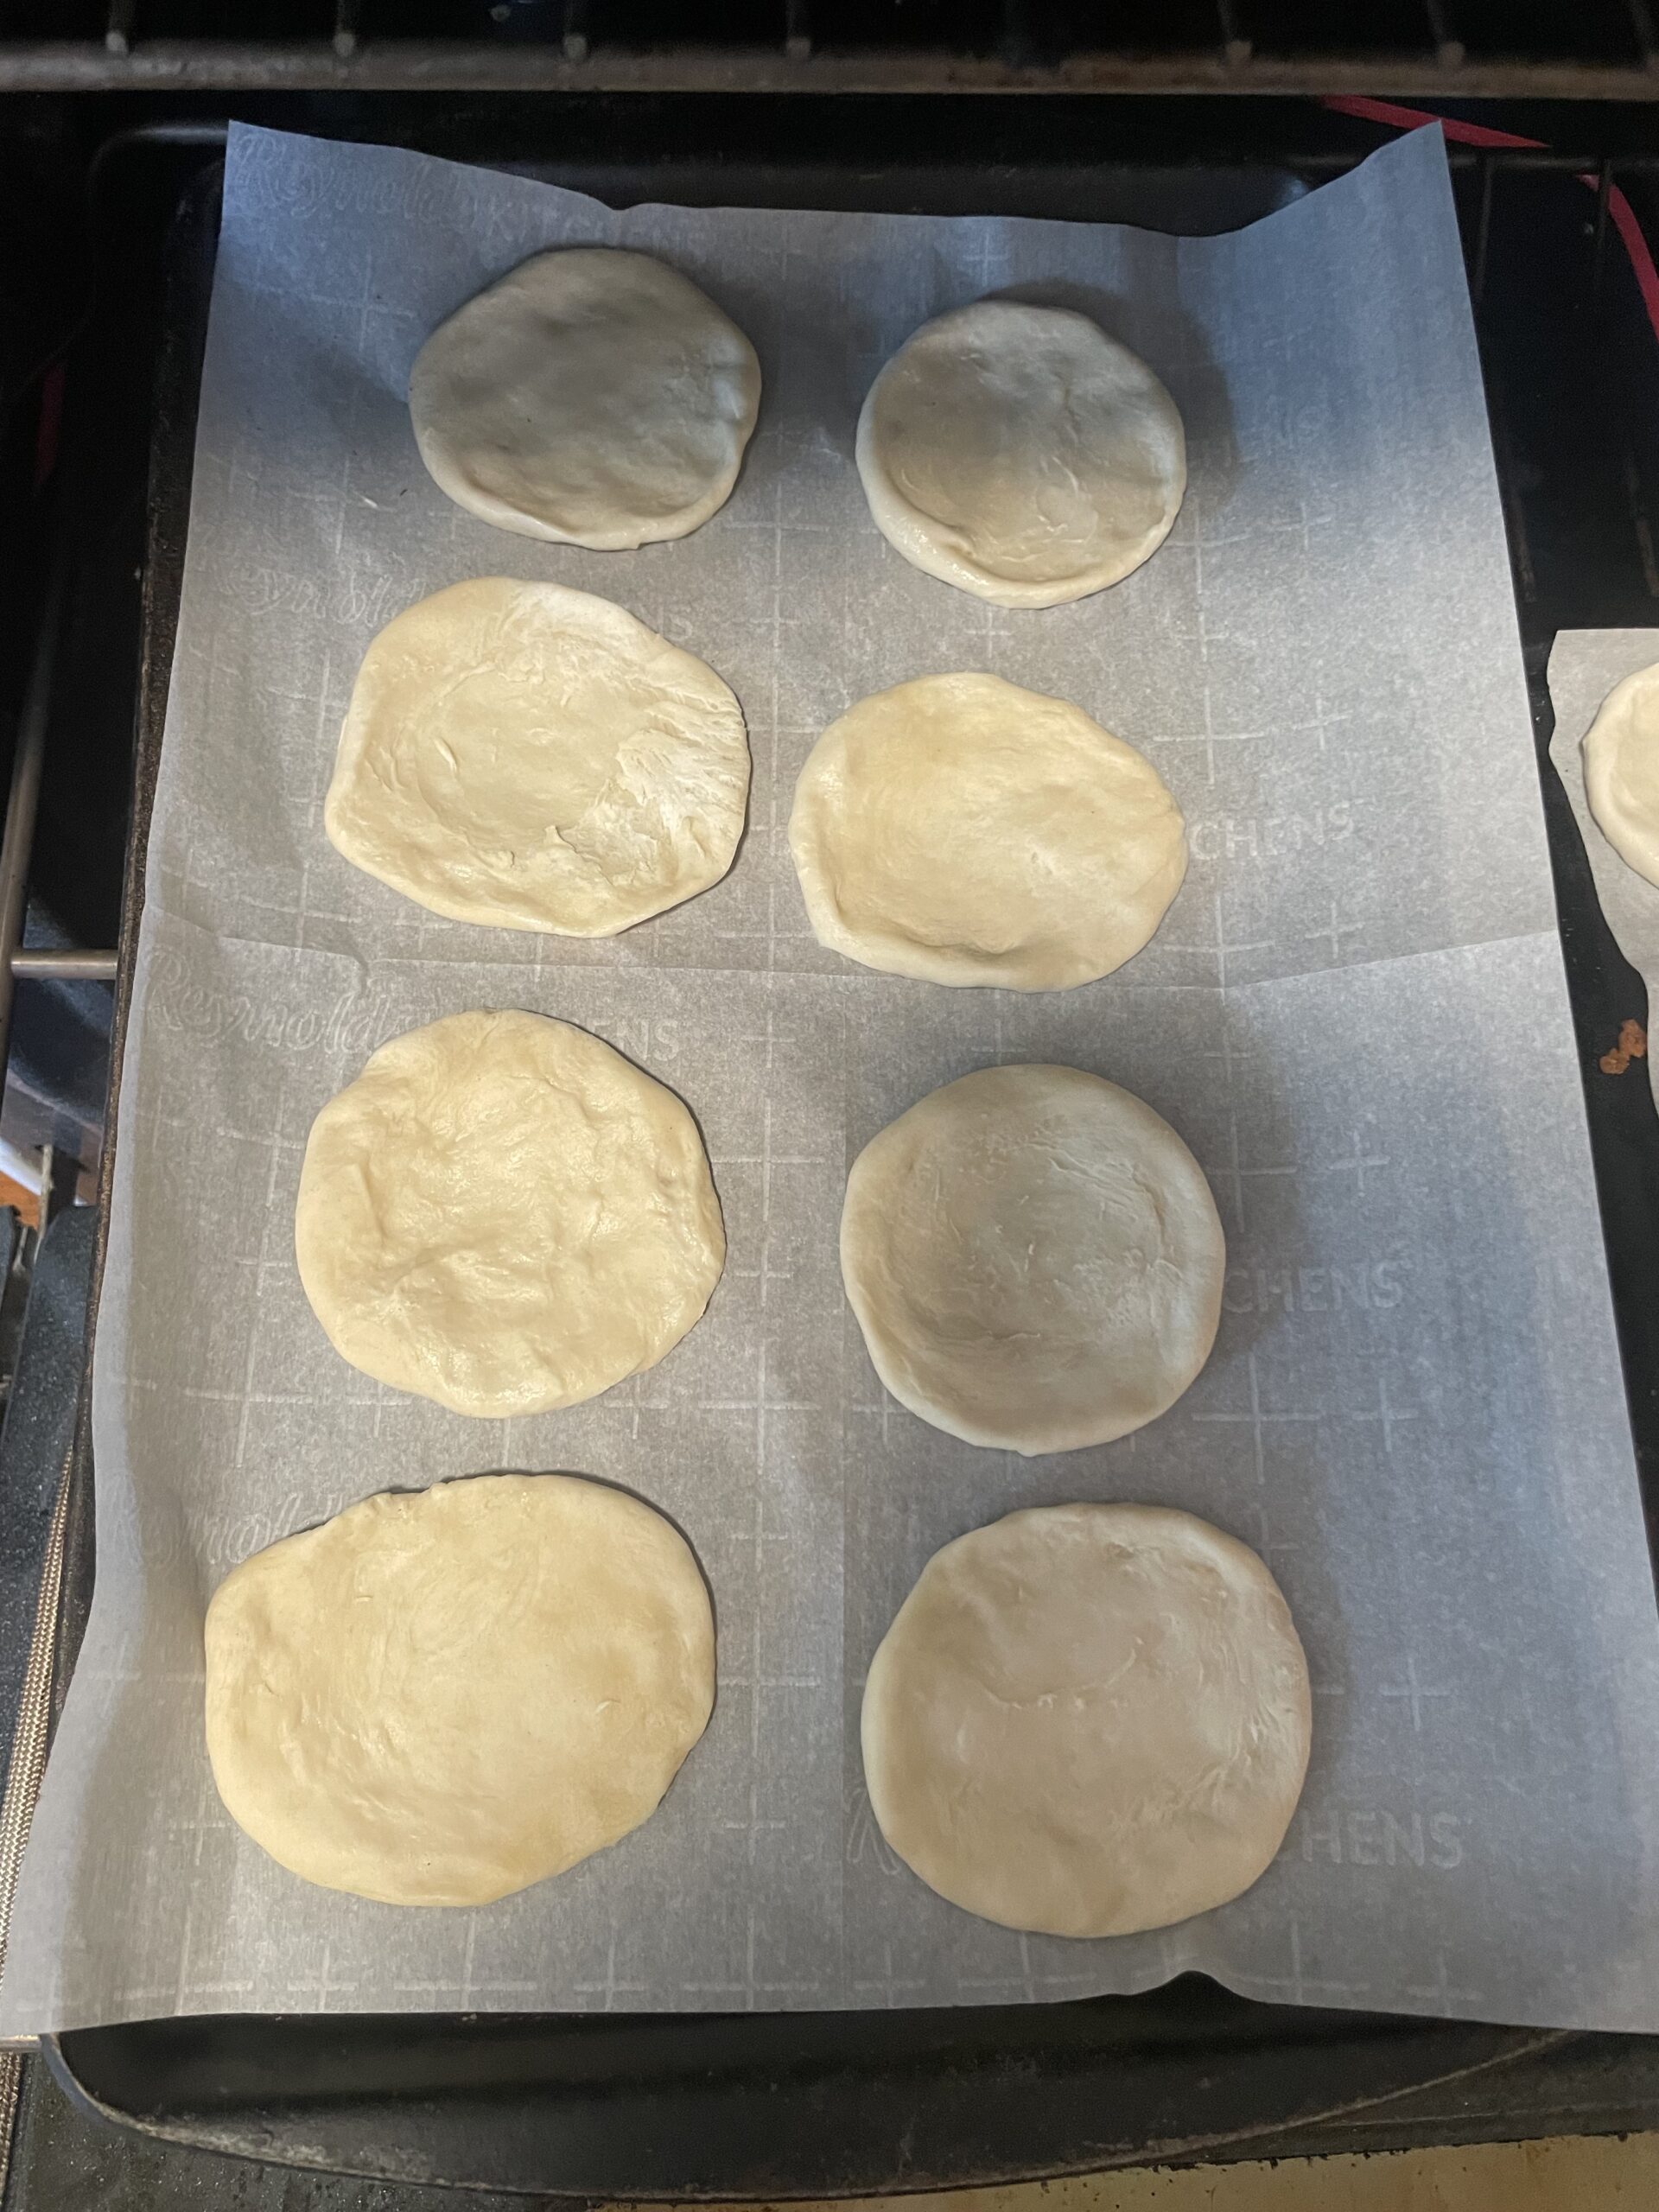
And yes, these adorable little pizzas are homemade using frozen dinner rolls. That’s right, we’re not even messing with pizza dough from scratch—this is mom life made easy.
What You’ll Need:
Rhodes Bake-N-Serv Frozen Dinner Rolls – I let these thaw and rise, then flattened them into mini crusts.
Pizza toppings – I used tomato sauce, shredded mozzarella, chopped bacon, and Italian seasoning.
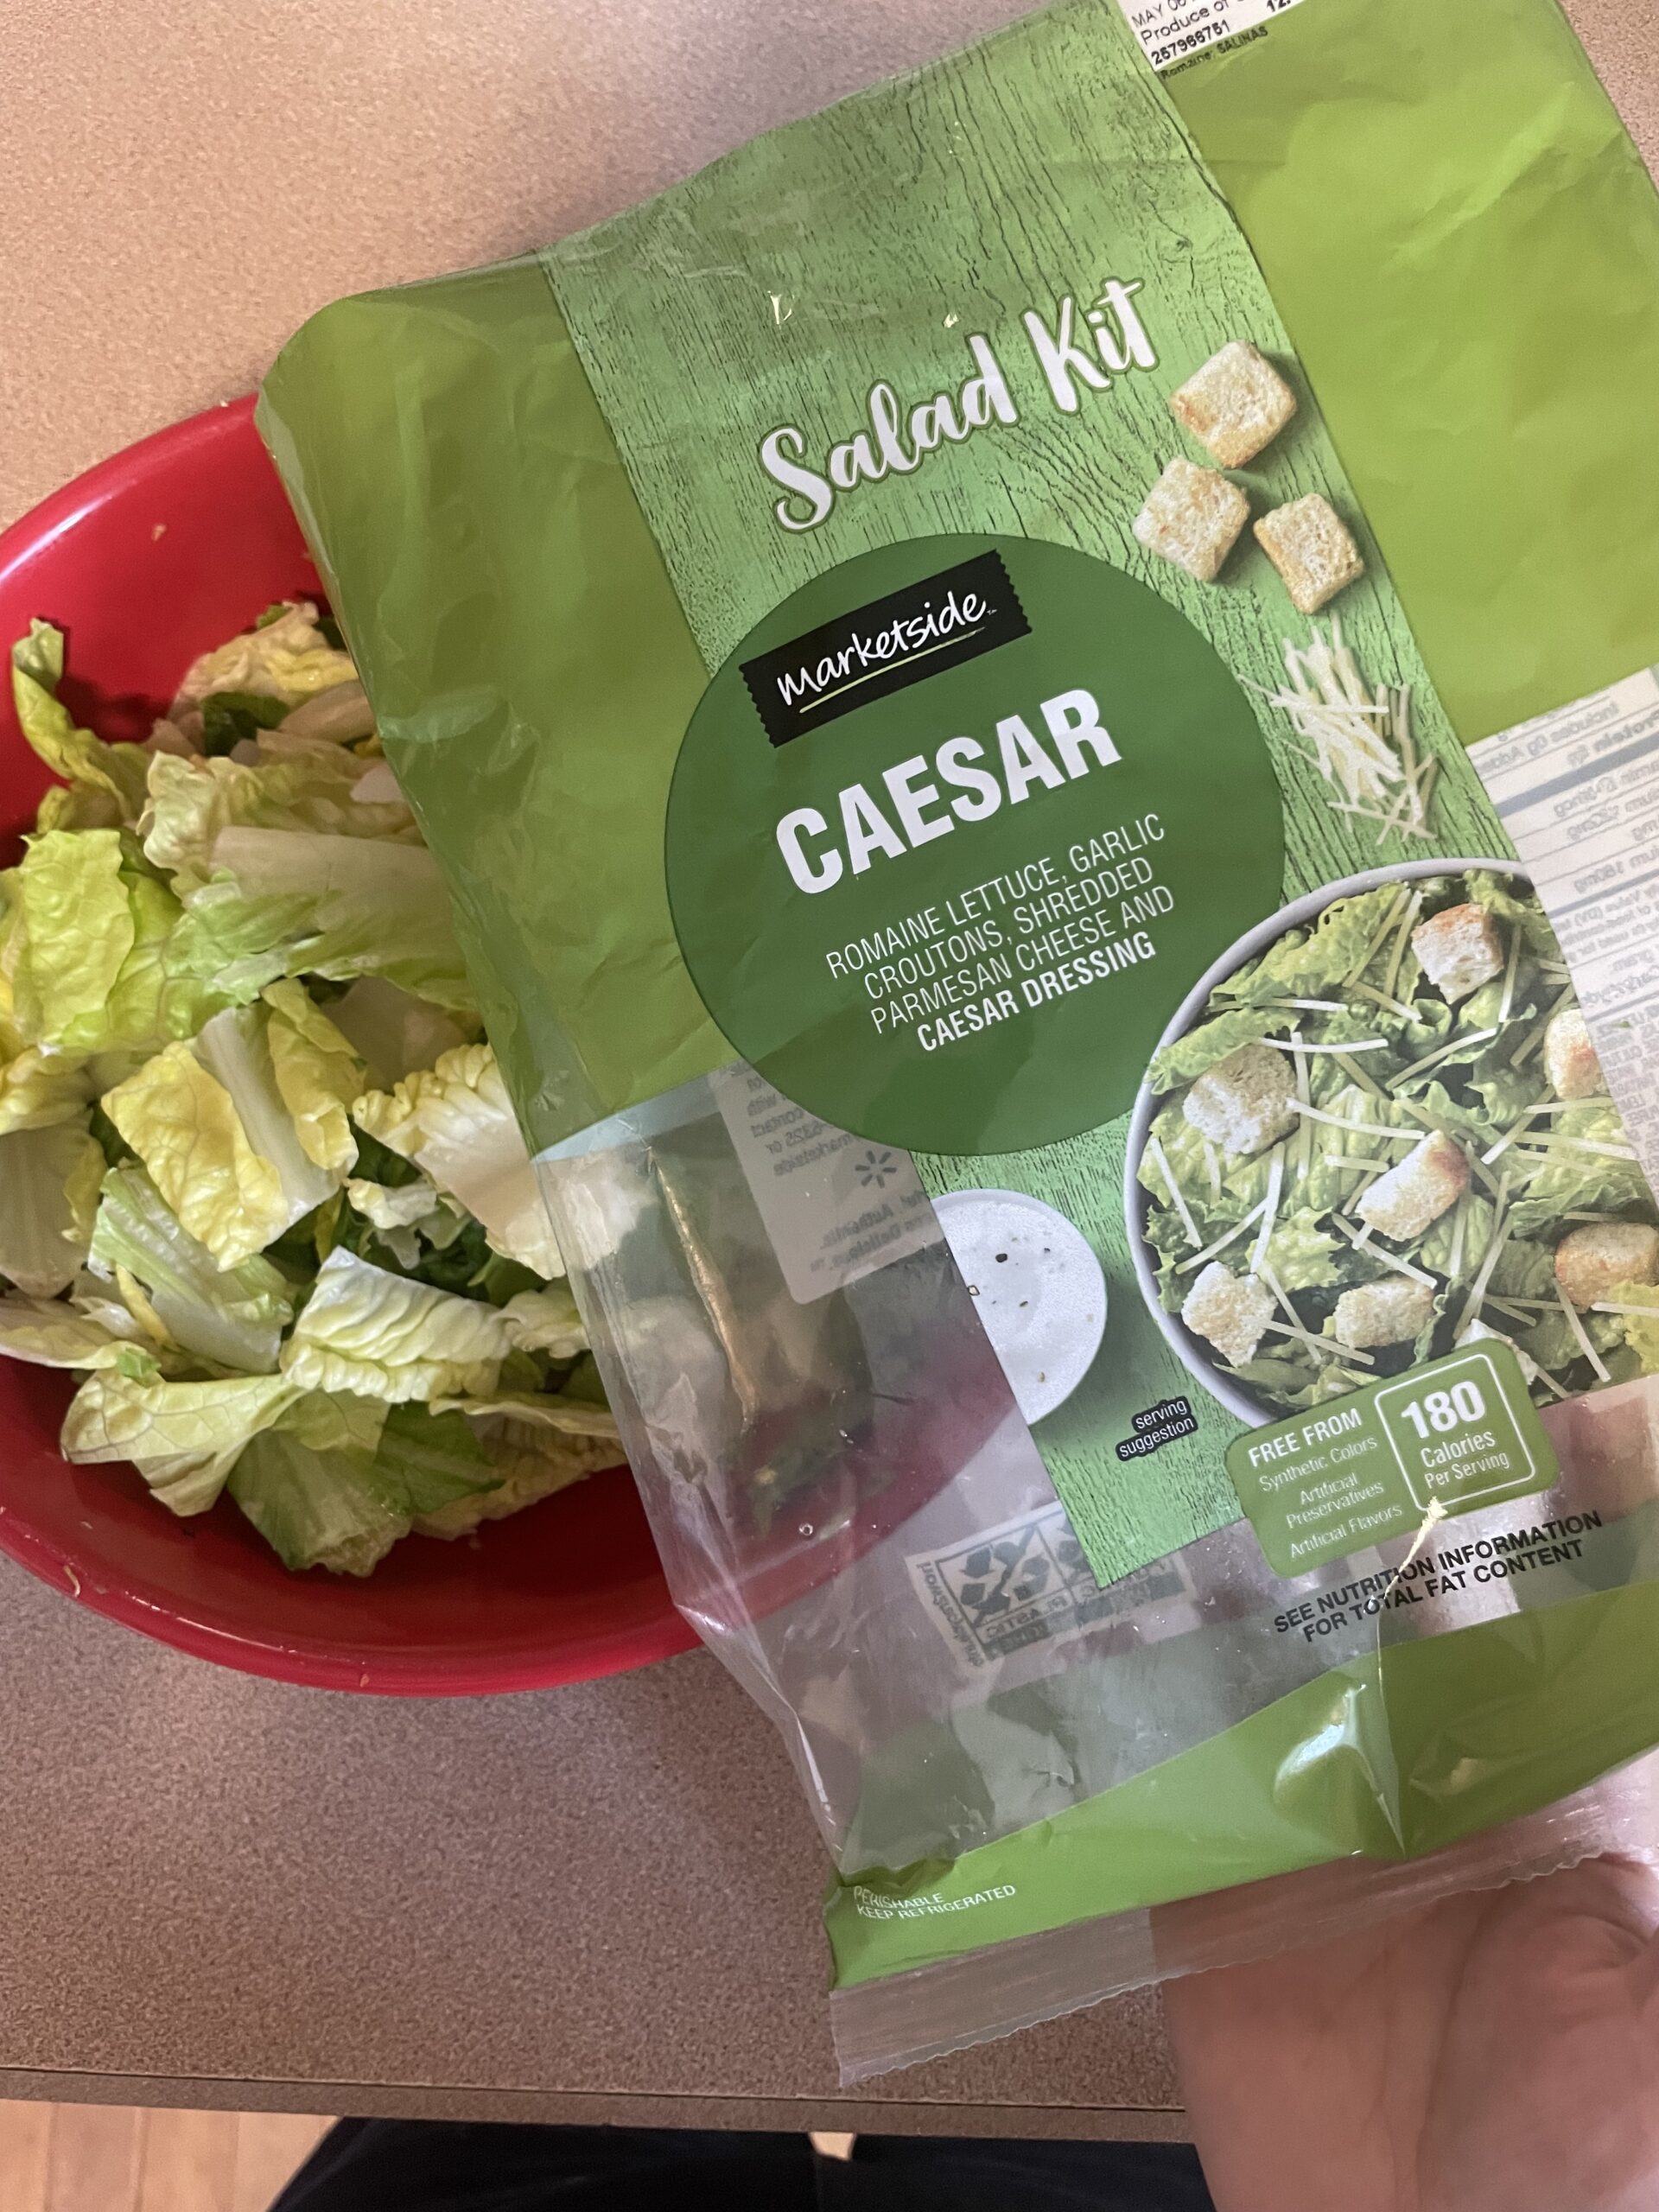
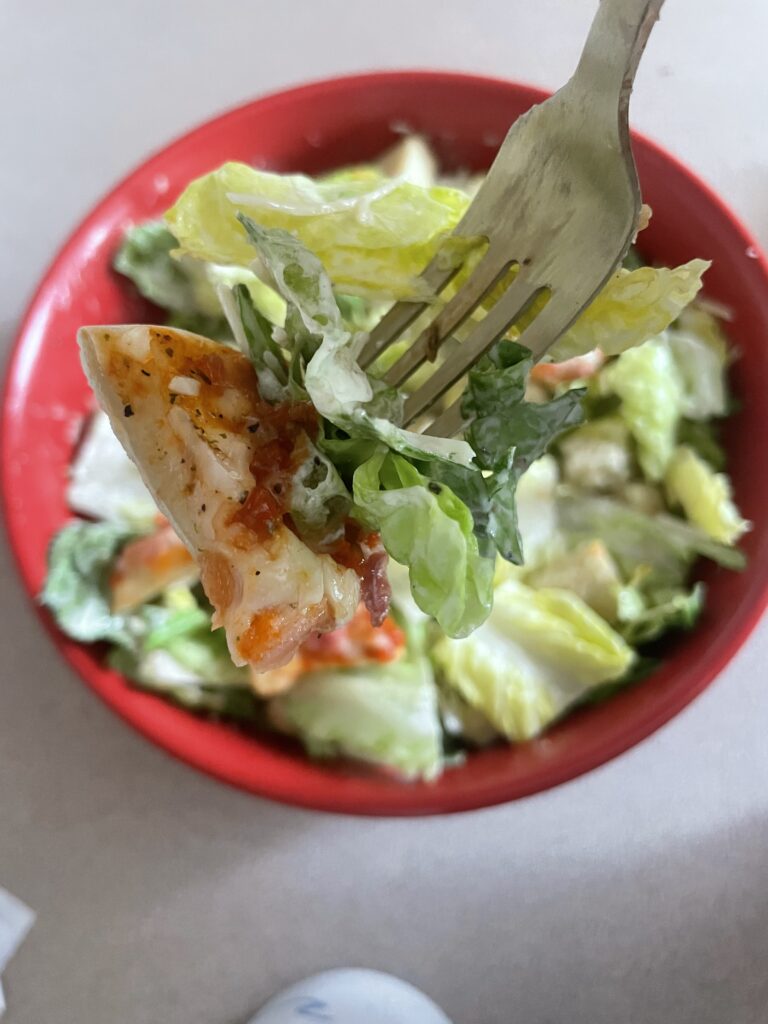
Caesar Salad Kit – Prepped and ready to toss. Includes romaine lettuce, garlic croutons, Parmesan cheese, and Caesar dressing.
How to Make the Mini Pizzas:
Thaw & Rise your Rhodes rolls according to the package instructions.
Once risen, flatten each roll into a small round and place them on parchment-lined baking sheets.
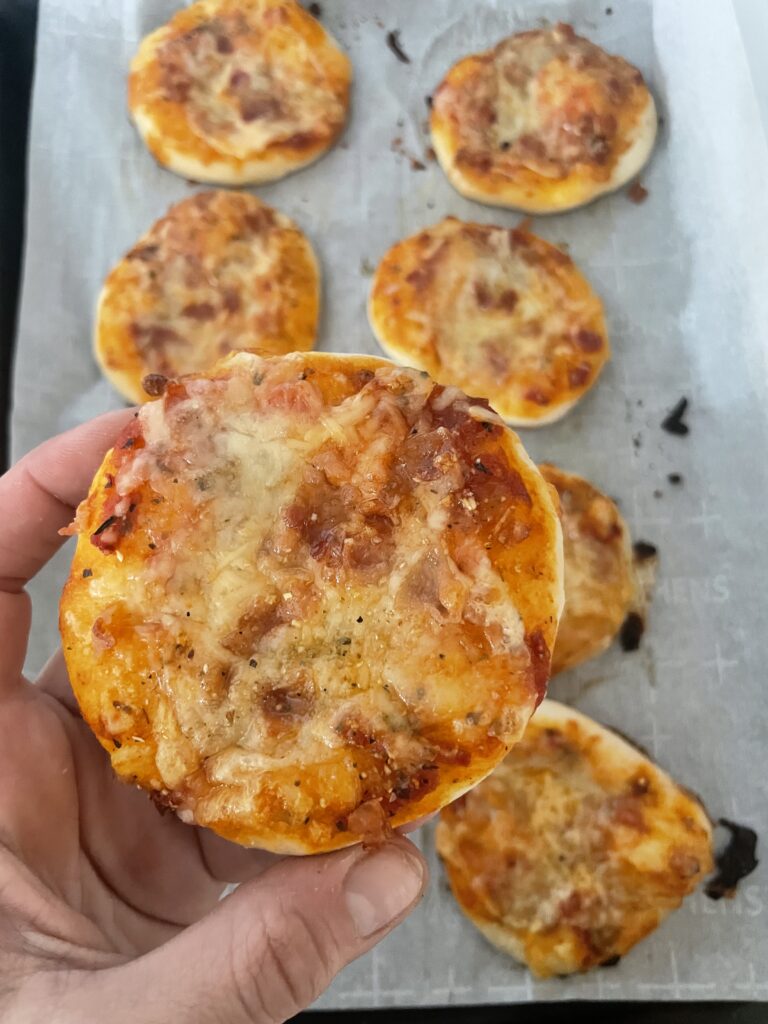
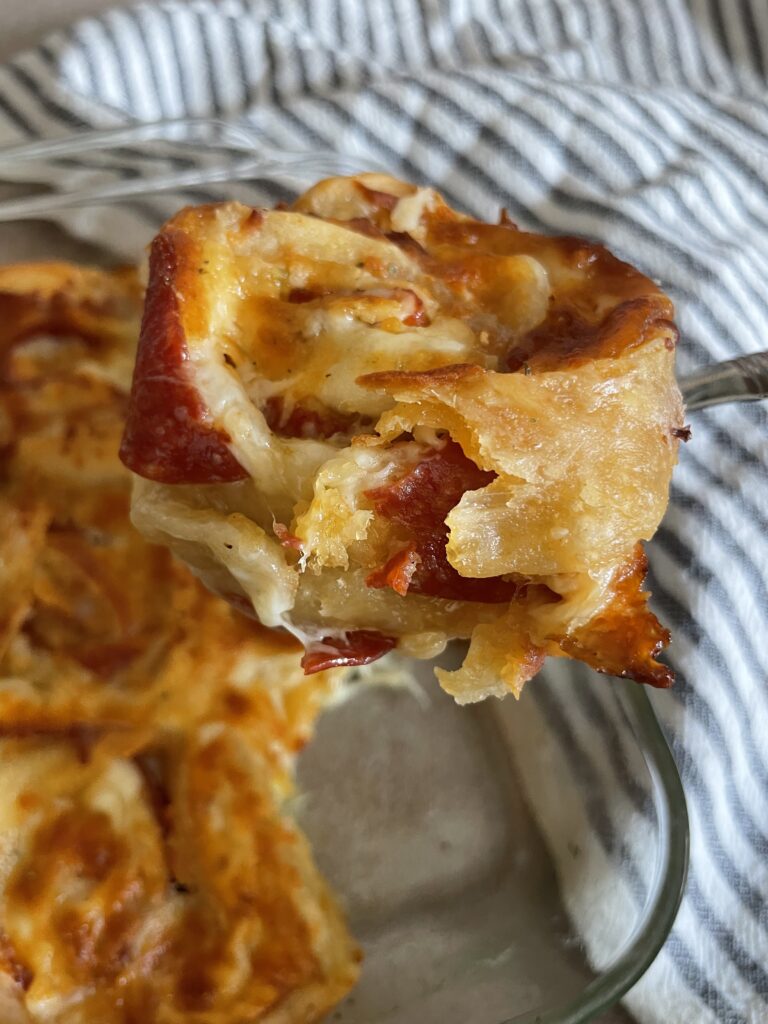
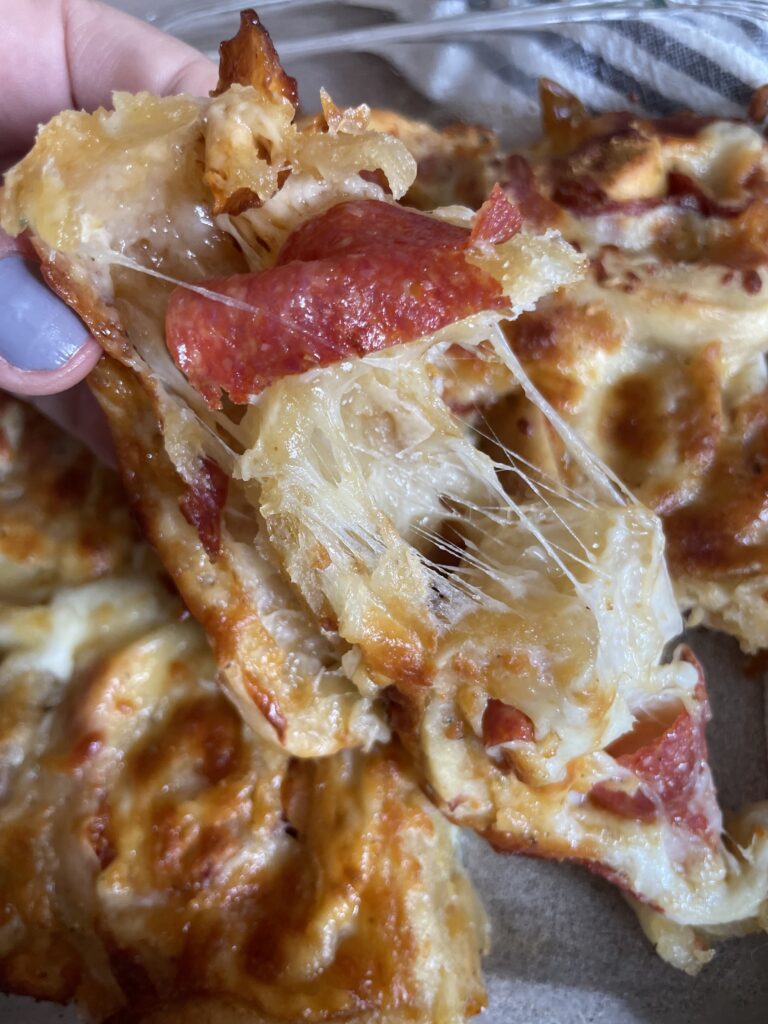
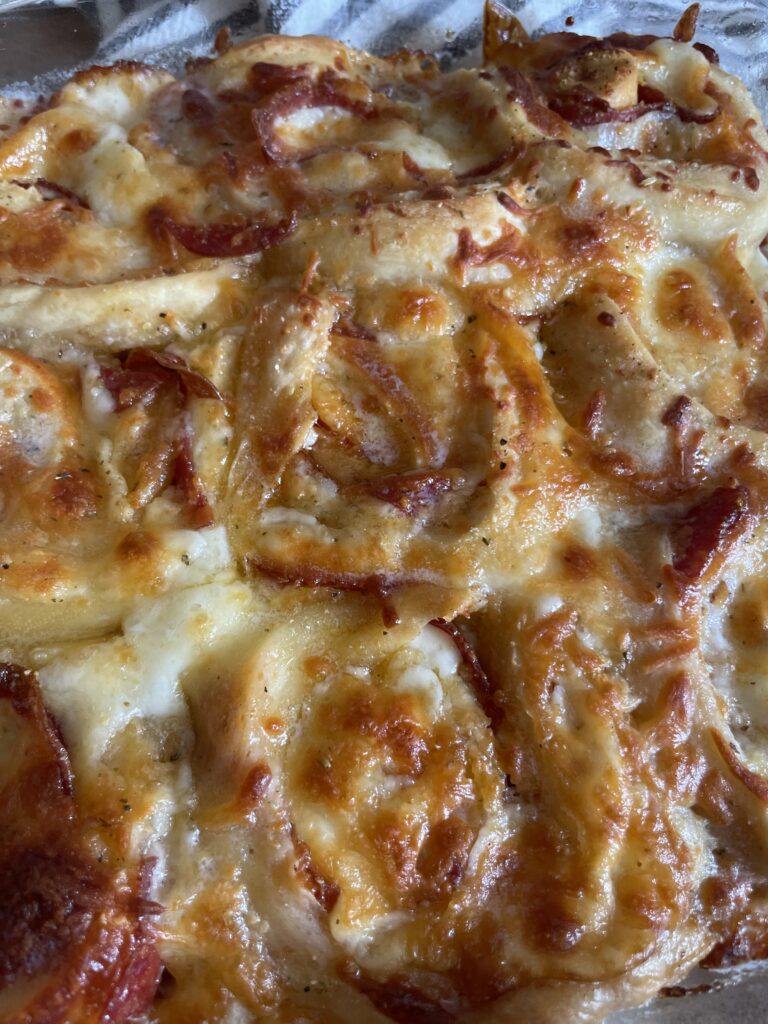
Add a spoonful of pizza sauce, shredded cheese, chopped bacon, and a sprinkle of Italian seasoning.
Bake at 375°F until golden and bubbly (about 12–15 minutes depending on your oven).
Let them cool slightly, then cut them into quarters for bite-size pizza salad toppers.
Bringing It All Together:
While the pizzas are baking, toss your Caesar salad kit into a bowl and give it a good mix. Once the pizzas are cool enough to handle, cut them up and scatter them over your salad. You’ve officially turned your girl dinner into a main character moment.
Why Moms Love This:
It’s fast, filling, and fun.
Kids can help make the mini pizzas.
You can prep extras for lunchboxes the next day.
It feels way fancier than it is—and that’s always a win.
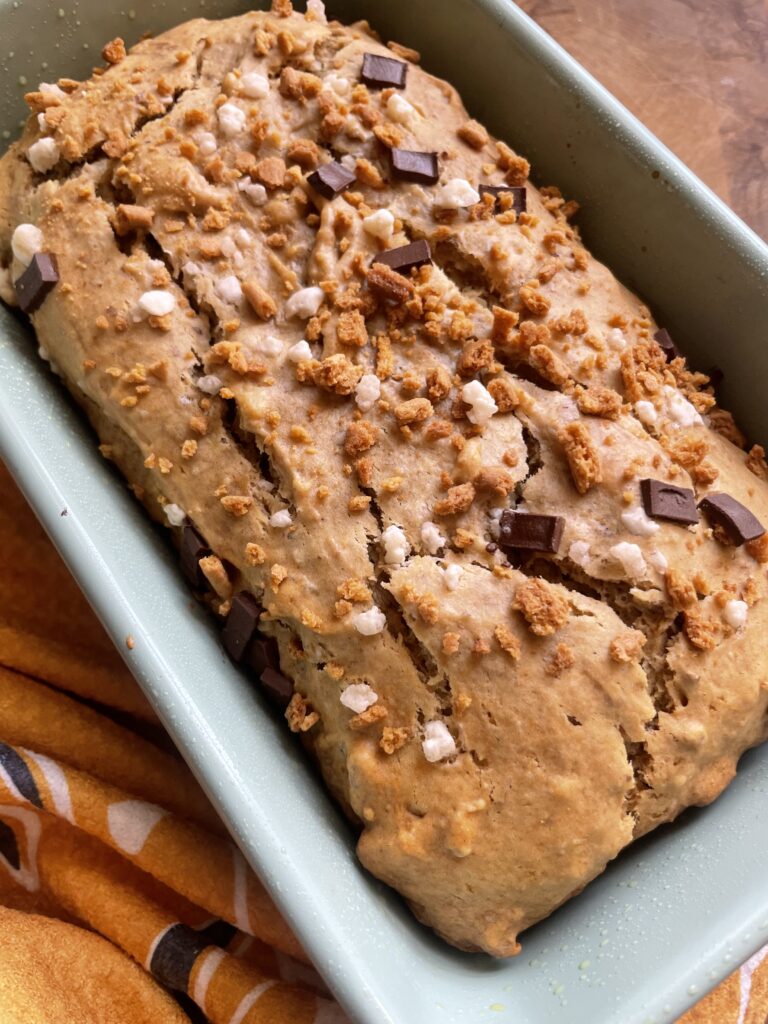
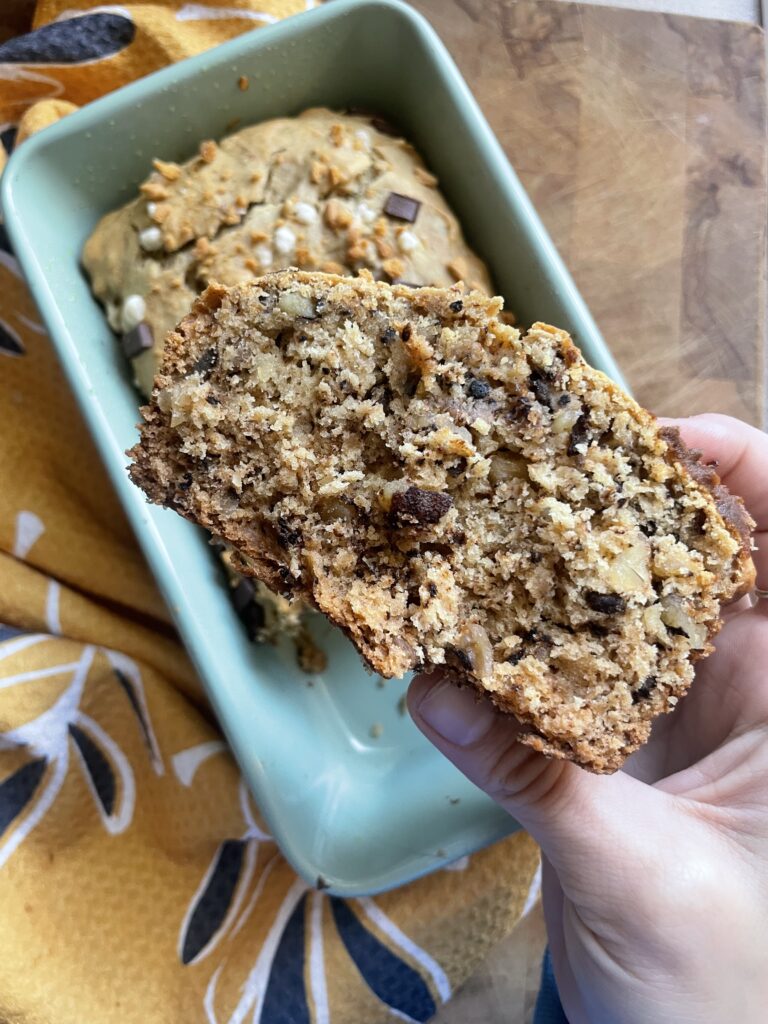
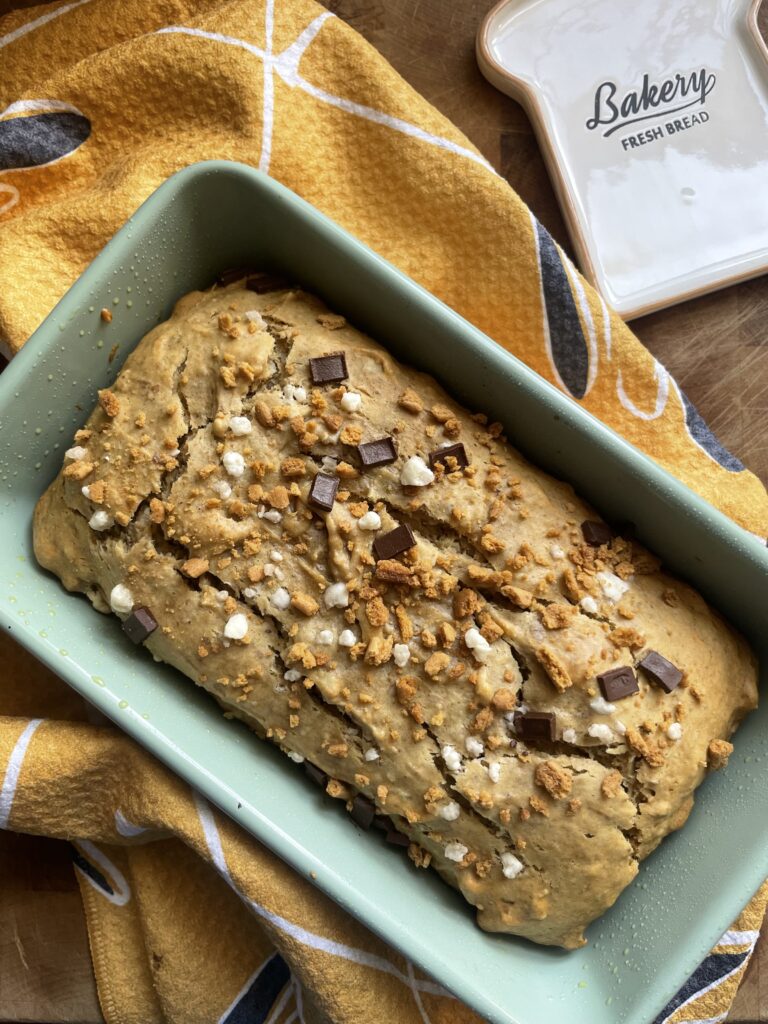
If you’re looking for a deliciously moist banana bread with a fun, chocolatey twist, this S’mores Banana Bread is the perfect recipe for you. Made with Chobani’s S’mores Flip Greek yogurt, this loaf gets an irresistible boost of flavor from creamy yogurt, crunchy walnuts, and the classic s’mores toppings—graham crackers, chocolate, and marshmallows—sprinkled on top.
S’mores Banana Bread Recipe
Ingredients:
• 2 cups all-purpose flour
• 1 teaspoon baking soda
• 1/4 teaspoon salt
• 1 cup sugar
• 1/2 cup vegetable oil
• 2 tablespoons milk
• 2-3 ripe bananas, mashed very well
• 1/2 cup chopped walnuts
• 1 container Chobani S’mores Flip yogurt (save the toppings for later!)
Instructions:
1. Preheat & Prep:
Preheat your oven to 350°F (175°C). Grease a 9×5-inch loaf pan or line it with parchment paper.
2. Mix the Dry Ingredients:
In a medium bowl, whisk together the flour, baking soda, and salt. Set aside.
3. Combine the Wet Ingredients:
In a large bowl, whisk together the sugar, vegetable oil, milk, and mashed bananas until smooth. Stir in the Chobani S’mores Flip yogurt (excluding the toppings).
4. Incorporate the Dry Ingredients:
Gradually fold the dry ingredients into the wet mixture, stirring until just combined. Do not overmix.
5. Add the Walnuts:
Gently fold in the chopped walnuts for extra crunch.
6. Pour & Top:
Pour the batter into the prepared loaf pan. Sprinkle the reserved graham crackers, chocolate, and marshmallow toppings from the Chobani S’mores Flip yogurt evenly over the top of the batter.
7. Bake:
Bake for 50-60 minutes, or until a toothpick inserted in the center comes out clean.
8. Cool & Enjoy:
Allow the banana bread to cool in the pan for about 10 minutes, then transfer it to a wire rack to cool completely. Slice and enjoy warm or at room temperature!
Serving & Storage Tips
• Best Served Warm: The chocolate will be melty, and the graham crackers will have a perfect crunch!
• Storage: Store in an airtight container at room temperature for up to 3 days or in the refrigerator for up to a week.
• Freezing Option: Slice and freeze individually for an easy grab-and-go treat later.
This S’mores Banana Bread is the perfect mix of comforting banana flavor, nutty crunch, and sweet s’mores nostalgia. Try it out and let me know how you like it!
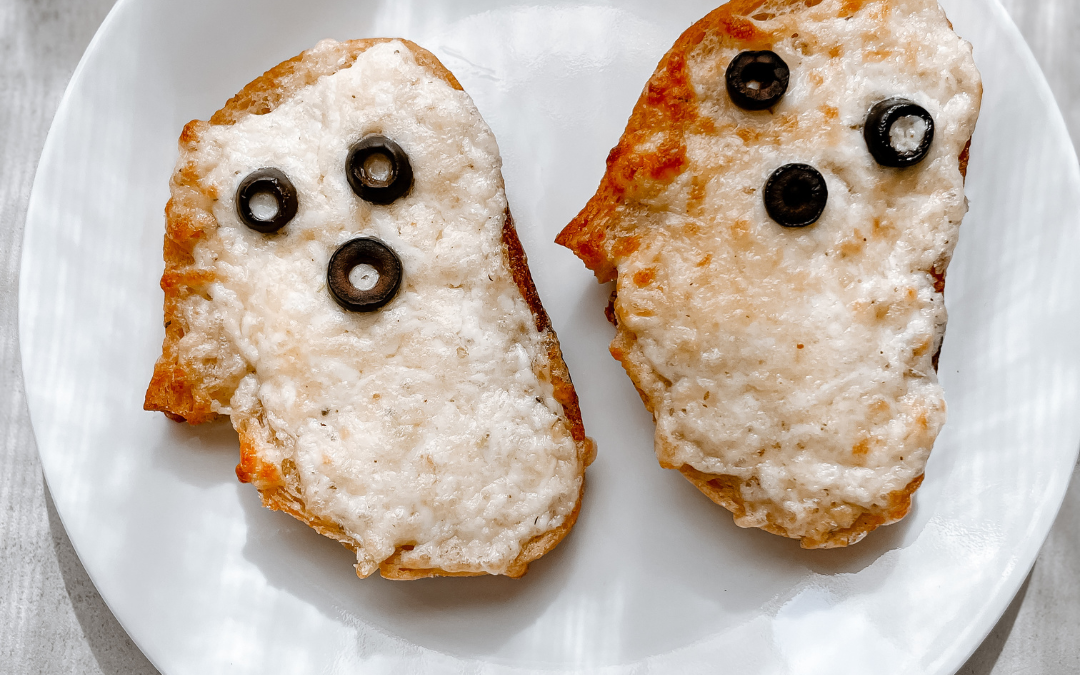
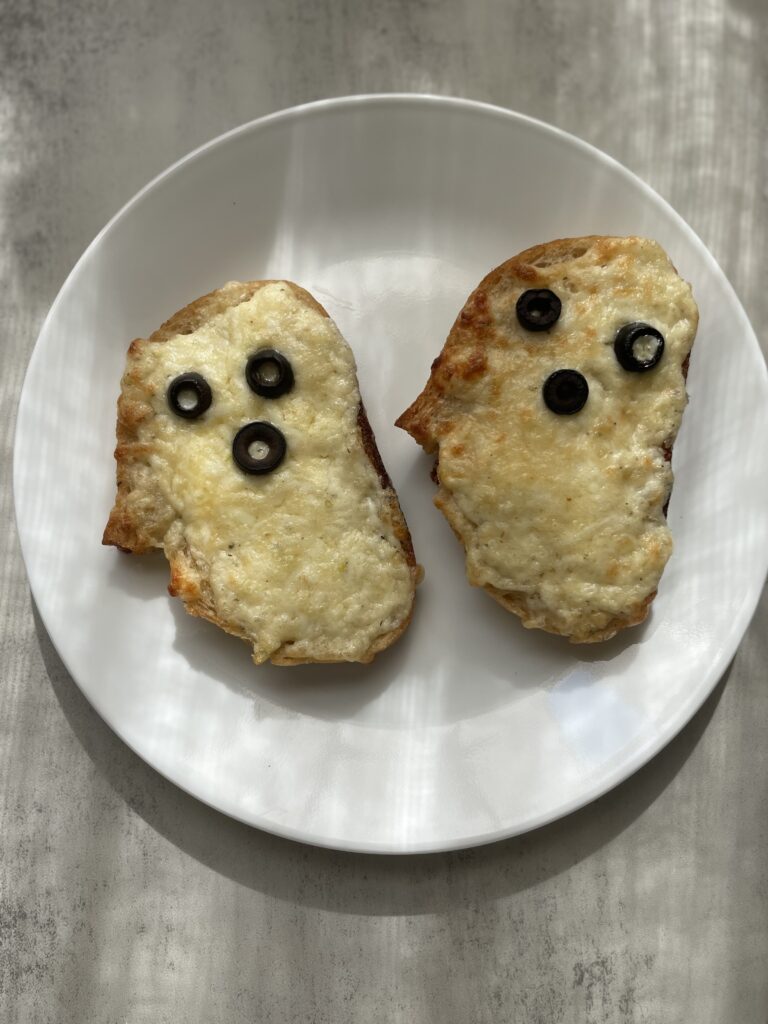
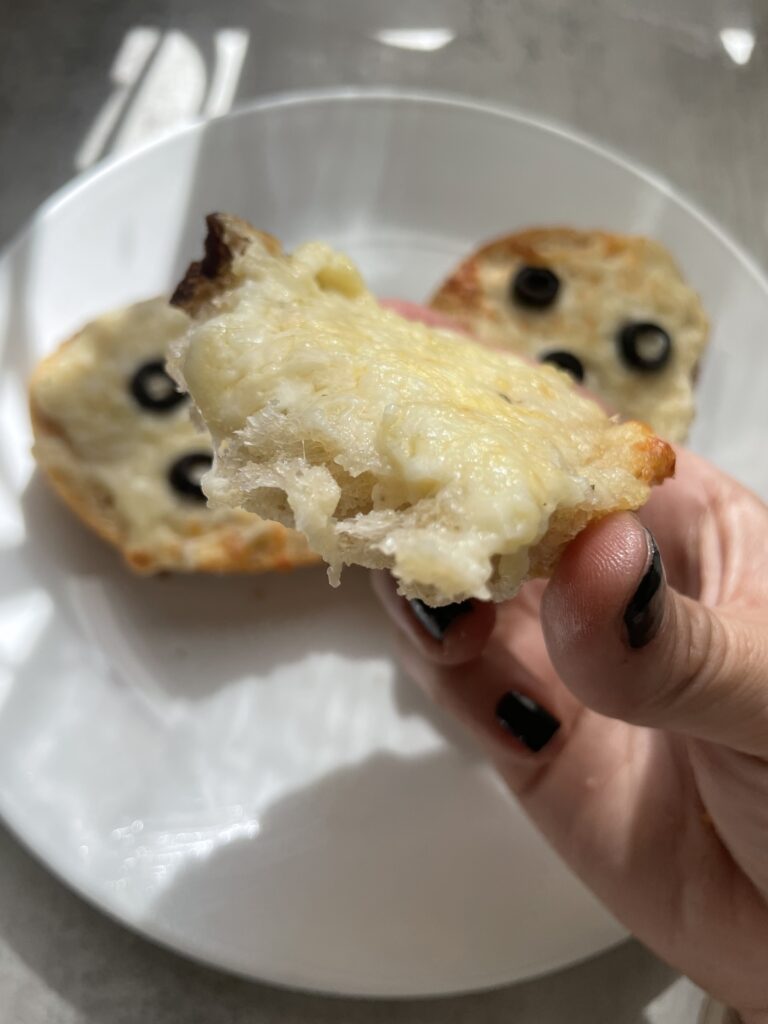
Looking for a spooky and savory treat that’s perfect for Halloween or any ghostly gathering? These cheesy garlic bread ghosts are a fun and delicious way to dress up classic garlic bread. Using simple ingredients like butter, cheese, and olives, this recipe adds a playful twist to a favorite snack. Plus, bread loaf slices make the perfect ghost shape without any extra effort! The ghosts are crunchy on the outside, cheesy on the inside, and hauntingly delicious.
Ingredients:
• 4 slices of sourdough bread (or any bread loaf slices)
• 2 tablespoons butter (softened)
• 2 tablespoons mayonnaise
• 1 clove garlic, minced
• 1 cup shredded cheese (cheddar or mozzarella works great)
• ¼ cup grated Parmesan cheese
• ½ teaspoon dried oregano
• ½ teaspoon dried basil
• Salt and pepper to taste
• Black olive slices (for the eyes and mouth)
Instructions:
1. Prepare the Bread:
• Preheat your oven to 375°F (190°C).
• If you’re using bread loaf slices, you’ll notice they naturally resemble ghost shapes, especially if you use sourdough. You can either leave them as is or trim them slightly to enhance the ghostly appearance with a knife.
2. Mix the Spread:
• In a small bowl, combine the softened butter, mayonnaise, minced garlic, garlic powder, oregano, basil, salt, and pepper. Mix until smooth and spreadable.
3. Get Cheesy:
• Spread the butter-mayo mixture generously on each slice of ghost-shaped bread.
• Sprinkle the shredded cheese evenly over the top, followed by a layer of grated Parmesan cheese. The mix of cheeses will create a melty, golden-brown topping.
4. Make the Ghost Faces:
• Use black olive slices to create eyes and mouths on your cheesy ghosts. Make them as spooky or silly as you like!
5. Bake:
• Place your ghost-shaped bread slices on a baking sheet lined with parchment paper.
• Bake for about 8-10 minutes or until the cheese is bubbly and golden brown.
6. Serve and Enjoy:
• Once out of the oven, let the cheesy garlic bread ghosts cool slightly before serving. These make the perfect appetizer or side dish for a Halloween party!
FAQ:
Can I use regular bread instead of sourdough?
Yes! Bread loaf slices make a fantastic ghost shape, whether you use white, wheat, or French bread.
What other cheese options can I use?
Feel free to mix it up! Mozzarella, cheddar, or a combination of Monterey Jack and provolone would also be delicious.
Do I have to use olives for the faces?
Not at all! Pepperoni slices, cut-up bell peppers, or capers make great alternatives for the ghost faces.
Can I make these ahead of time?
Yes! Prepare the ghosts ahead of time and store them in the fridge. Just bake them when you’re ready to serve.
What if I don’t have a ghost-shaped cookie cutter?
If you’re using loaf bread, you don’t need one! But if you want different shapes, you can freehand them with a knife.
Can I add other toppings?
Definitely! Add red pepper flakes, parsley, or crispy bacon bits for extra flavor and fun!
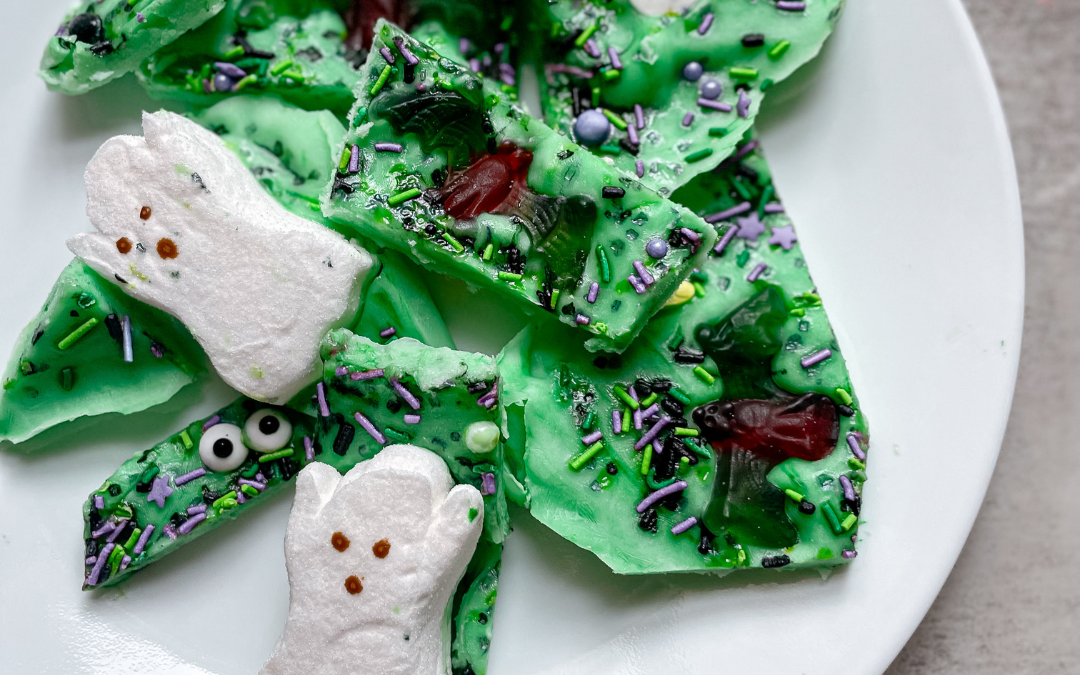
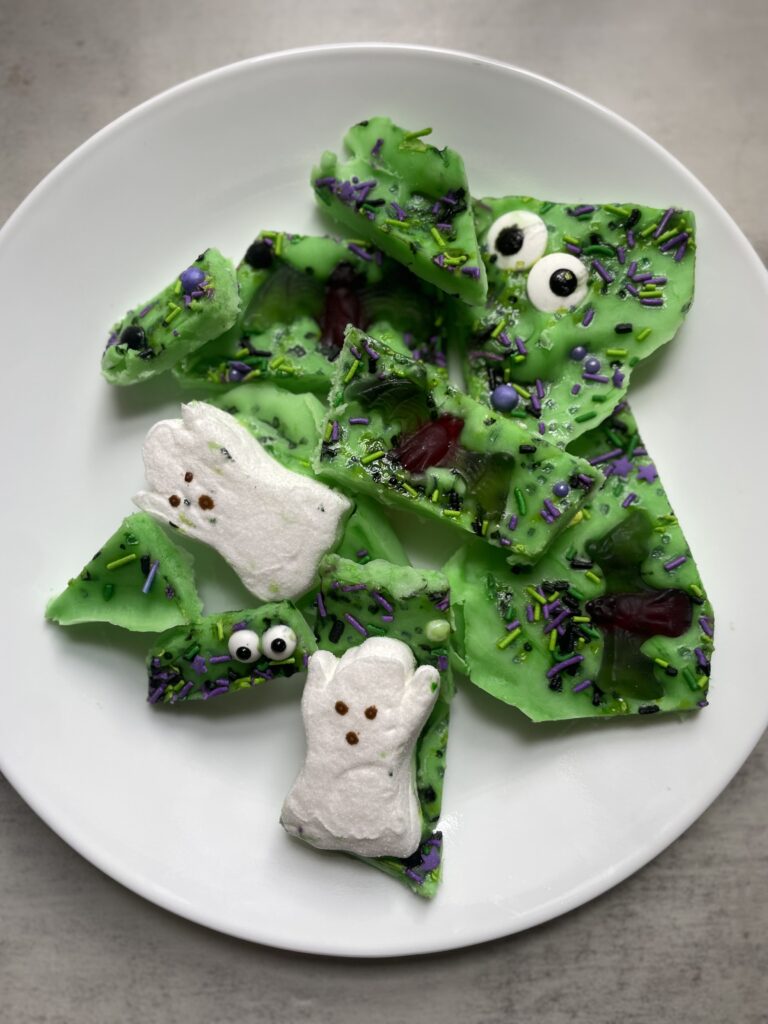
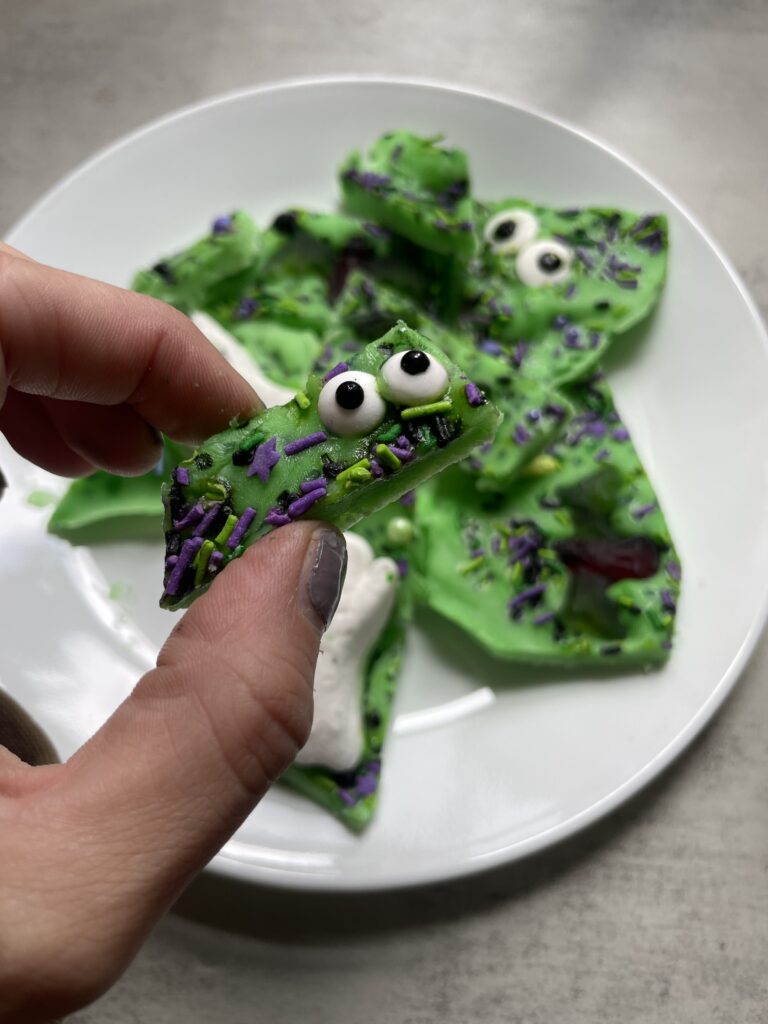
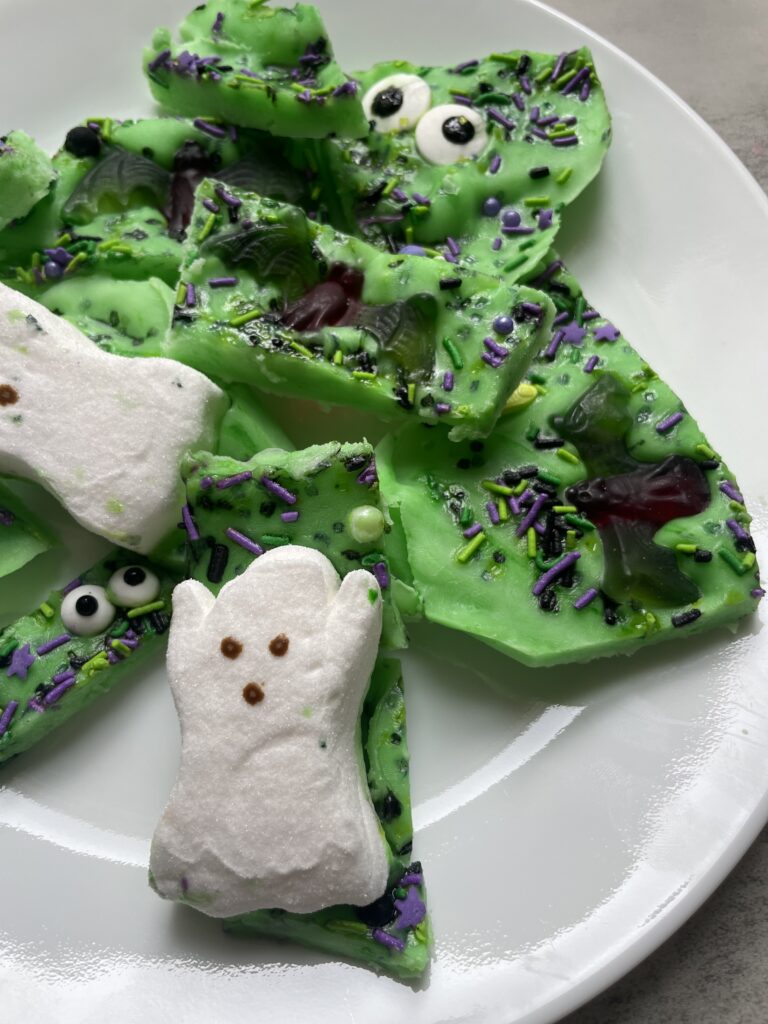
If you’re looking for a festive, fun, and delicious Halloween treat, this frozen yogurt bark is the perfect recipe! It’s easy to make, kid-friendly, and fully customizable with your favorite spooky toppings. I made mine Halloween-themed by coloring the yogurt green and decorating it with an assortment of creepy candies, gummies, and festive sprinkles.
Whether you’re throwing a Halloween party or just want to make a fun treat with the kids, this frozen yogurt bark will be a hit!
Ingredients:
• 2 cups plain or vanilla Greek yogurt (or any yogurt you prefer)
• Green food coloring (optional, to make the yogurt spooky)
• Honey or agave nectar (to sweeten, if desired)
• Halloween sprinkles
• Assorted Halloween candies:
• Gummy worms or spiders
• Peeps (ghosts, pumpkins, or any Halloween shapes)
• Candy eyeballs
• M&M’s (in Halloween colors)
• Mini chocolate chips
Additional Topping Ideas:
• Crushed Oreo cookies (for a dirt-like effect)
• Crushed graham crackers (for a sandy look)
• White chocolate drizzle (for a web-like effect)
• Edible glitter (for a magical touch)
• Cereal (like Fruity Pebbles for extra crunch and color)
Instructions:
1. Prepare the yogurt base:
• In a medium bowl, mix your Greek yogurt with honey or agave nectar to sweeten, if needed. Add green food coloring to the yogurt and stir until you reach your desired shade of spooky green.
2. Spread the yogurt:
• Line a baking sheet with parchment paper. Pour the green yogurt onto the sheet and spread it evenly into a thin layer, about ¼ inch thick.
3. Add the spooky toppings:
• Now for the fun part! Decorate your yogurt with a mix of Halloween-themed toppings. Get creative! I used festive sprinkles, gummy worms, Peeps, and candy eyeballs. You can also sprinkle on mini chocolate chips, crushed cookies, or anything else that adds a spooky touch.
4. Freeze the yogurt bark:
• Place the baking sheet in the freezer for at least 3 hours or until the yogurt is completely frozen.
5. Break and serve:
• Once frozen, remove the yogurt bark from the freezer and break it into bite-sized pieces. Serve immediately, or store in an airtight container in the freezer for a quick grab-and-go treat.
Tips for Customization:
• You can use any yogurt flavor you like, such as strawberry or vanilla.
• Change up the colors! Try purple or orange food coloring to fit the Halloween theme.
• Experiment with different candies, or even add some healthier options like nuts or dried fruit to balance the sweetness.
This Halloween frozen yogurt bark is not only festive and fun but also a lighter treat you can enjoy guilt-free. Let your kids help decorate, and they’ll love seeing their creations come to life in the freezer. Happy Halloween and enjoy your spooky snack!
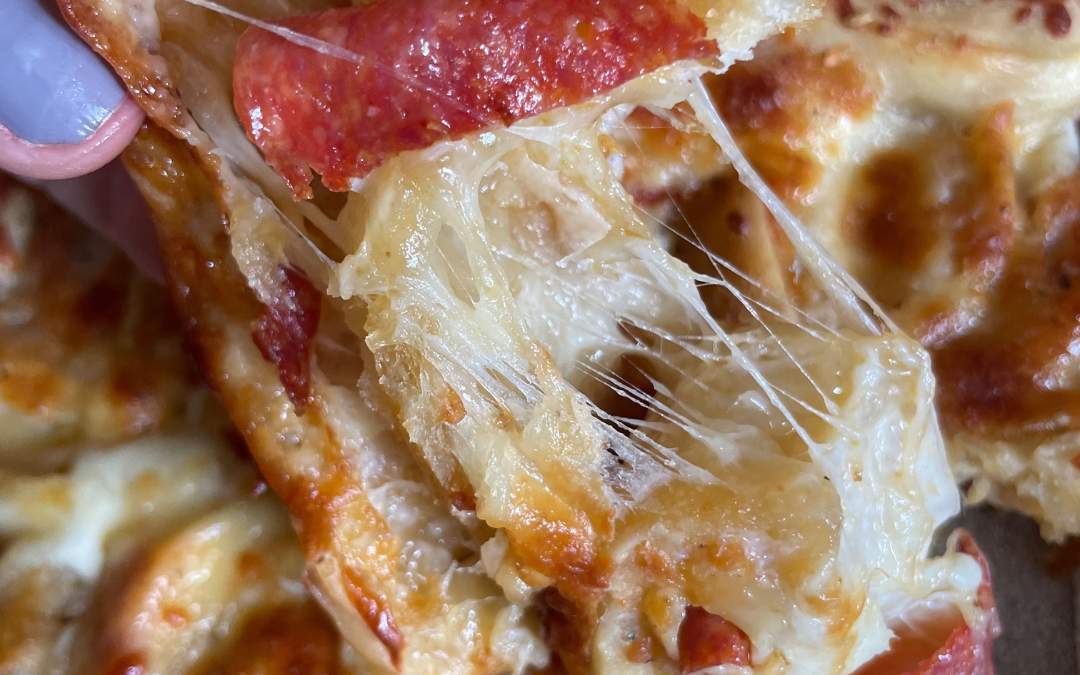
If you’re looking for a quick, crowd-pleasing snack or appetizer, these pepperoni pinwheels are the perfect solution! Packed with gooey mozzarella, flavorful provolone, and savory pepperoni, all wrapped in golden-brown dough, they’re irresistible. Whether you’re hosting a party, watching a game, or just need a snack, this recipe is sure to impress.
Why You’ll Love These Pepperoni Pinwheels
• Simple Ingredients: Made with ingredients you likely already have in your kitchen, these pinwheels come together quickly.
• Quick to Make: With pre-made dough, it’s easy to whip these up in under 30 minutes.
• Great for Sharing: Perfect for gatherings, game days, or just as a fun family snack.
Ingredients
Here’s what you’ll need to make a batch of these cheesy, buttery pepperoni pinwheels:
• 1 package of pizza dough (store-bought or homemade)
• 8 slices of mozzarella cheese
• 8 slices of provolone cheese
• 20–24 slices of pepperoni
• ¼ cup grated Parmesan cheese
• 2 tablespoons Italian seasoning
• 2 tablespoons melted butter
Instructions
1. Preheat the Oven: Set your oven to 375°F (190°C). While it heats, prepare your dough and filling.
2. Prepare the Dough: Roll out the pizza dough on a lightly floured surface. Aim for a rectangle shape, about 12×10 inches. This makes it easier to roll and ensures even layers of cheese and pepperoni.
3. Layer the Cheese and Pepperoni:
• First, lay the mozzarella slices evenly across the dough, leaving a small border around the edges.
• Then, layer the provolone slices on top of the mozzarella.
• Arrange the pepperoni slices over the provolone. It’s best to spread them out evenly, but feel free to add extra if you’re a pepperoni lover!
4. Roll It Up: Starting from one long edge of the rectangle, carefully roll the dough into a tight log. Pinch the seam to seal it and tuck in the ends.
5. Slice the Pinwheels: Using a sharp knife, cut the dough log into 1-inch thick slices. You should get about 10–12 pinwheels.
6. Arrange and Bake: Place the pinwheels on a parchment-lined baking sheet, leaving space between them. Brush each pinwheel with the melted butter and sprinkle with the grated Parmesan cheese and Italian seasoning.
7. Bake: Bake in the preheated oven for 12–15 minutes, or until the dough is golden brown and the cheese is melted and bubbly.
8. Serve: Let the pinwheels cool slightly before serving. They’re delicious on their own, but for an extra kick, serve them with marinara sauce for dipping!
Tips for Perfect Pinwheels
• Don’t Overfill: It’s tempting to load these up with cheese and pepperoni, but too much filling can make the dough hard to roll and slice.
• Make Ahead: You can assemble the pinwheels in advance and refrigerate the dough log. When you’re ready to bake, simply slice and pop them in the oven.
• Customize It: Feel free to add other ingredients, like chopped olives, sautéed mushrooms, or even a dash of hot sauce, to make these pinwheels your own.
Why This Recipe Works
The combination of three cheeses—mozzarella, provolone, and Parmesan—creates the perfect balance of creamy, melty, and savory. The Italian seasoning mixed with butter adds a rich, aromatic finish, while the pepperoni gives each bite a satisfying meaty flavor. With a golden-brown, buttery crust, these pepperoni pinwheels are a treat everyone will enjoy.
If motherhood has you stressed and you feel like you’ve lost your creativity, I am here to help! Here you will find easy recipes, simple DIY’s, affordable styles, and what to read next. I believe we all have a creative side, some of us just need a little help to find it. I will help inspire you to have creative expression without standards.