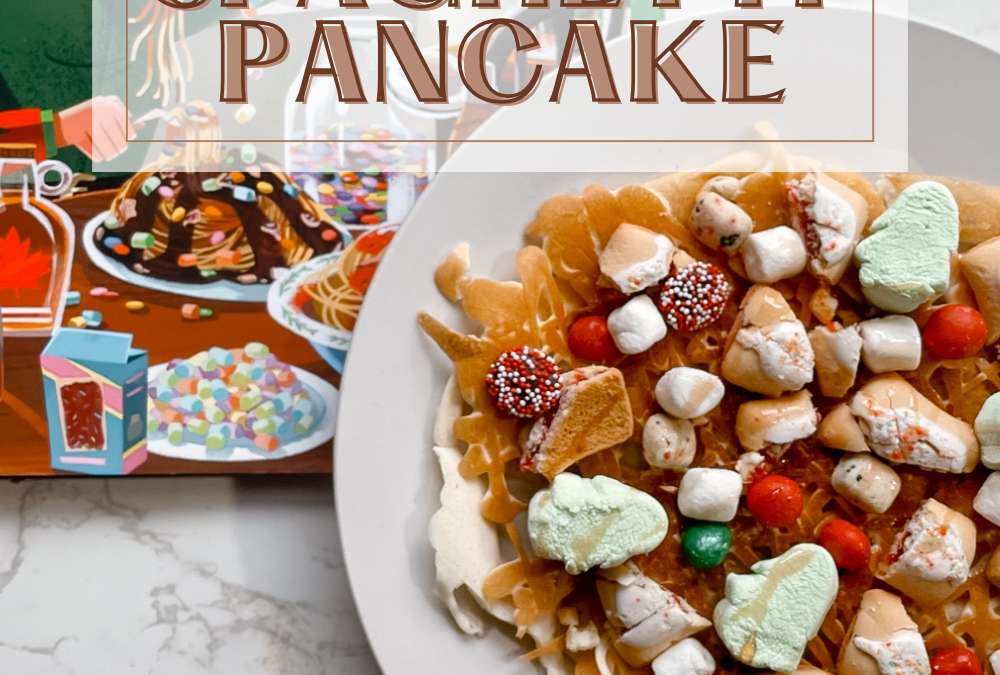
Elf is a heartwarming holiday classic that has captured the hearts of many with its whimsical storyline and the lovable character Buddy the Elf, played by the talented Will Ferrell. One of Buddy’s most iconic culinary creations is his famous spaghetti pancakes, where he combines spaghetti, maple syrup, and candy. In this blog post, we’ll explore how to recreate Buddy’s delightful Elf Pancakes using pancake mix instead of spaghetti, all while celebrating our affection for the movie that has become a cherished part of our holiday traditions.
Creating Buddy’s Signature Dish with a Twist:
Buddy’s unwavering love for all things sweet, combined with his unique culinary tastes, has made him a memorable character. To recreate Buddy’s signature Elf Pancakes with a twist, follow these steps:
Ingredients:
Pancake mix
Maple syrup
Candy (e.g., M&M’s, marshmallows, and chocolate chips)
Pop tarts (any flavor)
Instructions:
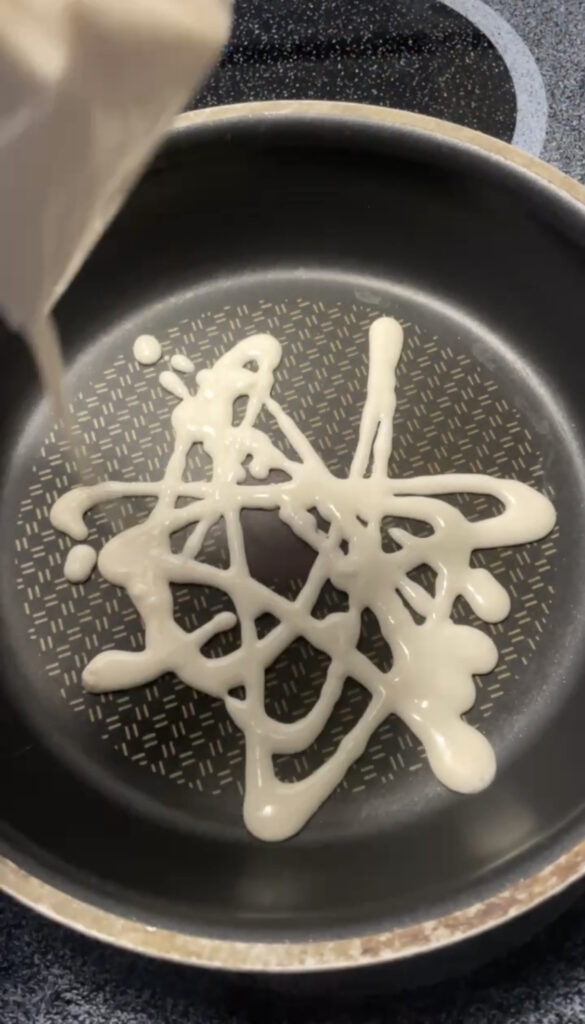
Prepare the pancake mix according to the package instructions. Drizzle mix onto heated griddle.
Cook the pancakes on a griddle or non-stick skillet until they are golden brown.
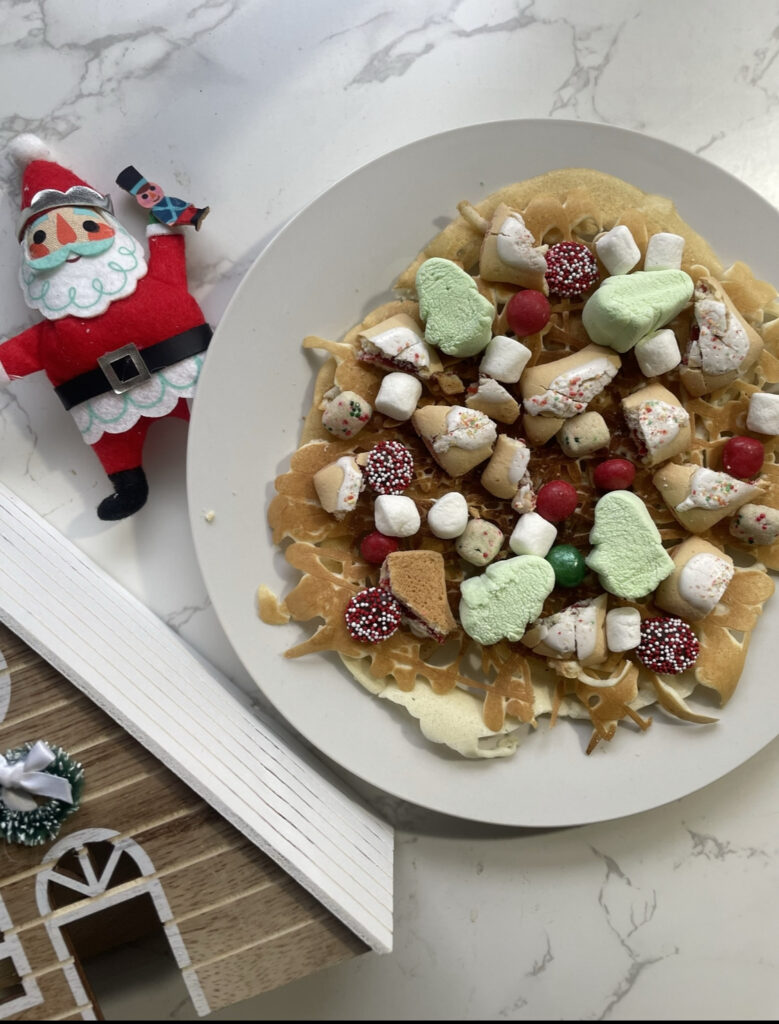
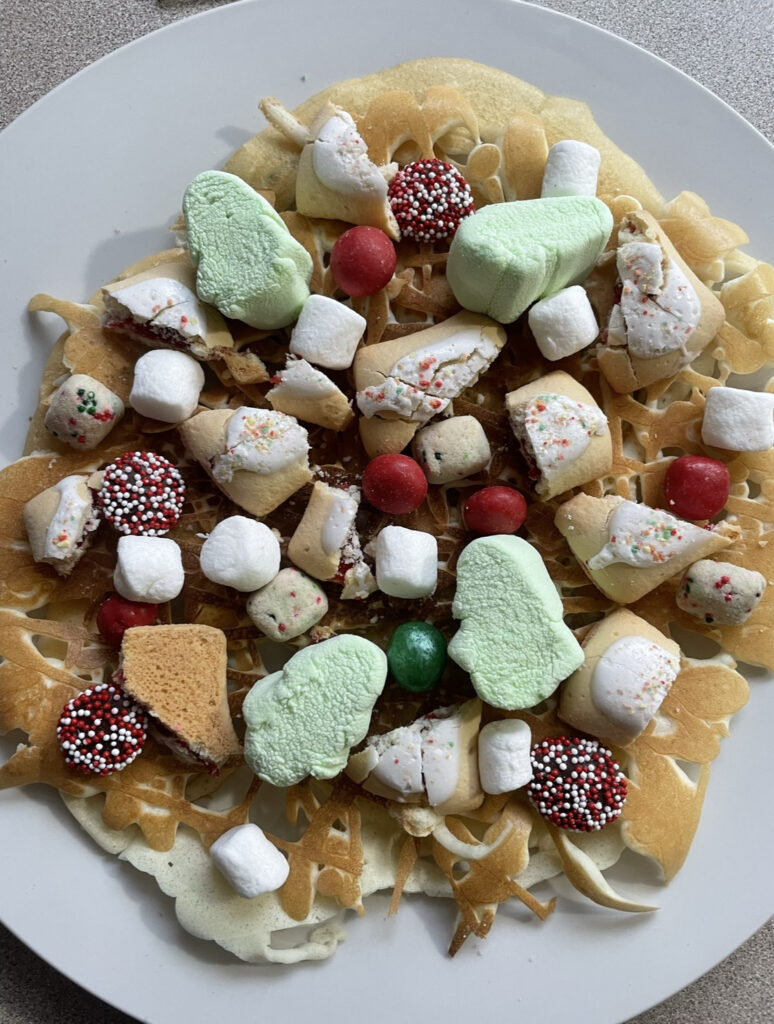
Once the pancakes are cooked, stack them on a plate.
Drizzle a generous amount of maple syrup over the pancake stack.
Sprinkle an assortment of candy on top of the pancakes. Get creative with your candy choices, using items like M&M’s, marshmallows, and chocolate chips.
Crumble up Pop tarts on top of dish.
Serve your Elf Pancakes and enjoy this delightful treat that captures Buddy’s unique culinary spirit.
Elf is a film that warms our hearts, and recreating Buddy’s iconic pancakes is a delicious way to pay homage to the movie. This activity is perfect for enjoying with loved ones during the holiday season. So, get your pancake mix, maple syrup, and candy ready, put on the movie, and savor the magic of the movie while indulging in a plate of Elf Pancakes. As Buddy would say, “The best way to spread Christmas cheer is singing loud for all to hear!”
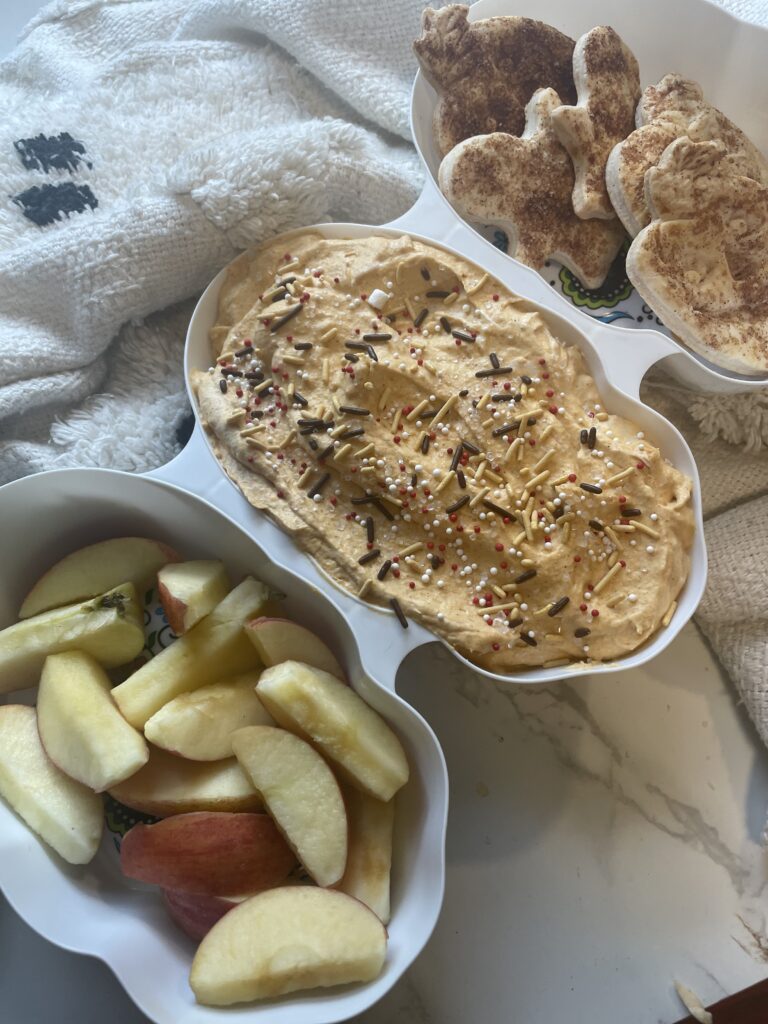
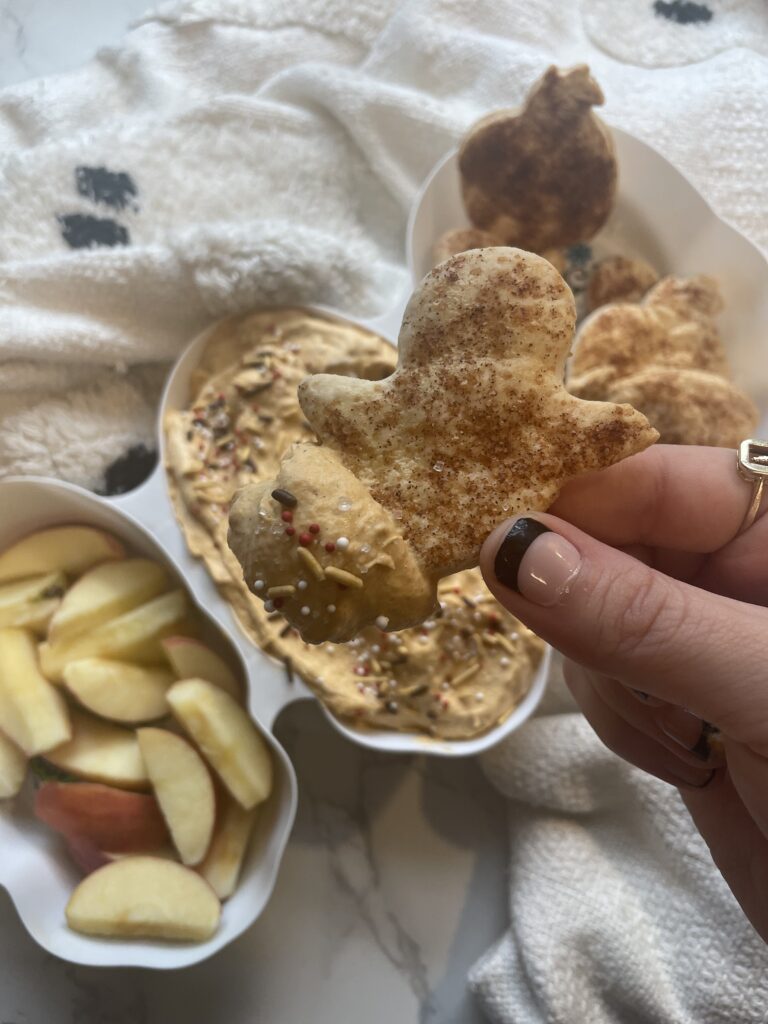
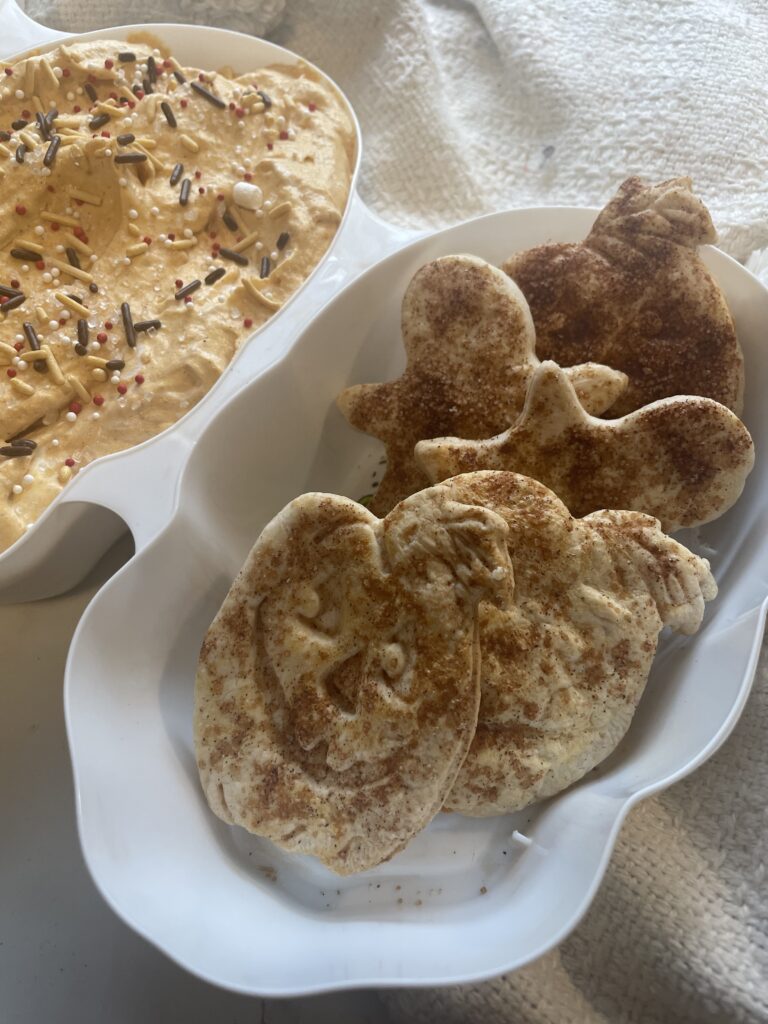
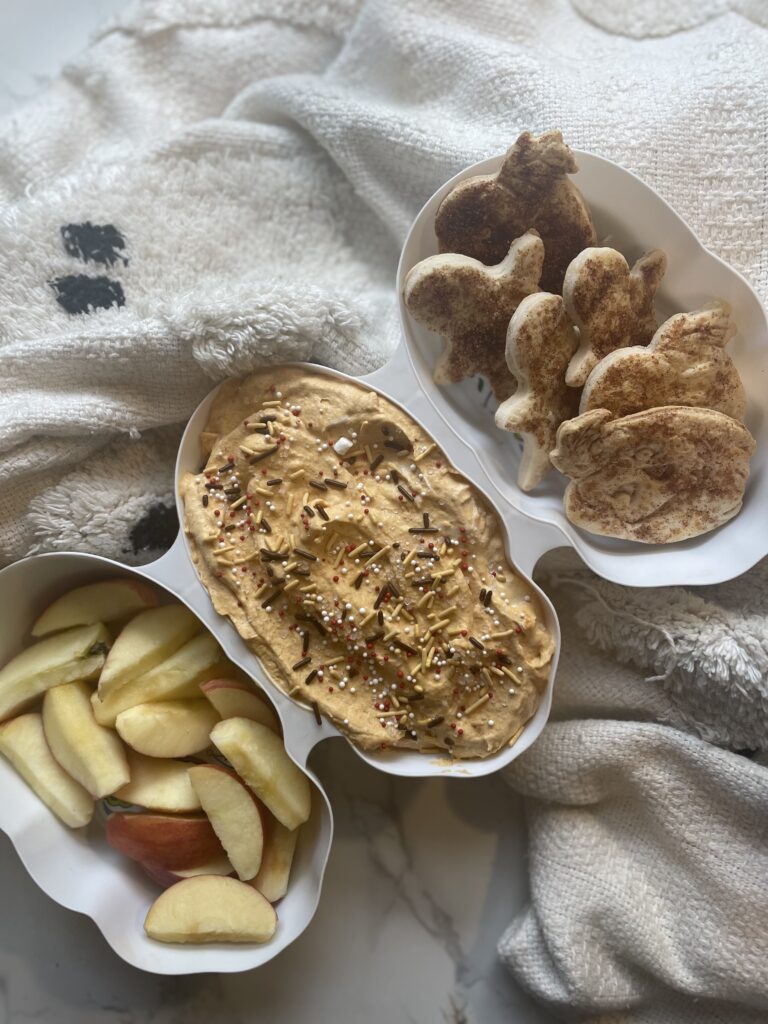
As the leaves turn vibrant shades of orange and the air becomes crisp, there’s a special kind of excitement that fills the air – it’s Halloween season! And what better way to celebrate this spooky time of year than by whipping up some deliciously festive treats? One of my absolute favorites is making Halloween-themed goodies, and today, I’m thrilled to share my love for creating a scrumptious Pumpkin Pie Dip with Pie Crust Chips. This delightful concoction is the perfect blend of sweet and spicy, making it an irresistible treat for your Halloween festivities.
Ingredients You’ll Need
For the Pumpkin Pie Dip:
1 cup of pumpkin purée
1 package (3.4 oz) of vanilla instant pudding mix
1 cup of Cool Whip (or a similar whipped topping)
1 teaspoon of cinnamon sugar (adjust to taste)
1 teaspoon of pumpkin pie spice (adjust to taste)
Milk (for adjusting the dip’s consistency)
For the Pie Crust Chips:
Premade pie crusts (you can use refrigerated or frozen pie crusts)
Milk (for brushing the pie crusts)
Instructions:
Making the Pumpkin Pie Dip:
In a mixing bowl, combine the pumpkin purée, vanilla instant pudding mix, and Cool Whip.
Stir the ingredients together until you achieve a smooth and creamy consistency.
Gradually add the cinnamon sugar and pumpkin pie spice to the mixture, adjusting the quantities to your personal taste. Feel free to add more or less to suit your preferences.
Once you’re satisfied with the taste and consistency, cover the dip and refrigerate it for at least an hour to allow the flavors to meld together. You can also refrigerate it longer for a richer flavor.
Preparing the Pie Crust Chips:
Preheat your oven according to the instructions on the premade pie crust packaging.
Roll out the premade pie crusts on a lightly floured surface. Using Halloween-themed cookie cutters, cut out various spooky shapes from the dough.
Place the pie crust shapes on a baking sheet lined with parchment paper.
Brush each shape with a bit of milk to help them turn golden brown while baking.
Sprinkle the shapes with additional cinnamon sugar for extra flavor.
Bake the pie crust chips in the preheated oven as per the package instructions, usually around 8-10 minutes or until they turn golden brown and crispy.
Putting It All Together
Now that you have your Pumpkin Pie Dip and Pie Crust Chips ready, it’s time to assemble your Halloween masterpiece. Arrange the golden pie crust chips around your Pumpkin Pie Dip, and watch as your guests are delighted by this enchanting and delicious Halloween treat. You can also add fruit, cookies and crackers along with your pie crust chips!
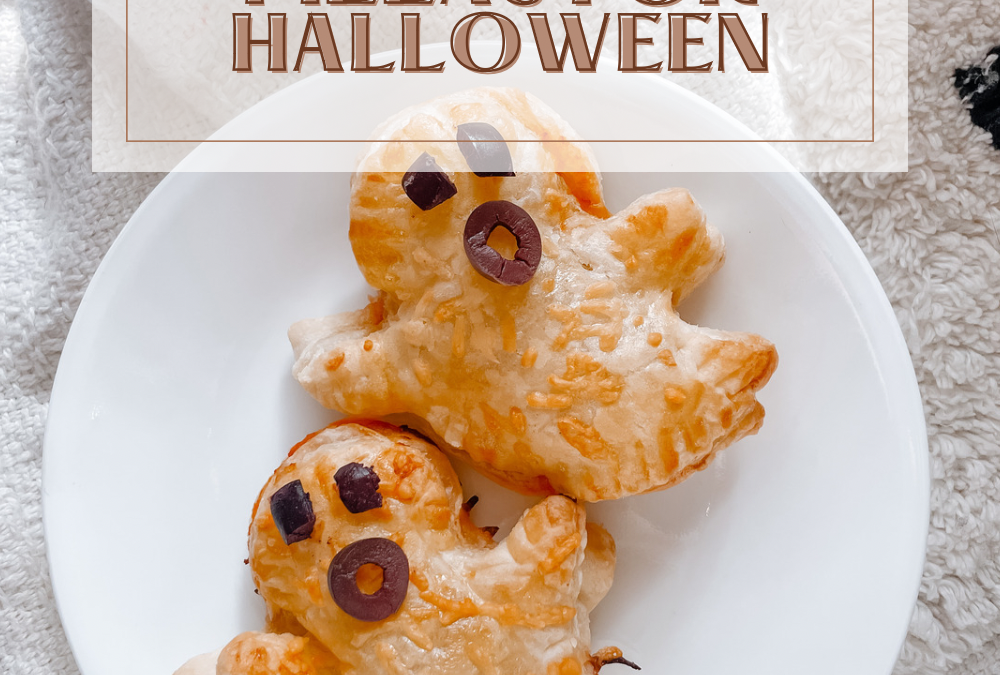
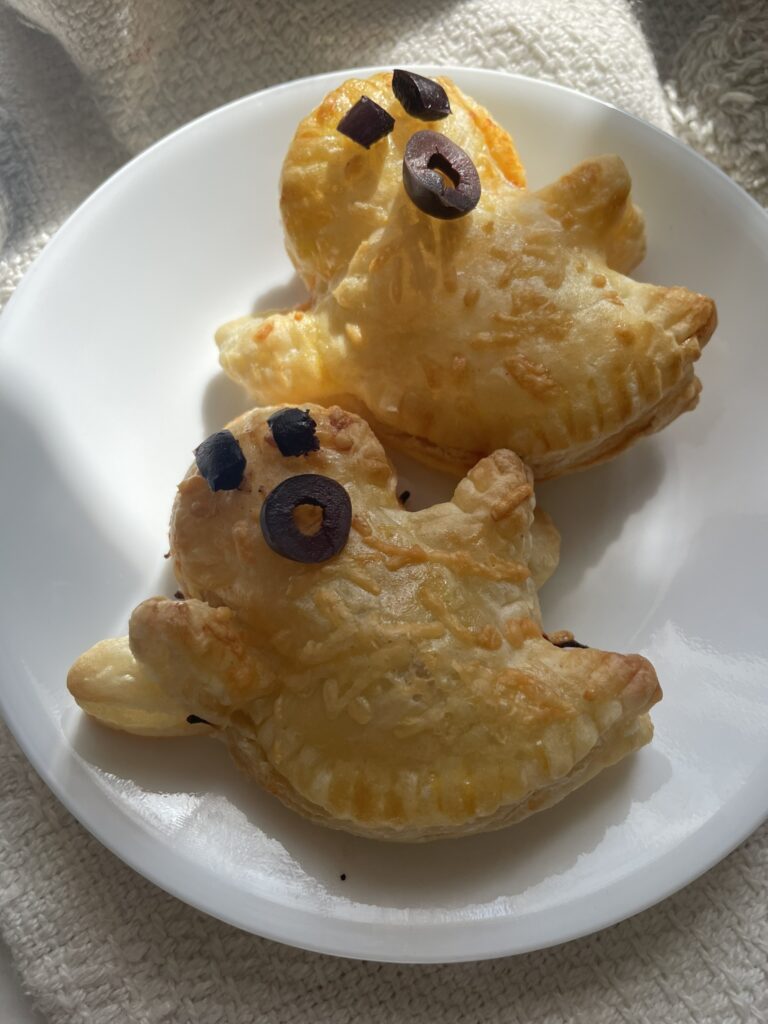
Halloween is the perfect time to get creative in the kitchen, and what’s more fun than preparing deliciously eerie treats that will spook and satisfy your guests? This year, we’re diving into the world of Spooky Puff Pastry Pizzas. These little pizzas are not only a visual delight but also incredibly tasty. So, grab your apron and get ready to conjure up these ghostly delights for your Halloween gathering.
Ingredients:
For the Puff Pastry Ghosts:
1 sheet of puff pastry (thawed)
1 egg (for egg wash)
Black olives (for eyes)
For the Pizza Sauce:
1/2 cup tomato sauce
1/2 teaspoon dried oregano
1/2 teaspoon garlic powder
Salt and pepper to taste
For Toppings:
Shredded mozzarella cheese
Sliced black olives
Sliced red bell pepper
Sliced green bell pepper
Sliced mushrooms
Sliced pepperoni
Instructions:
Preheat your oven to 375°F (190°C).
Start by preparing the pizza sauce. In a small bowl, mix together the tomato sauce, dried oregano, garlic powder, salt, and pepper. Set it aside.
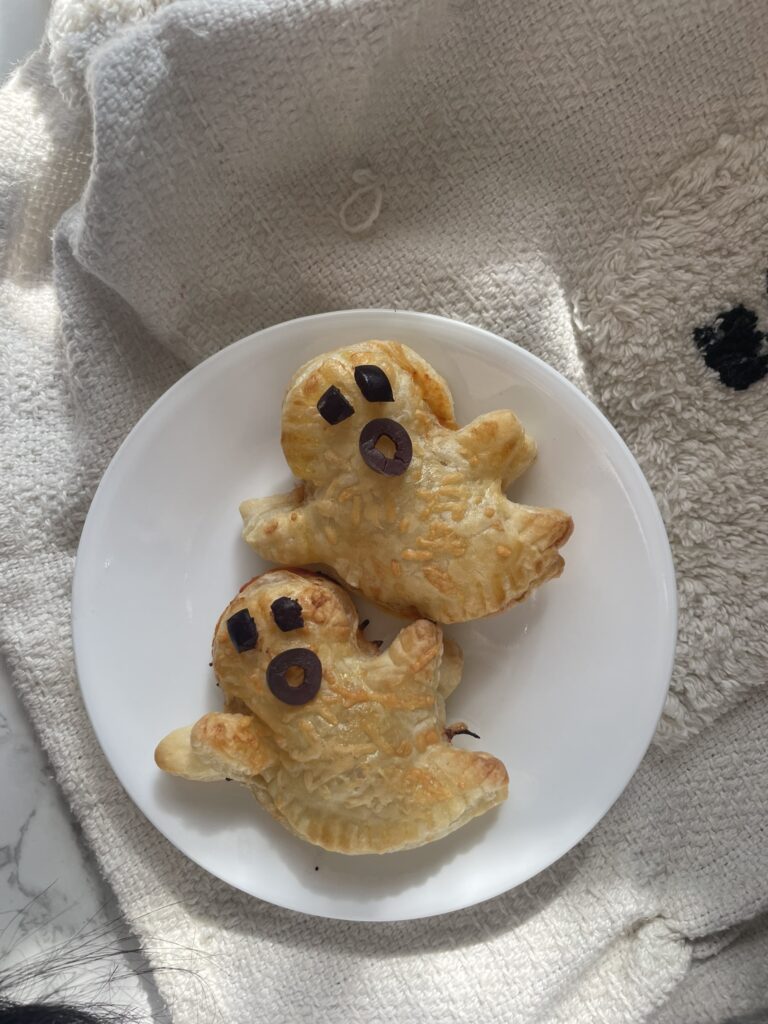
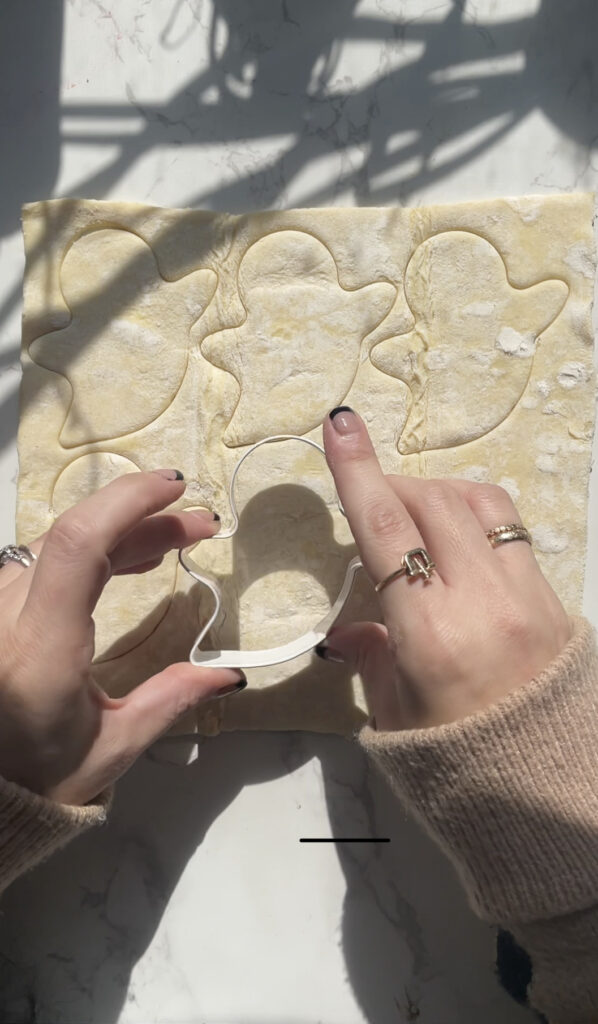
Roll out the puff pastry sheet on a lightly floured surface. Using a ghost-shaped cookie cutter, cut out ghost shapes from the puff pastry. Place them on a baking sheet lined with parchment paper.
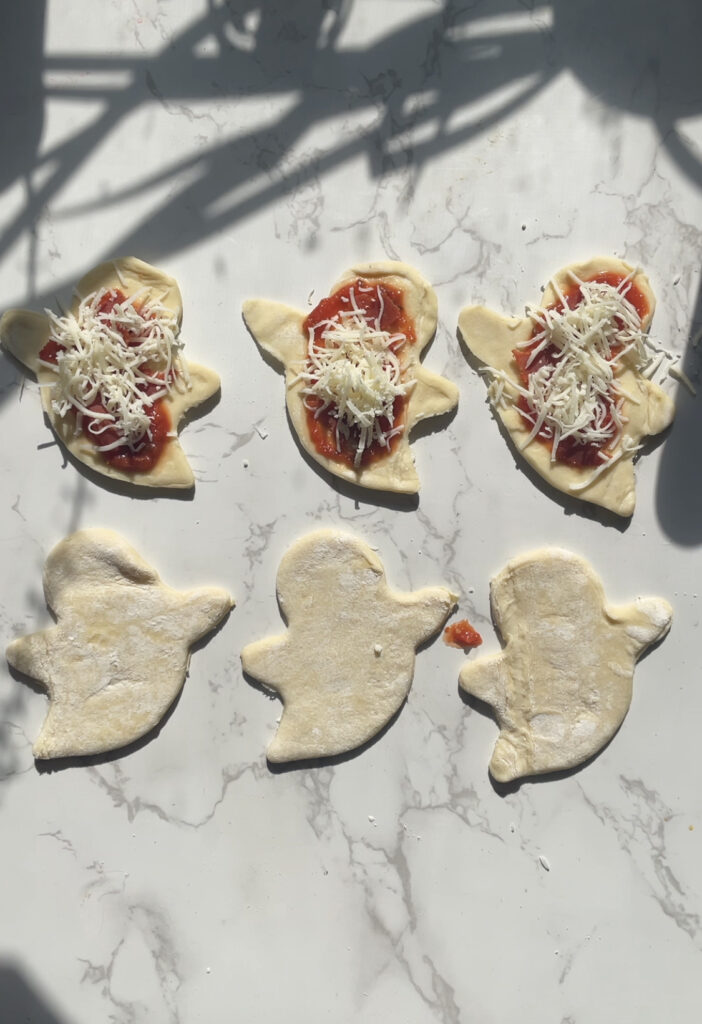
Now it’s time to assemble the ghosts. Spread a thin layer of pizza sauce on each ghost, leaving a small border around the edges.
Add a generous sprinkle of shredded mozzarella cheese on top of the sauce.
Decorate your ghost puff pastries with various toppings like sliced black olives for the eyes, red and green bell peppers for a mouth, and mushrooms for a spooky aura. Get creative with different toppings to make each ghost unique.
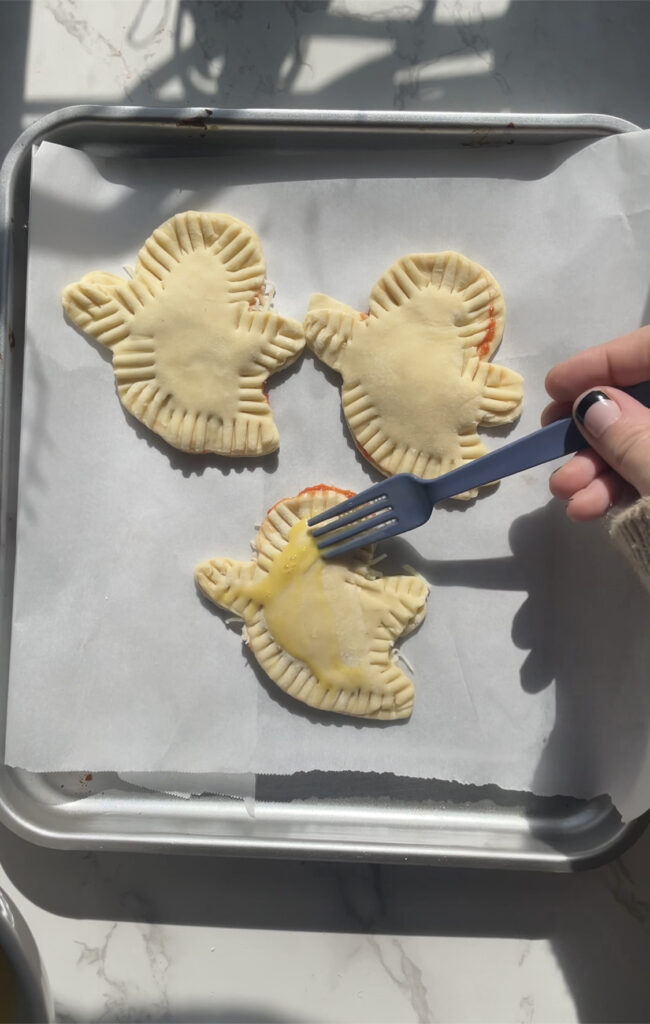
Top with another ghost and seal them together using a fork.
Brush the ghosts with egg wash.
Bake in the preheated oven for 12-15 minutes or until the puff pastry turns golden brown, and the cheese is bubbling.
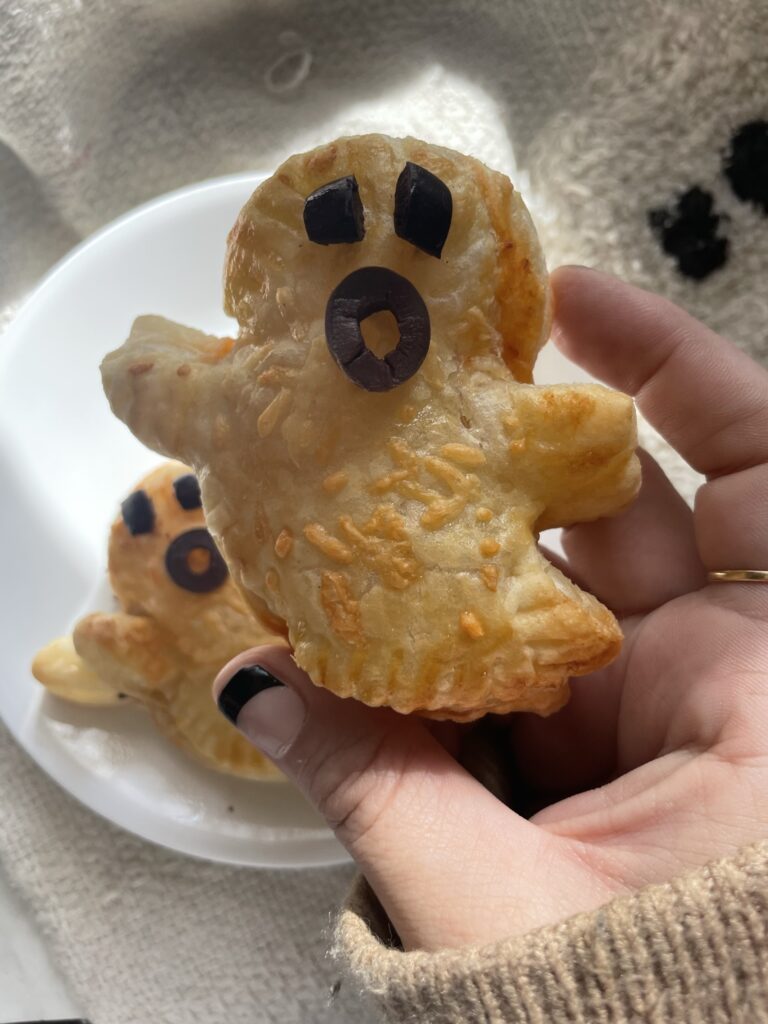
Remove your Ghost Puff Pastry Pizzas from the oven and let them cool for a few minutes before serving.
Arrange your ghostly creations on a spooky platter, and watch as your guests are delighted by these adorable and delicious treats!
Ghost Puff Pastry Pizzas are the perfect addition to your Halloween menu, combining the flavors of a classic pizza with a hauntingly cute twist. They’re a hit with kids and adults alike, making them an ideal choice for your Halloween party. So, whip up a batch of these delightful, edible specters and get ready to celebrate a spooktacular Halloween with your friends and family. Happy Haunting!
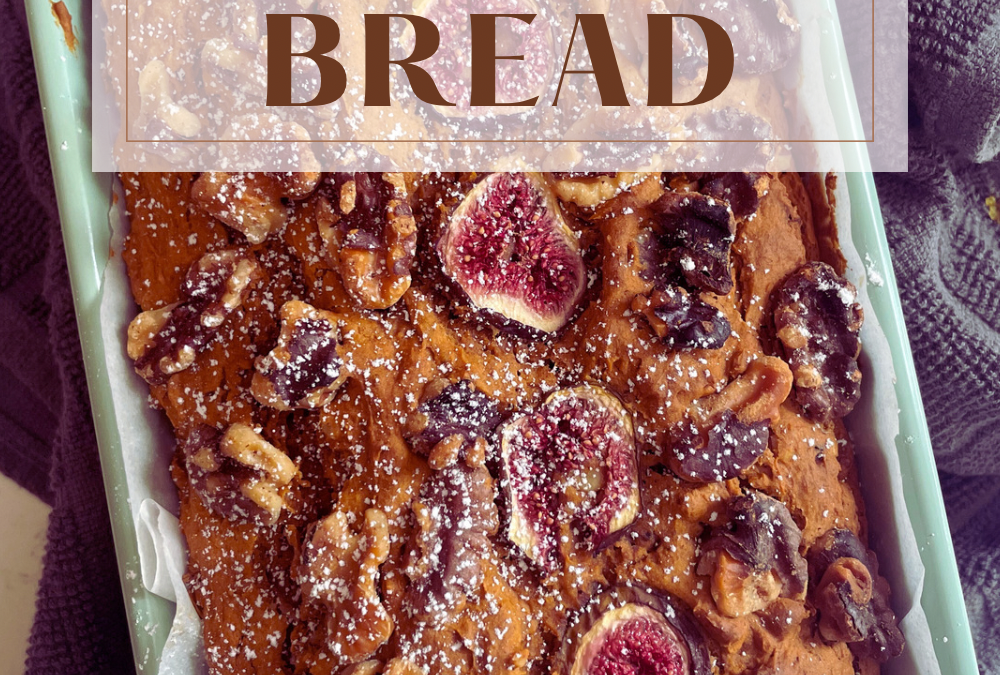
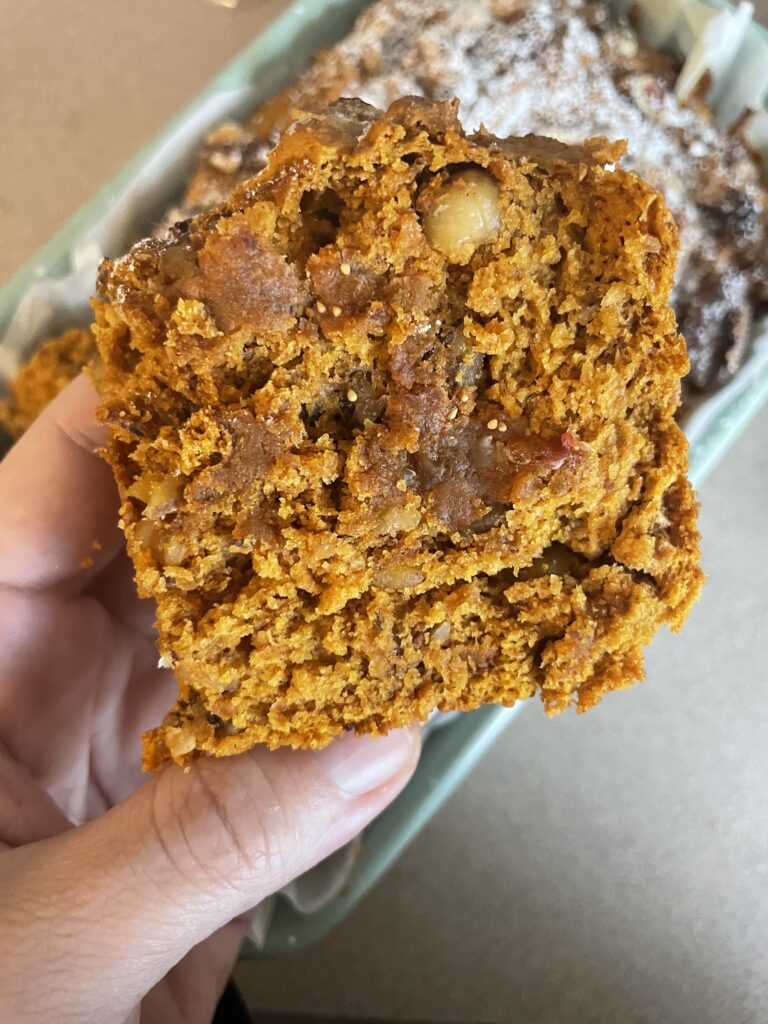
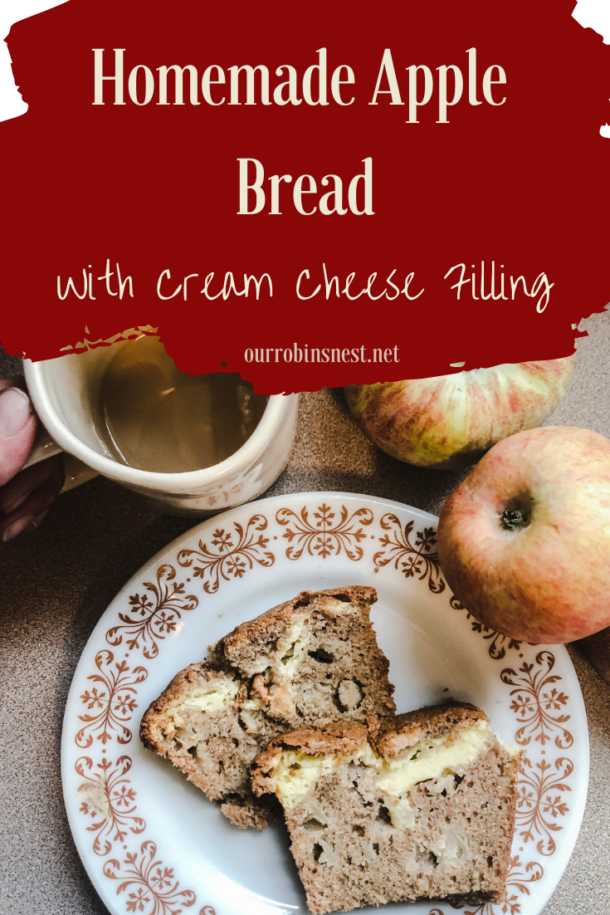
As the leaves begin to don their vibrant hues and the air turns crisp with the promise of cooler days, there’s an undeniable excitement in the air. Fall is here! There’s something truly magical about the transition from summer to autumn; for me, it’s all about the cool breeze, cozy sweaters, and, of course, the delightful flavors of the season. Today, I want to share my enthusiasm for fall and a mouthwatering recipe for Pumpkin Fig Bread that perfectly captures the essence of this beautiful season.
Fall’s Arrival: A Time for Joy
The arrival of fall is like a gentle whisper from nature, reminding us to slow down and savor life’s simple pleasures. The cool breeze that rustles the leaves, the scent of cinnamon in the air, and the promise of family gatherings all contribute to the enchantment of this season. It’s a time to indulge in the comfort of warm beverages, long walks in the woods, and, of course, the joys of baking.
Embracing Fall with Pumpkin Fig Bread
One of my favorite ways to celebrate fall is by baking seasonal treats, and this Pumpkin Fig Bread is an absolute winner. It is incredibly easy to make and combines the rich, earthy flavors of pumpkin and figs, making it the perfect companion to a steaming cup of tea or coffee. You can also click here to find out why I love figs!
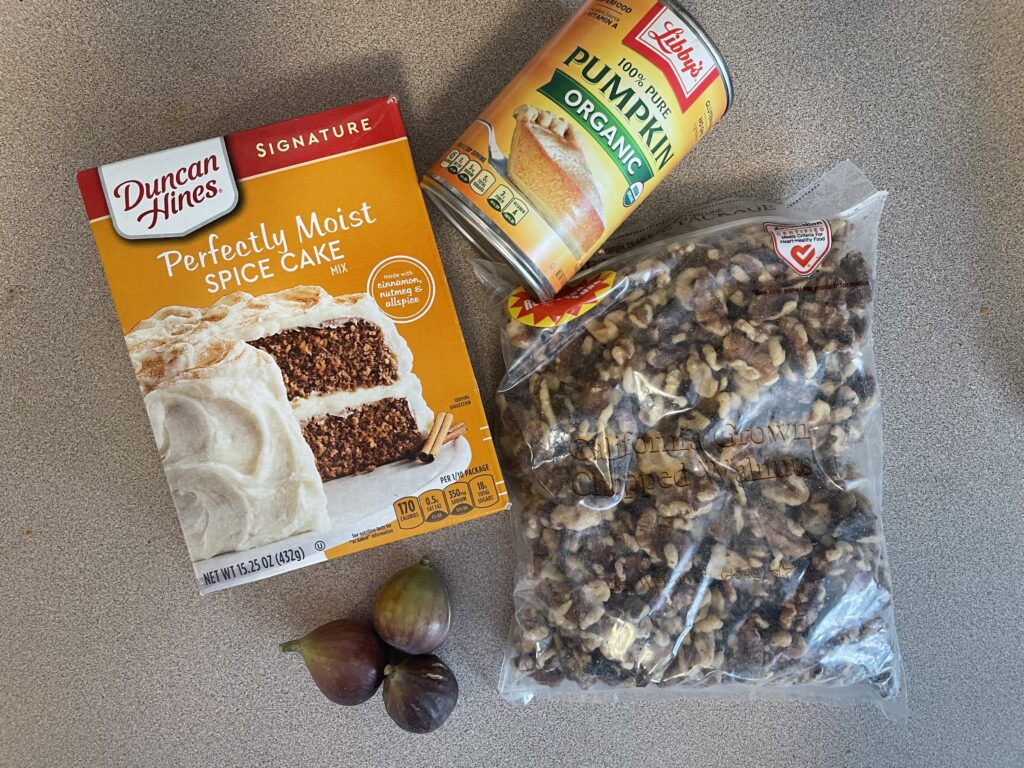
Ingredients You’ll Need:
1 box of spice cake mix
1 can (15 ounces) of pumpkin purée
1/2 cup of chopped walnuts
1/2 cup of chopped figs (fresh or dried)
Powdered sugar (optional, for dusting)
The Simple Steps:
Preheat and Prep: Preheat your oven to 350°F (175°C) and grease a loaf pan.
Mix the Ingredients: In a large mixing bowl, combine the spice cake mix and pumpkin purée. Stir until the mixture is smooth and well incorporated.
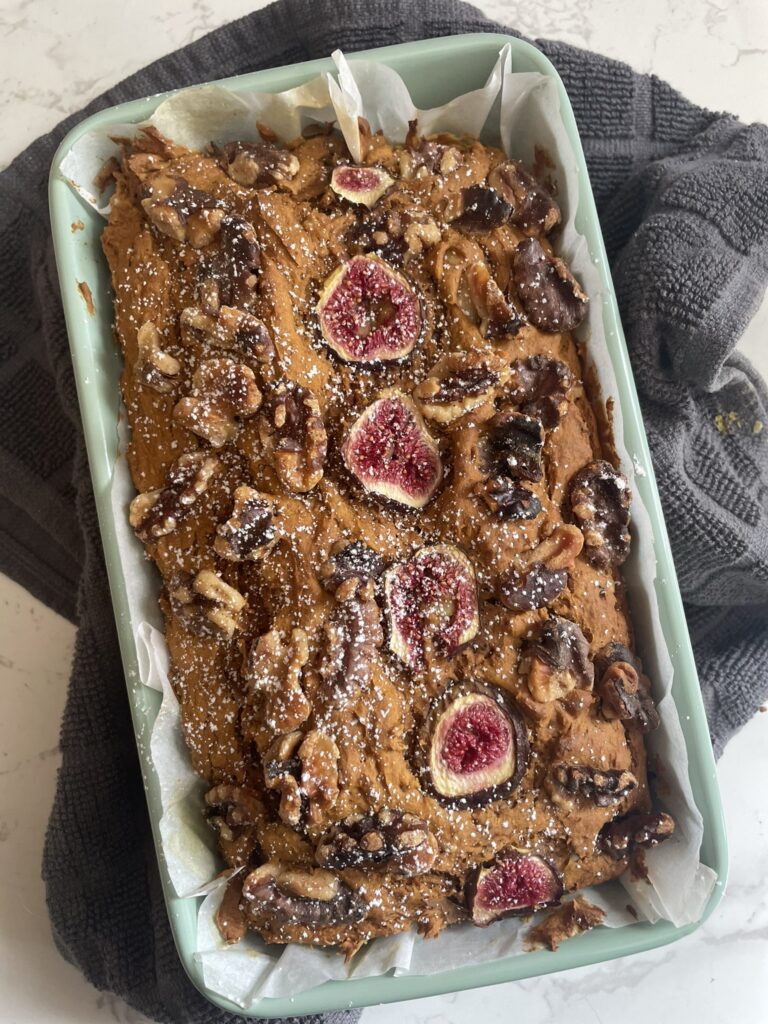
Fold in the Goodies: Gently fold in the chopped walnuts and figs. These ingredients will add a delightful texture and burst of flavor to your bread.
Bake to Perfection: Pour the batter into the greased loaf pan and spread it evenly. Bake in the preheated oven for approximately 35-40 minutes or until a toothpick inserted into the center comes out clean.
Cool and Enjoy: Allow the Pumpkin Fig Bread to cool in the pan for about 10 minutes before transferring it to a wire rack to cool completely. If desired, dust the top with powdered sugar for a touch of sweetness.
Enjoy Your Pumpkin Fig Bread
With the arrival of fall and the cool breeze that dances through the trees, there’s no better time to embrace the joys of baking. This Pumpkin Fig Bread is a delightful treat for your taste buds and a wonderful way to welcome the season’s simple pleasures. So, don your coziest sweater, brew a warm beverage, and savor every bite of this autumn-inspired creation. Fall is here, and a world of beauty and flavor is waiting to be enjoyed. Happy baking!
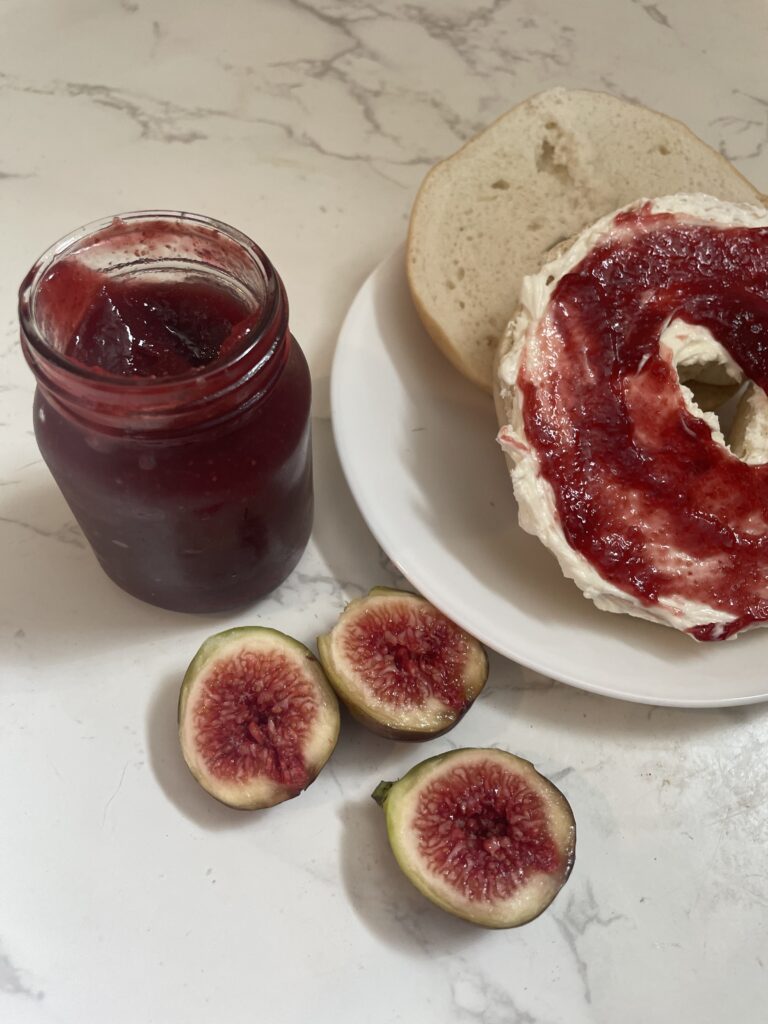
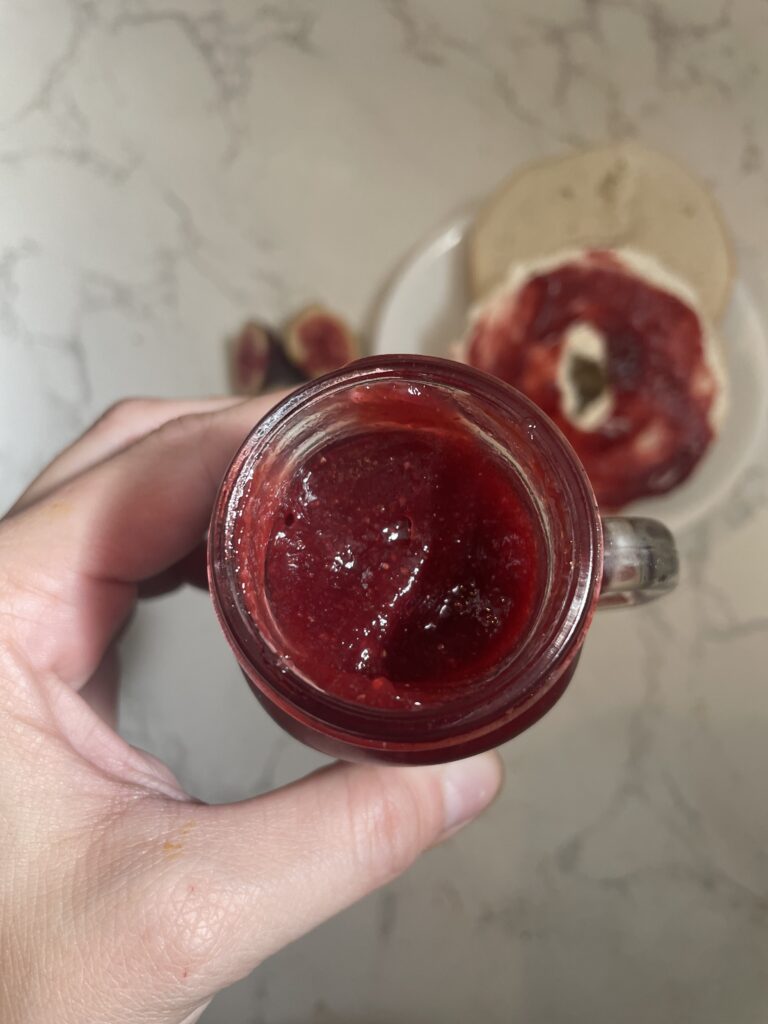
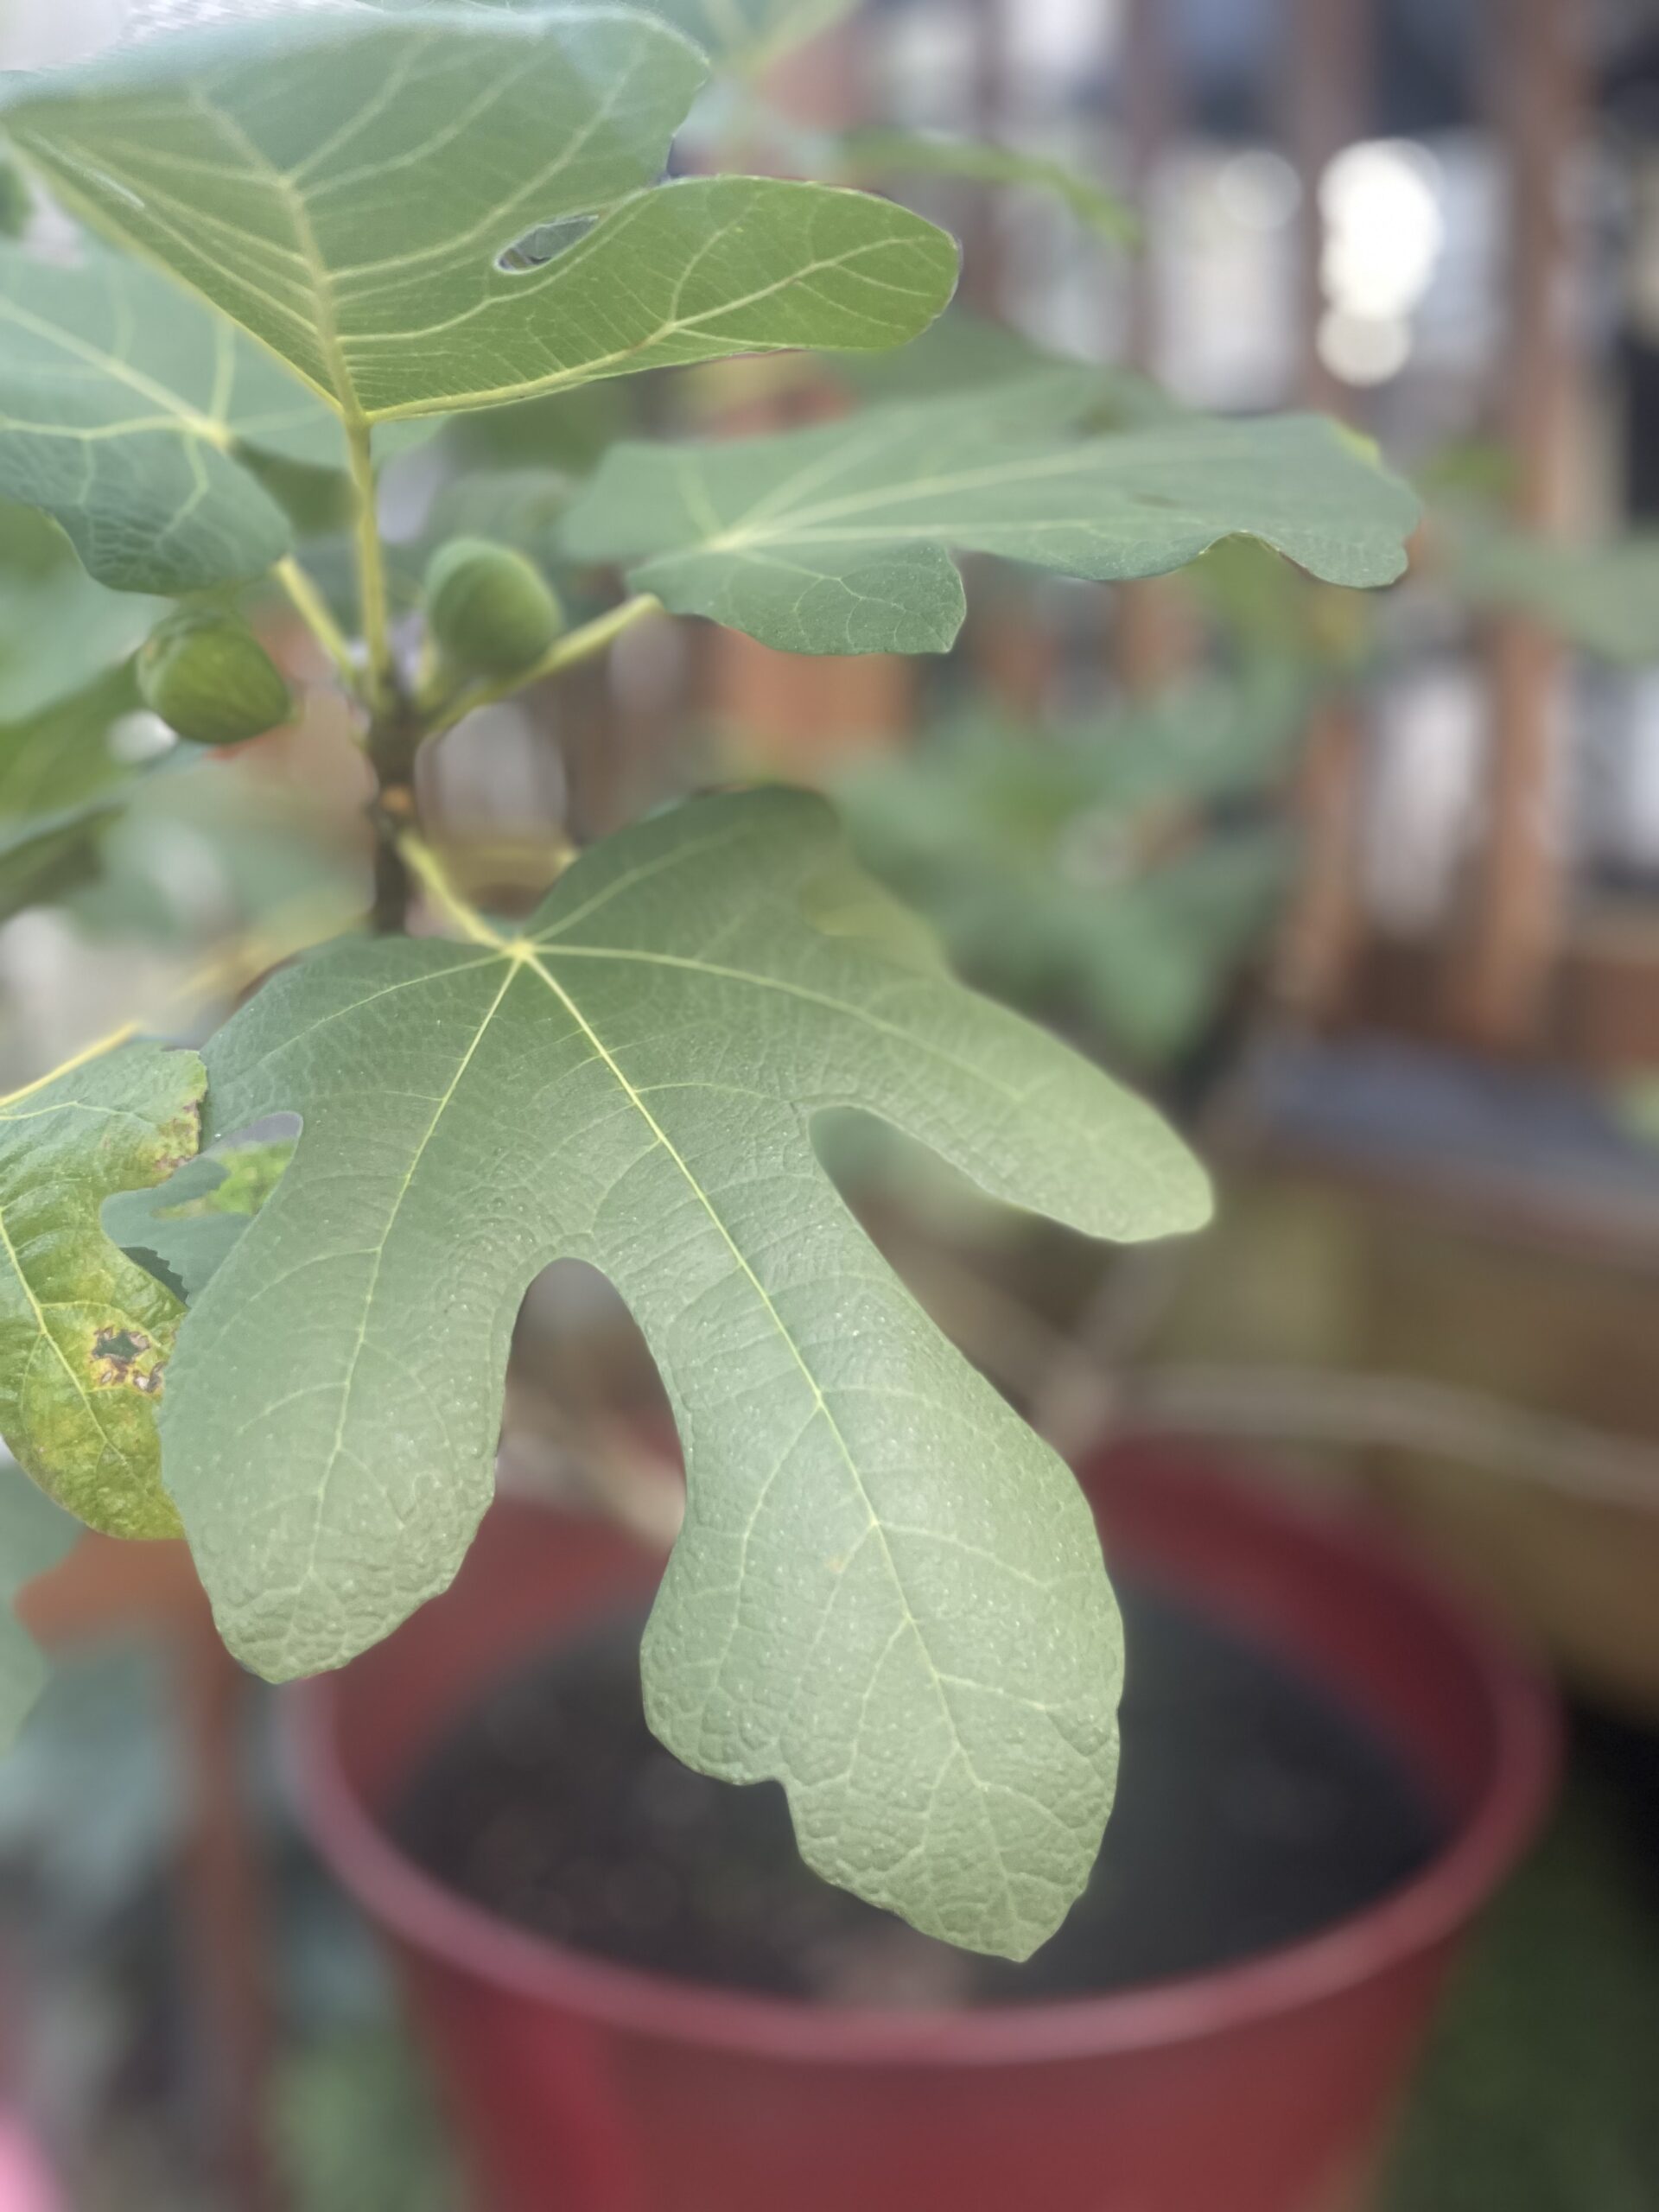
There’s something undeniably magical about the act of preserving fruit. It’s a tradition that transcends generations, passing down delicious flavors and cherished memories. Today, I am making homemade fig jam, using figs from a tree that has been a part of my family for generations. This recipe is a tribute to my poppa, who once tended to the very fig tree that now thrives in my care.
The Fig Tree Legacy
My fig tree is a source of pride and nostalgia, a living testament to the enduring bond between generations. When my father gave me a small piece of the beloved tree, I felt the weight of tradition and the joy of preserving it.
Ingredients You’ll Need
Before we get into the process, let’s gather the ingredients for this delectable homemade fig jam:
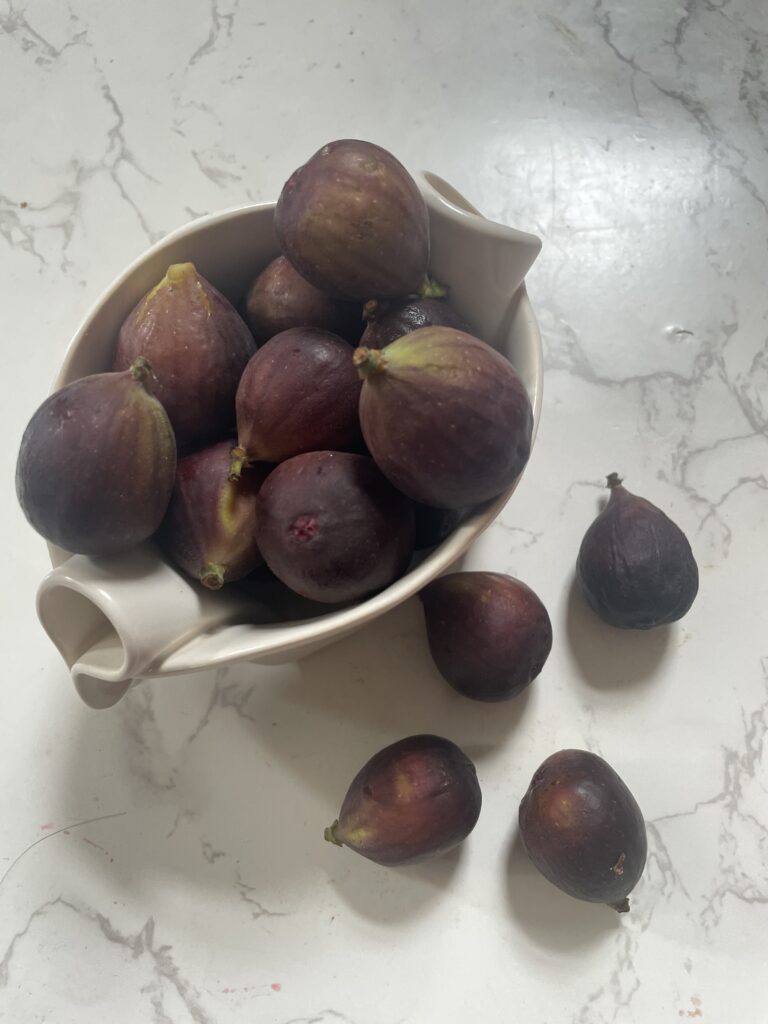
Fresh Figs: You’ll need about 2 pounds of ripe figs, preferably from your grandfather’s tree or any fresh figs you can get your hands on.
Granulated Sugar: Approximately 1 1/2 cups of granulated sugar to sweeten the jam.
Lemon Juice: The juice of one lemon, adds a touch of brightness to the jam.
Water: A quarter cup of water to help the jam reach the perfect consistency.
The Process
Wash and Prepare the Figs:
Gently wash the figs under cold water, removing any dirt or debris.
Trim the stems and cut the figs into small pieces. Leave the skin on for added texture and flavor.
Combine Ingredients:
In a large saucepan, combine the figs, sugar, lemon juice, and water.
Stir well to ensure the sugar dissolves.
Cook the Jam:
Over medium-high heat, bring the mixture to a boil.
Once boiling, reduce the heat to low and let it simmer. Stir occasionally.
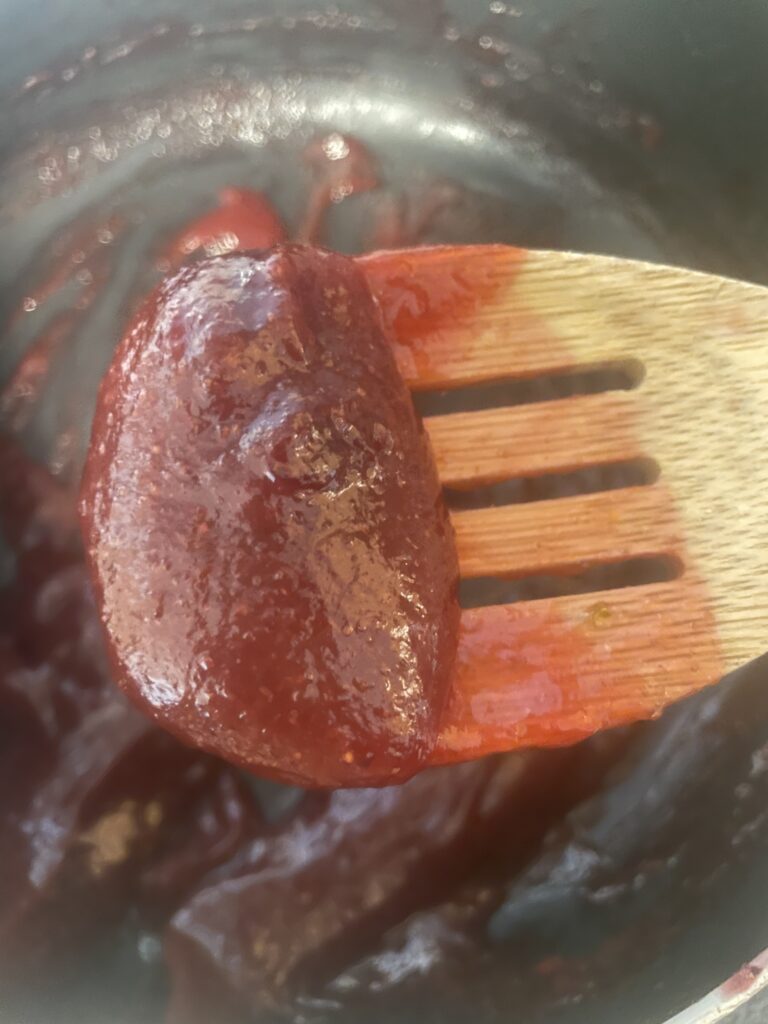
Monitor the Consistency:
Simmer the jam for about 45-60 minutes, or until it thickens to your desired consistency.
To check the consistency, place a spoonful of the jam on a chilled plate. If it wrinkles when you push it with your finger, it’s ready.
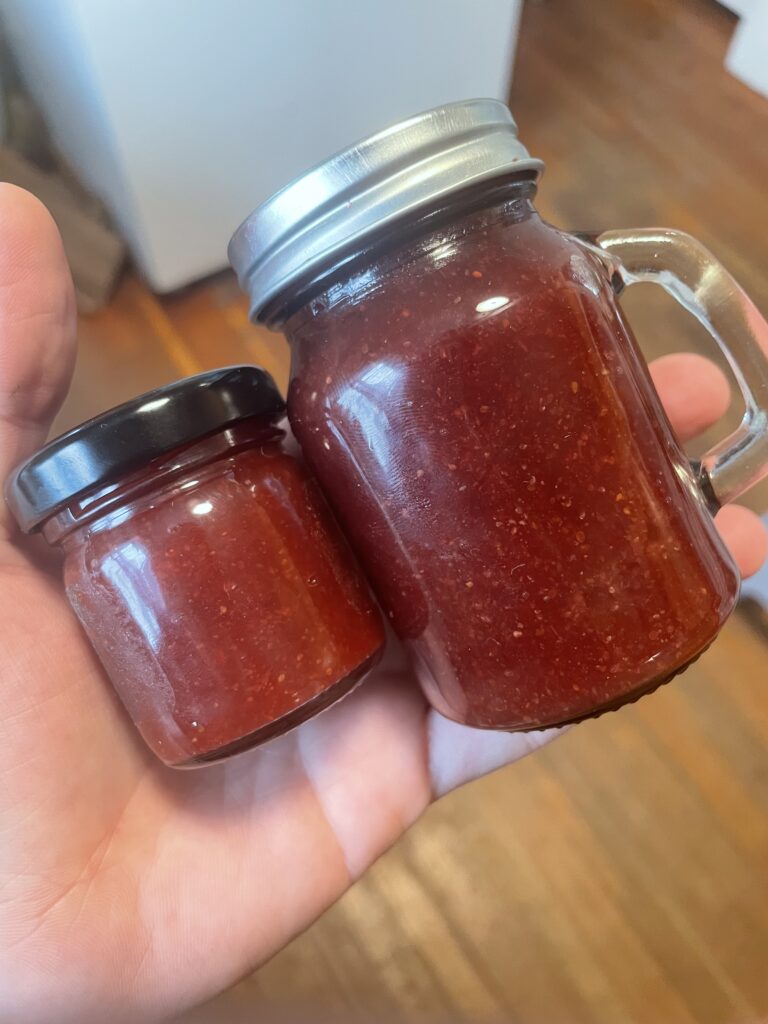
Preserve Your Memories:
Carefully ladle the hot fig jam into sterilized jars, leaving a little space at the top.
Seal the jars while they are still hot, creating a vacuum seal as they cool.
Appreciate What You’ve Made
As the aroma of simmering figs fills your kitchen, take a moment to appreciate the connection between the past and the present. This homemade fig jam recipe not only preserves the delicious flavor of ripe figs but also honors the legacy of the fig tree that has been a part of your family for generations.
Whether you enjoy your fig jam on warm toast in the morning or as a sweet accompaniment to cheese and crackers, remember the love, history, and tradition it embodies.
If motherhood has you stressed and you feel like you’ve lost your creativity, I am here to help! Here you will find easy recipes, simple DIY’s, affordable styles, and what to read next. I believe we all have a creative side, some of us just need a little help to find it. I will help inspire you to have creative expression without standards.