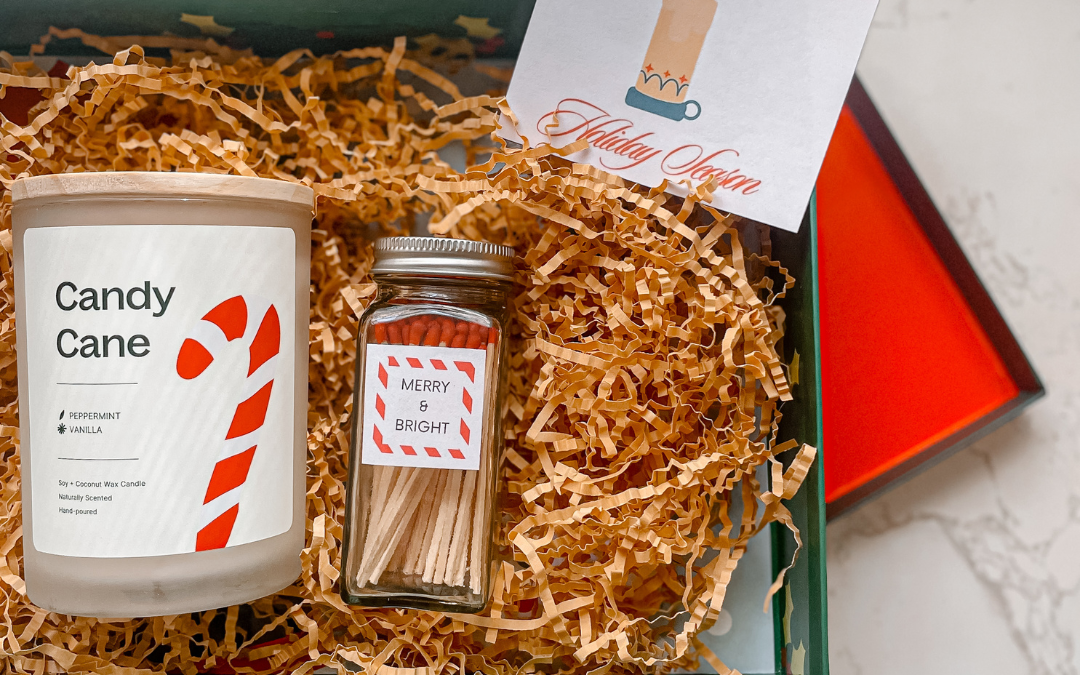
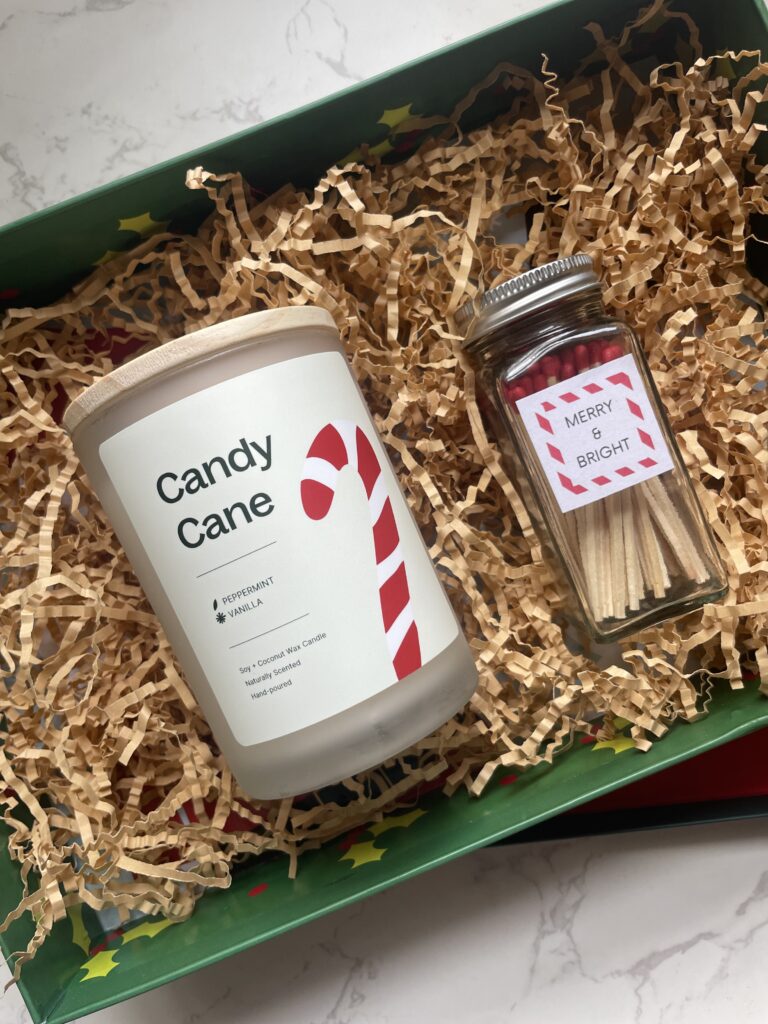
The holiday season is the perfect time for creating thoughtful, handmade gifts. This year, I’m bringing you a simple but charming DIY holiday gift idea that’s both practical and cozy: a holiday-scented candle paired with a repurposed spice jar match holder. This gift is ideal for anyone who loves the warm ambiance of candlelight and makes for a lovely, budget-friendly present. Plus, I’m including a printable label and gift tag to make it extra special!
This post contains affiliate links
What You’ll Need:
• An empty spice jar (cleaned and dried)
• Matches (long matches work great for aesthetics and ease)
• Printable labels and gift tags (scroll down to download)
• Sandpaper or striking paper (for match ignition)
Step 1: Clean and Prepare Your Spice Jar
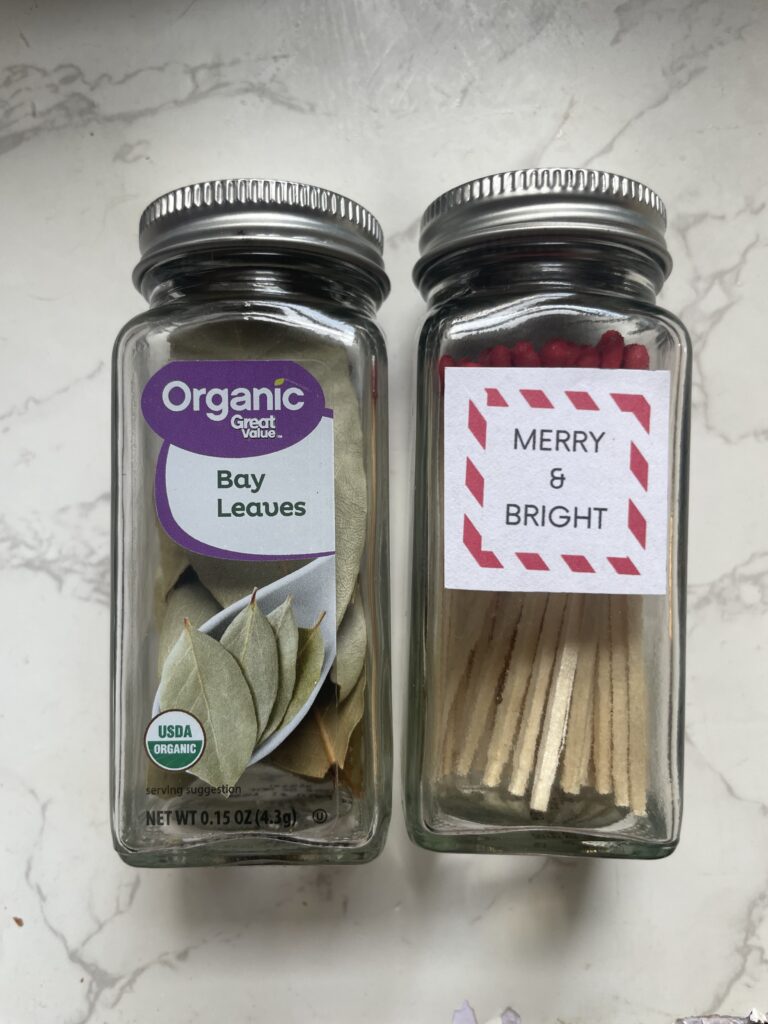
To start, take any empty spice jar you have on hand. Remove any labels by soaking the jar in warm, soapy water. A clean surface will ensure that your new label will adhere smoothly.
Step 2: Add Your Matches
Once your jar is dry, fill it with matches. You can use regular matches or the longer ones that are great for lighting candles in deeper holders. They give a stylish look and are easy to handle.
Step 3: Create the Strike Surface
To make your jar functional, cut a small piece of sandpaper or use adhesive striking paper and affix it to the bottom or side of the jar. This will serve as the strike area for lighting the matches. Make sure to use a surface that works with your type of matches!
Step 4: Label & Personalize
Print out the label I’ve created and stick it to the spice jar. You can use a glue stick for regular paper or use printable sticker paper. This label adds a festive touch, making it clear that this is more than just a simple spice jar – it’s now a holiday match holder! Attach the gift tag to the candle or the match jar with some twine or ribbon to complete the look.
Step 5: Gift It!
Pair the match holder with a holiday candle from Plant Therapy. Their seasonal scents will make any room feel cozy and inviting. Bundle them together for a gift that’s sure to be appreciated during the chilly months.
Why It’s a Great Gift
This DIY match holder and candle set brings a sense of warmth and personality. It’s perfect for anyone who loves creating an inviting space and makes for a unique, thoughtful gift. The repurposed jar not only gives it a handmade feel but also keeps it eco-friendly.
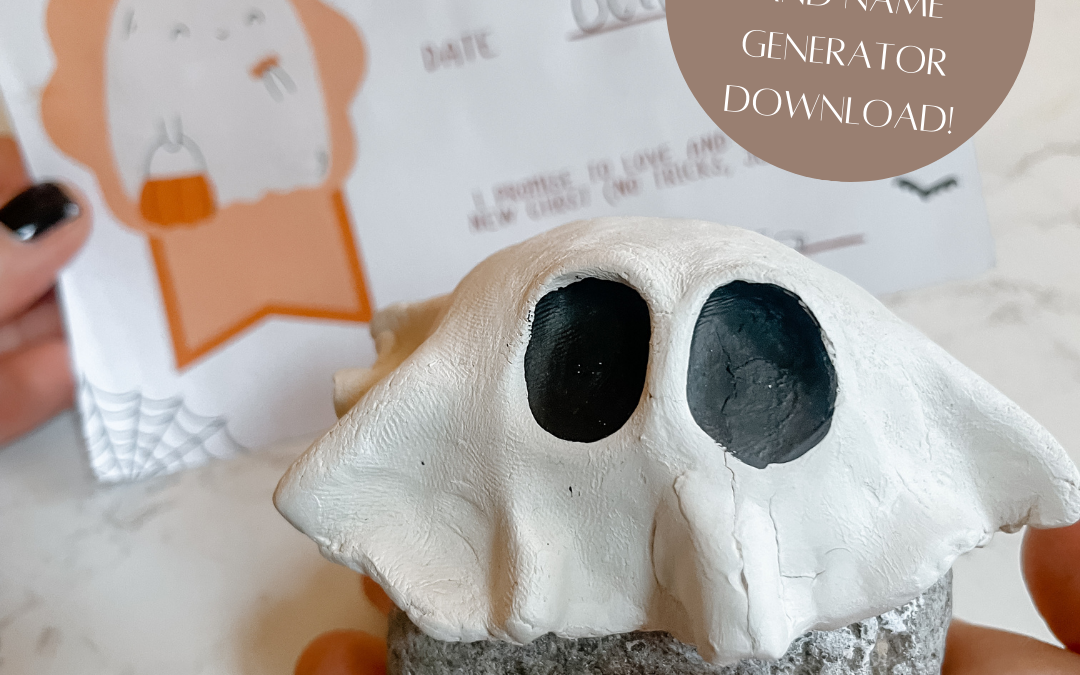
Looking for a fun and unique Halloween craft this year? Try this “Adopt-a-Ghost” project! This charming activity lets you turn ordinary rocks into adorable ghost figures, complete with their own names and adoption certificates. It’s the perfect way to get into the Halloween spirit, and it’s great for kids and adults alike.
What You’ll Need:
• Rocks (any size or shape you like)
• White paint or air-dry clay
• Black paint or permanent markers for facial details
• Paintbrushes
• Optional: Clear varnish to seal the paint
• Printable adoption certificate (included)
• Printable ghost name generator (included)
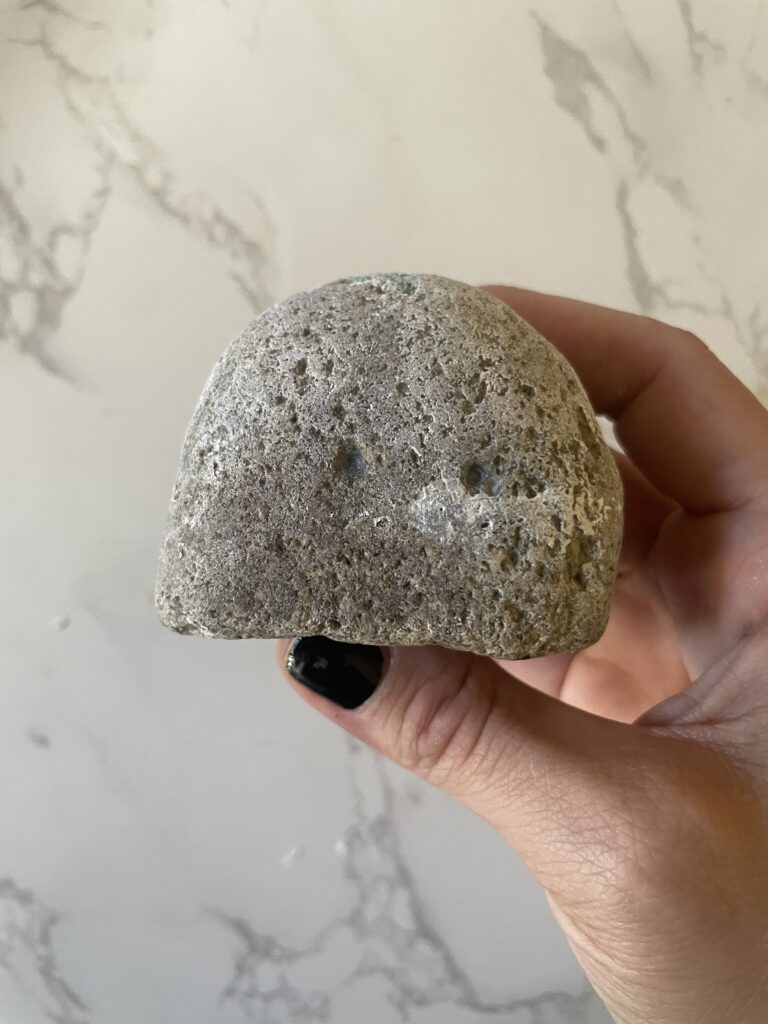
Step 1: Find the Perfect Rock
The first step in your Adopt-a-Ghost project is a little adventure: finding the perfect rock! Head outside and look for rocks of different shapes and sizes. Some may have a round, ghost-like form naturally, while others might be more unique. Just make sure they’re smooth enough for painting or covering with air-dry clay.
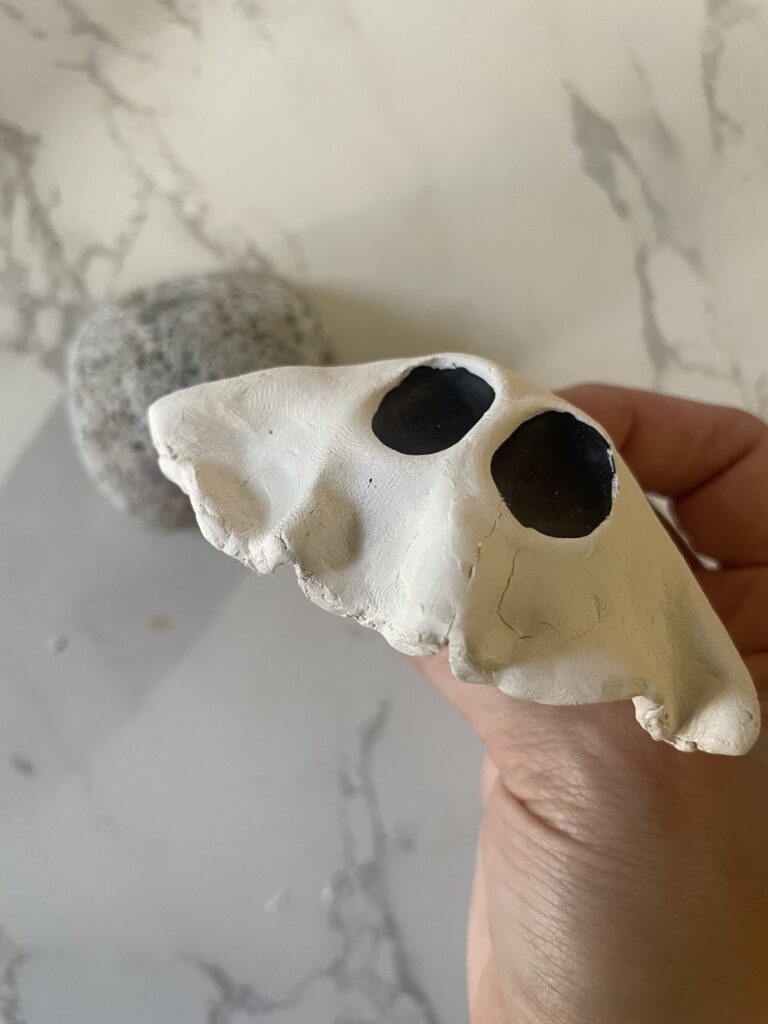
Step 2: Turn Your Rock into a Ghost
Once you have your rock, it’s time to transform it into a ghost! You have two main options for decorating: using white paint or air-dry clay.
• Using Paint: Simply paint your rock white. You may need to do two or three coats depending on how dark the rock is. Once it’s dry, use black paint or a marker to add eyes and a mouth to your ghost. These can be cute or spooky, depending on your style.
• Using Air-Dry Clay: If you want a more textured look, you can cover your rock with a thin layer of white air-dry clay. Smooth it over the surface, then let it dry according to the clay’s instructions. After it dries, add the face using black paint or a permanent marker.
For an extra professional touch, you can seal your ghost with a coat of clear varnish once it’s fully painted. This helps protect the design and gives your ghost a glossy finish.
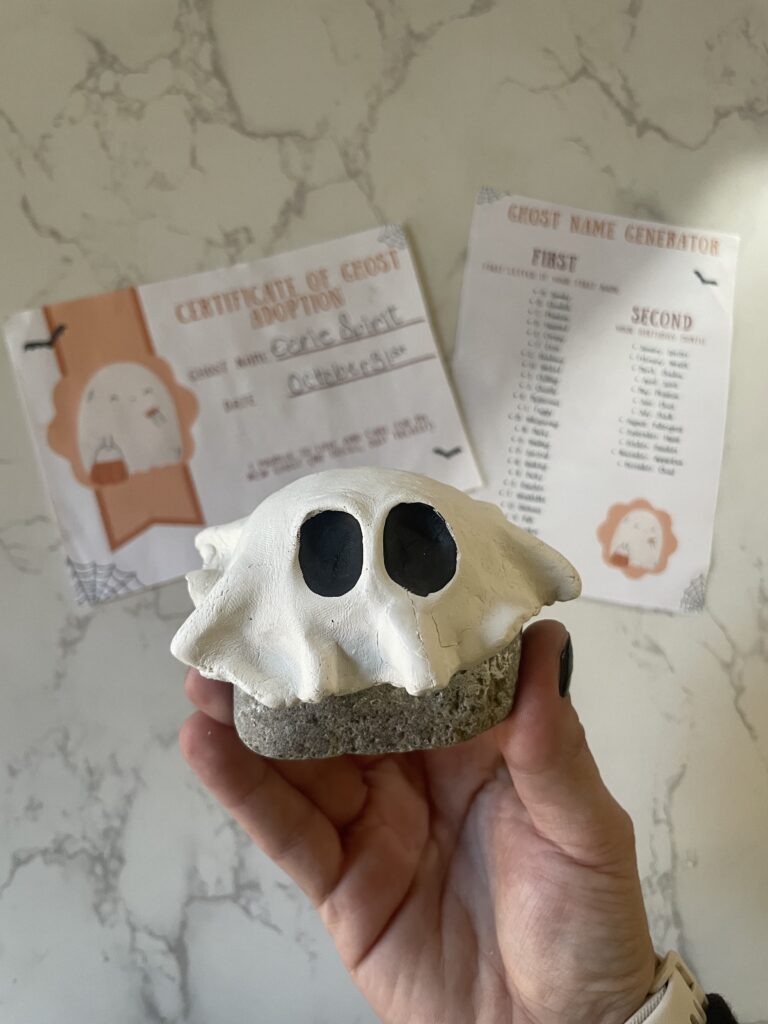
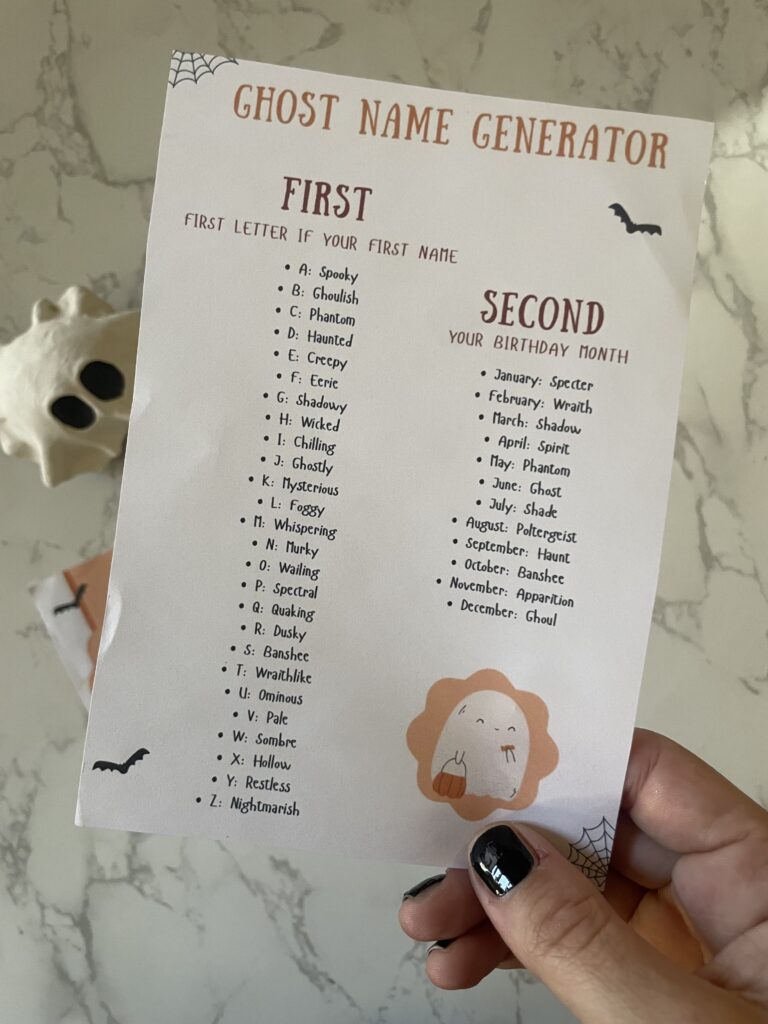
Step 3: Give Your Ghost a Name
What’s a ghost without a name? This is where the fun really begins. Use the Ghost Name Generator printable to give your new spectral friend a unique and spooky name. The printable is packed with fun combinations that are sure to spark some creativity.
Step 4: Create the Adoption Certificate
Now that your ghost has a name, it’s time to make it official! Download and print the Ghost Adoption Certificate provided with this craft. Fill in your ghost’s name, the date of adoption, and your own name as the proud adoptive parent. This certificate adds a fun and personal touch to the craft, making it feel like a real adoption event.
Step 5: Show Off Your Adopted Ghost
Once your ghost is finished and the adoption is official, you can proudly display your new friend! Place them on a shelf, desk, or even on your porch as part of your Halloween decor. You can even make multiple ghosts and set up a whole haunted family!
This craft is a perfect activity for a Halloween party, a weekend DIY project, or a classroom craft session. Plus, it’s a great way to combine creativity, outdoor exploration, and a bit of spooky fun.
Bonus Ideas:
• Ghost Village: Why stop at one? Gather several rocks and create a whole ghost village with unique characters and names!
• Personalized Halloween Gifts: These ghost rocks make adorable gifts. Attach the adoption certificate and ghost name card, and give them to friends or family as a quirky, handmade Halloween gift.
• Use Glow-in-the-Dark Paint: Add an extra layer of fun by using glow-in-the-dark paint for the eyes or entire body of the ghost. They’ll light up the night, creating a truly spooky vibe!
With this Adopt-a-Ghost craft, you’ll have a simple, engaging, and creative Halloween activity to enjoy with family and friends. Not only do you get to personalize your ghost, but the added adoption certificate and name generator make this craft feel extra special.
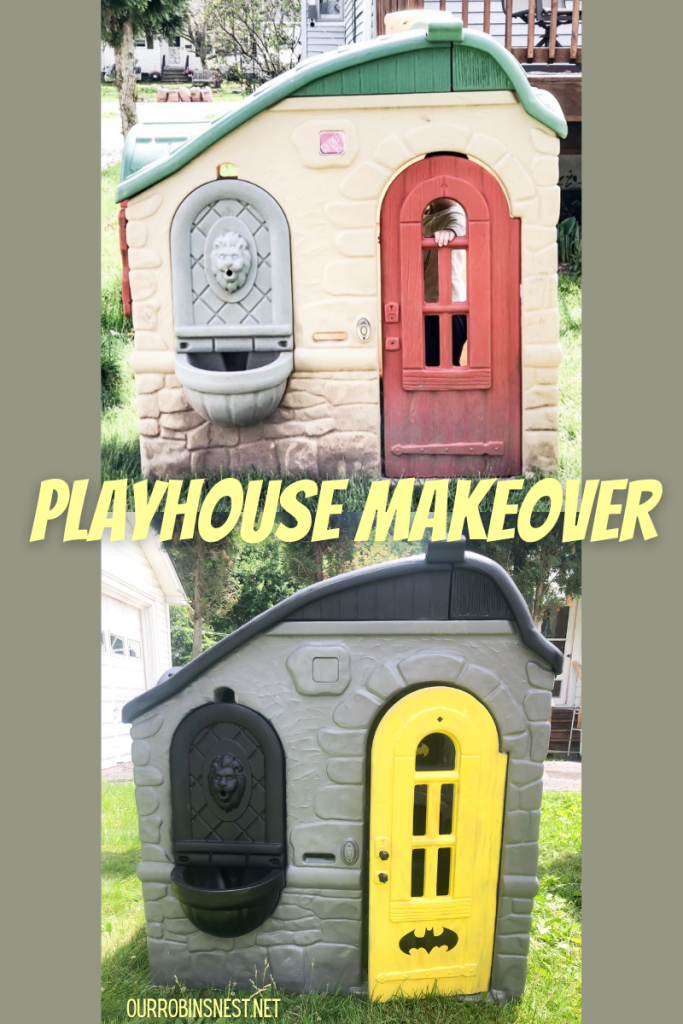
When life hands you a roadside find, turn it into something fun!
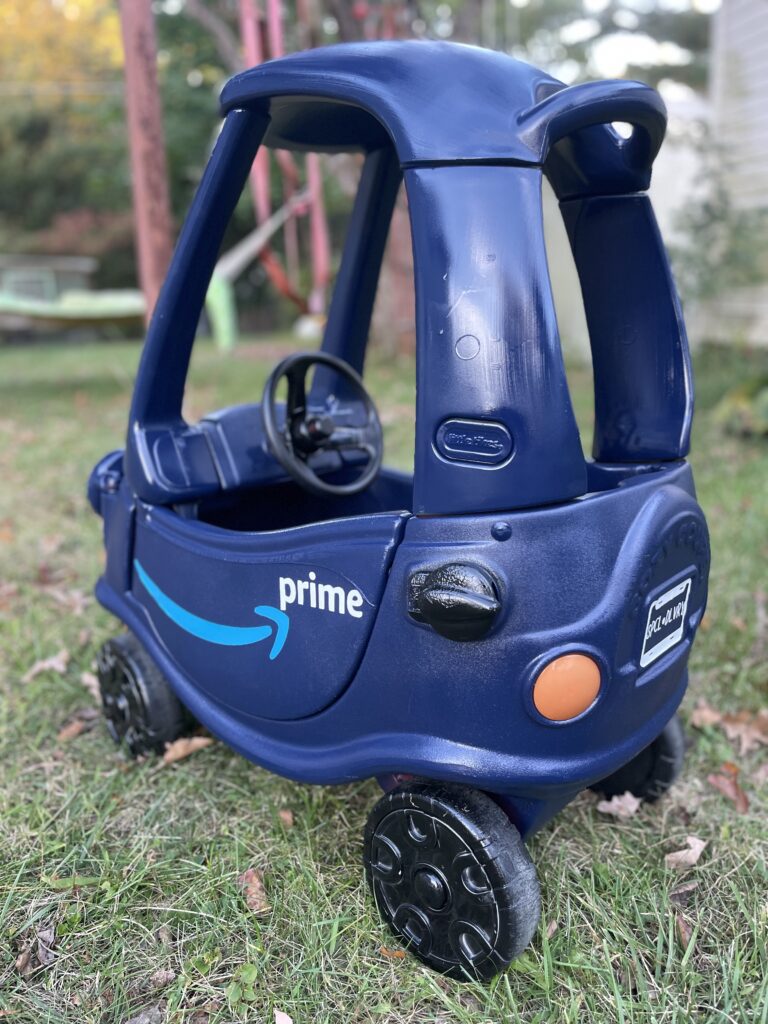
I recently came across a Little Tikes Cozy Coupe that was left on the side of the road, and I couldn’t resist taking it home for a makeover. My boys love playing with delivery trucks, and what better inspiration than an Amazon Prime delivery truck? With a little spray paint and my trusty Cricut machine, I turned this worn-out car into the coolest ride on the block.
Here’s how I did it:
Materials You’ll Need:
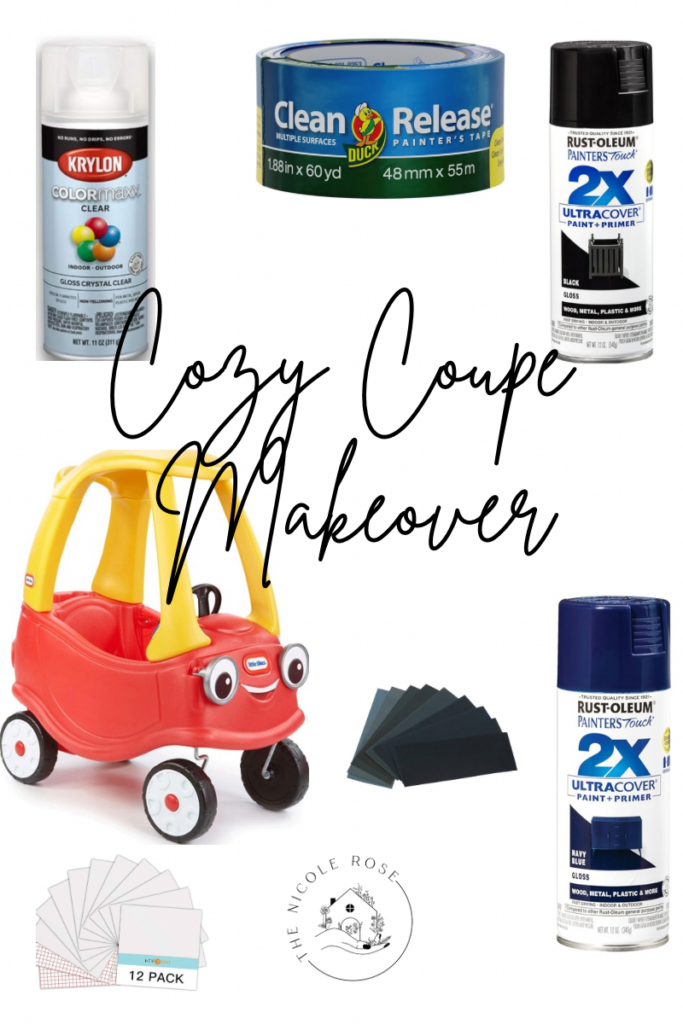
• Little Tikes Cozy Coupe (or any similar toy car)
• Spray paint (I used dark blue for the body and black for the accents)
• Cricut machine (optional but super helpful for creating decals)
• Vinyl for decals (I used light blue and white for the Amazon Prime logo and silver for headlights)
• Clear coat (optional for added durability)
• Painter’s tape/plastic bags (for masking areas you don’t want to paint)
• Screwdriver (for removing any parts you don’t want painted)
Step-by-Step Instructions:
1. Prep the Cozy Coupe
Before diving into the paint, I disassembled the Cozy Coupe to ensure a neat and clean paint job. Using a screwdriver, I removed the steering wheel, key, gas cap, and hub caps. I removed the stickers using Goo Gone and sanded down the whole car.
2. Spray Paint
I wanted to keep the Amazon Prime truck color scheme, so I chose dark blue for the body and black for the wheels and accents. After cleaning the car thoroughly, I covered the wheels with plastic bags. I spray-painted the entire body dark blue, then used black spray paint for the roof and wheels. I made sure to use multiple light coats for an even finish.
3. Create the Amazon Prime Logo
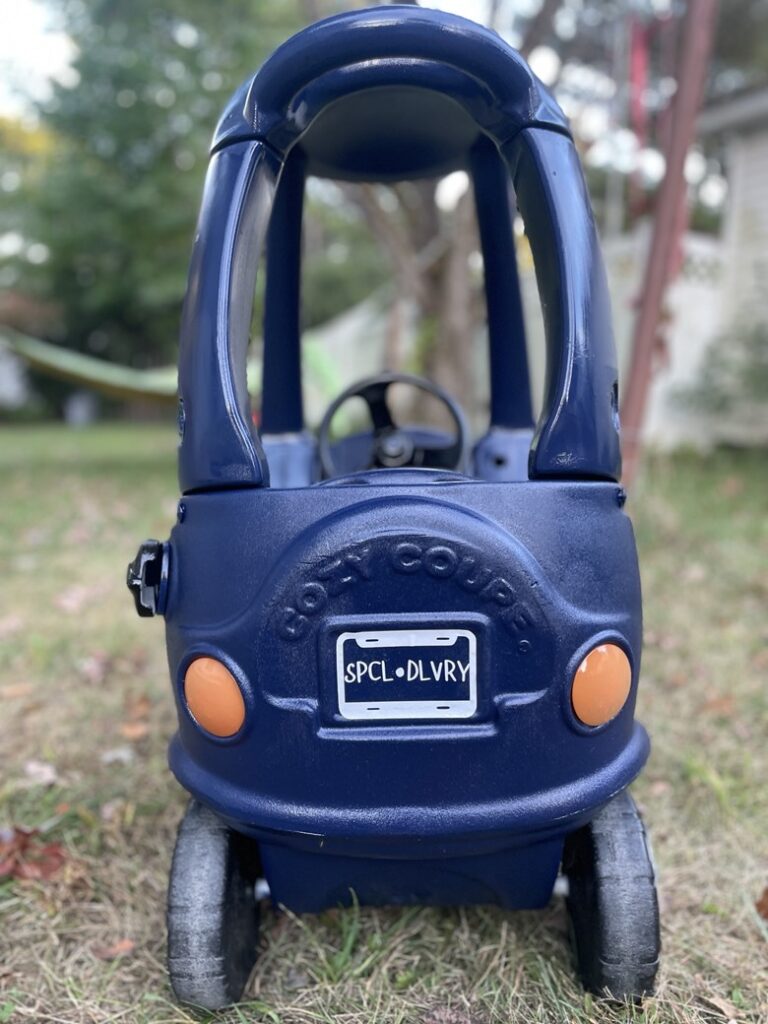
This is where my Cricut came in handy! I used my Cricut machine to create vinyl decals for the Amazon Prime logo and license plate. For the logo, I used light blue and white vinyl to match the classic Amazon Prime look. I also added a personalized license plate for a fun touch. I traced the headlights and cut out circles.
4. Apply the Decals
Once the paint was dry, I applied the vinyl decals to the truck’s sides, headlights, and the back for the license plate. The Cricut-made stickers made it super easy to get that professional look without much effort.
5. Finishing Touches
To ensure the paint job would last through all the outdoor adventures, I added a clear coat over the entire car. This step is optional but definitely helps keep the paint from chipping.
And voila! We now have a Little Tikes Cozy Coupe Amazon Prime delivery truck, and my boys couldn’t be more thrilled. It’s been a huge hit in our neighborhood, and it only took a little time and creativity to transform this roadside find into something special.
• When spray painting, always do it in a well-ventilated area and wear a mask.
• If you don’t have a Cricut, you can buy premade vinyl stickers online or even hand-paint your designs!
• Be sure to apply multiple thin coats of spray paint for the smoothest finish.
I hope this inspires you to get creative with your own Cozy Coupe makeovers! It’s such a fun and easy way to give new life to old toys and add a personal touch that your kids will love.
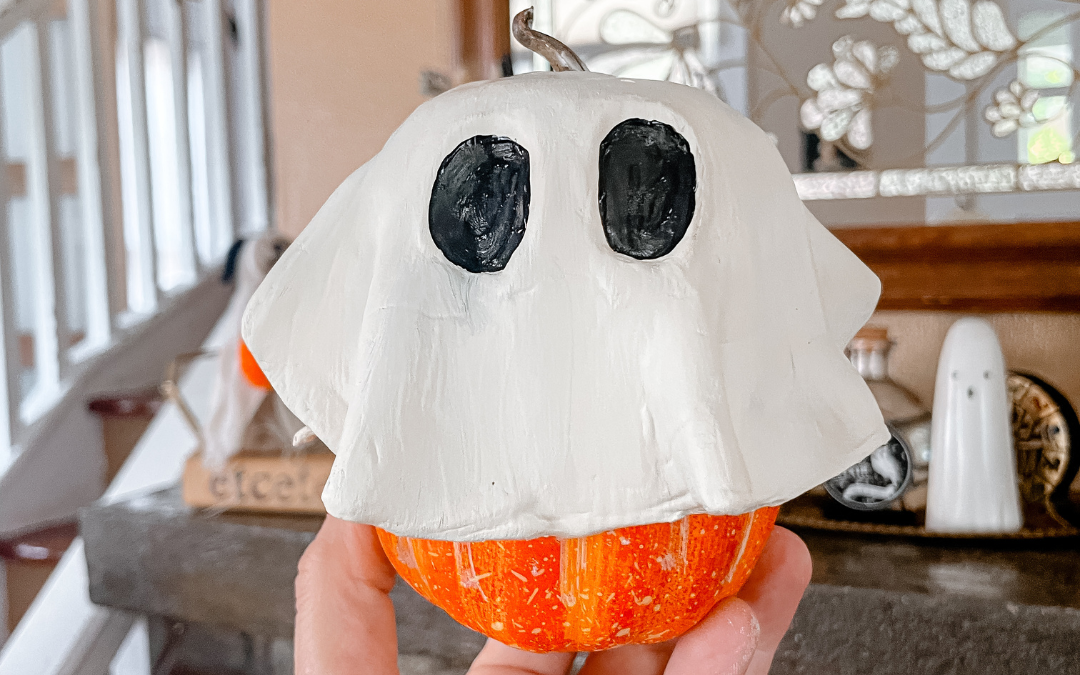
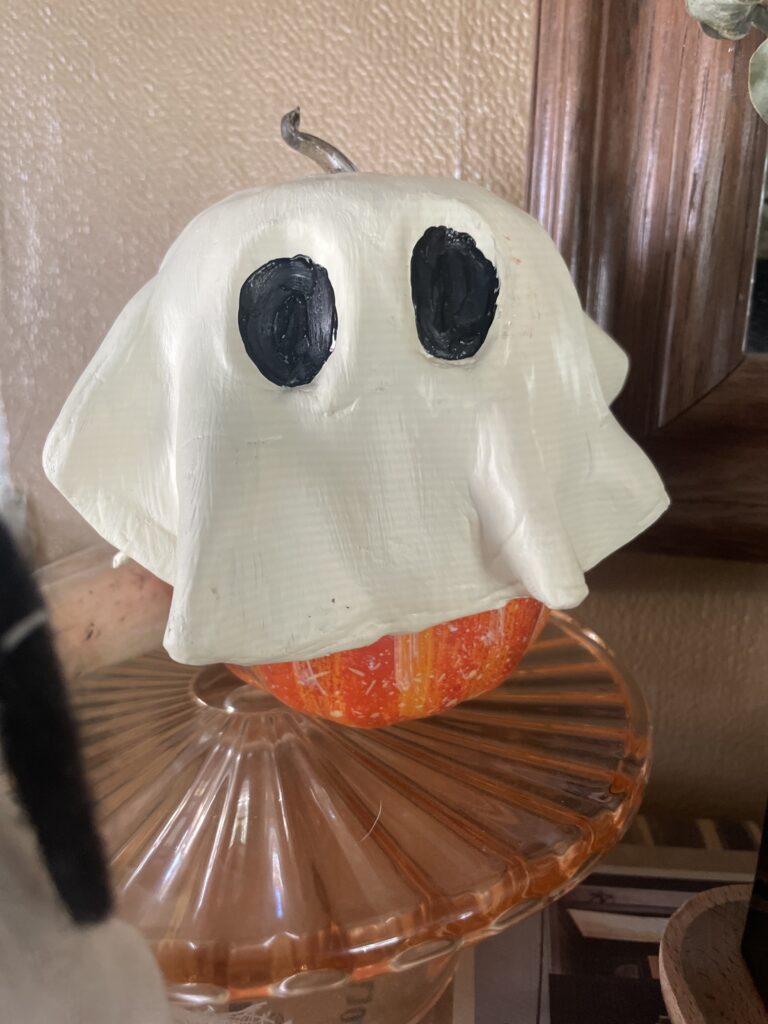
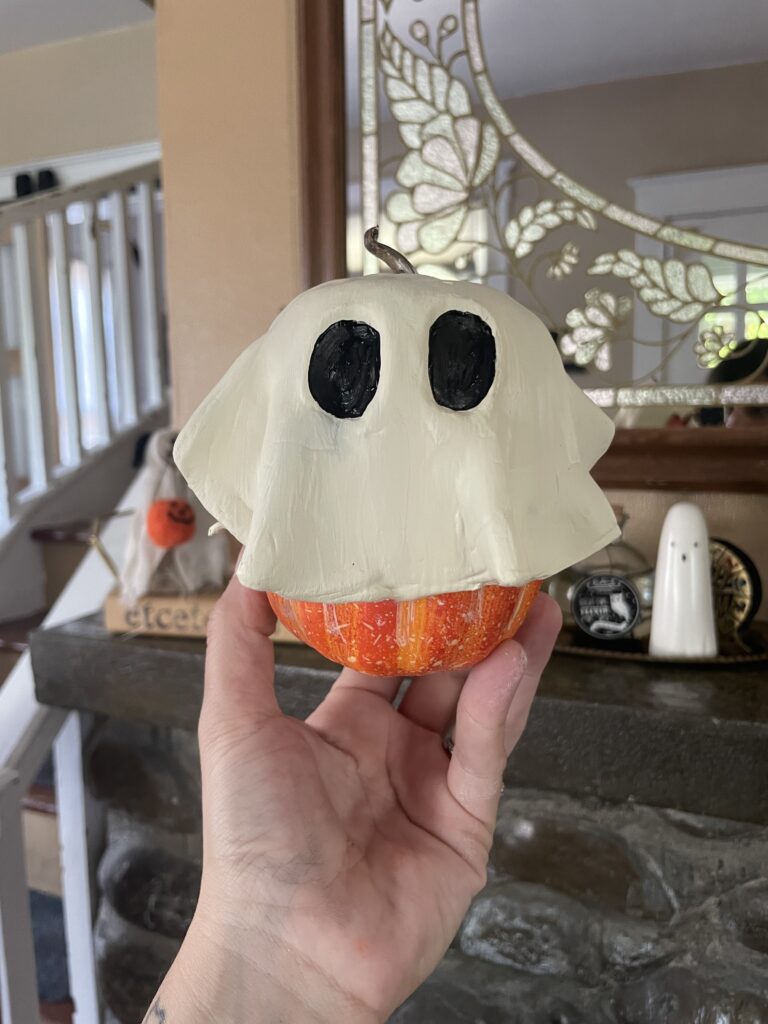
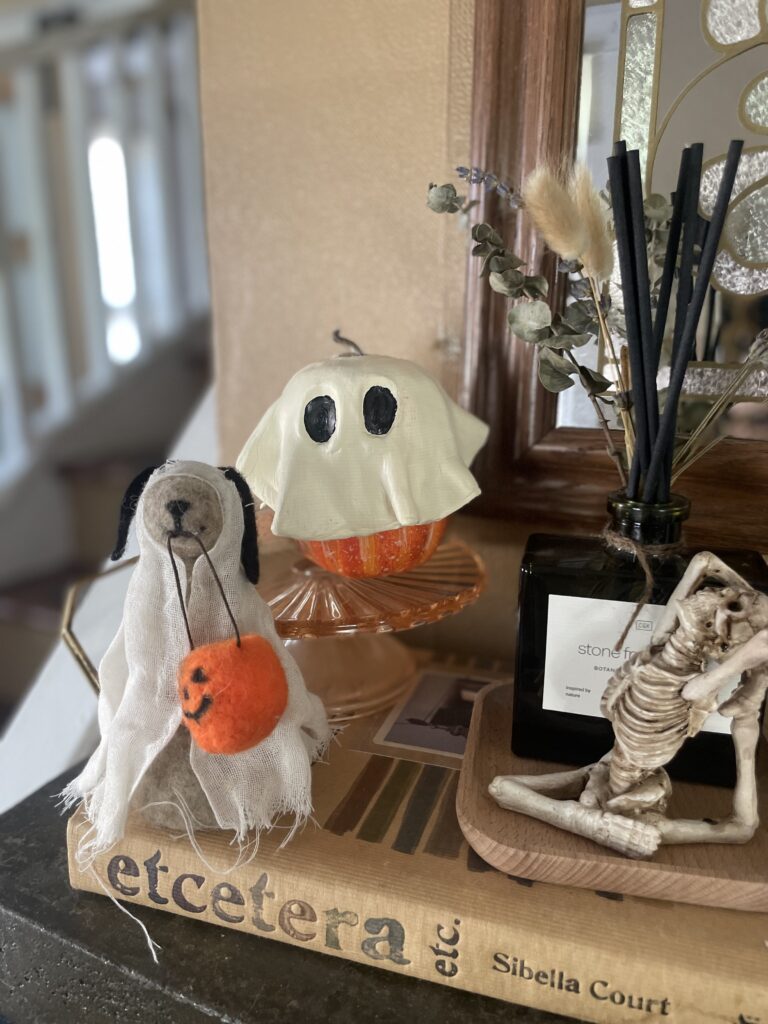
Get ready to add a spooky yet charming touch to your fall décor with these adorable air-dry clay ghost pumpkins! This craft is perfect for a fun Halloween project, and it’s easy to create using inexpensive materials like a pumpkin from the dollar store and some air-dry clay.
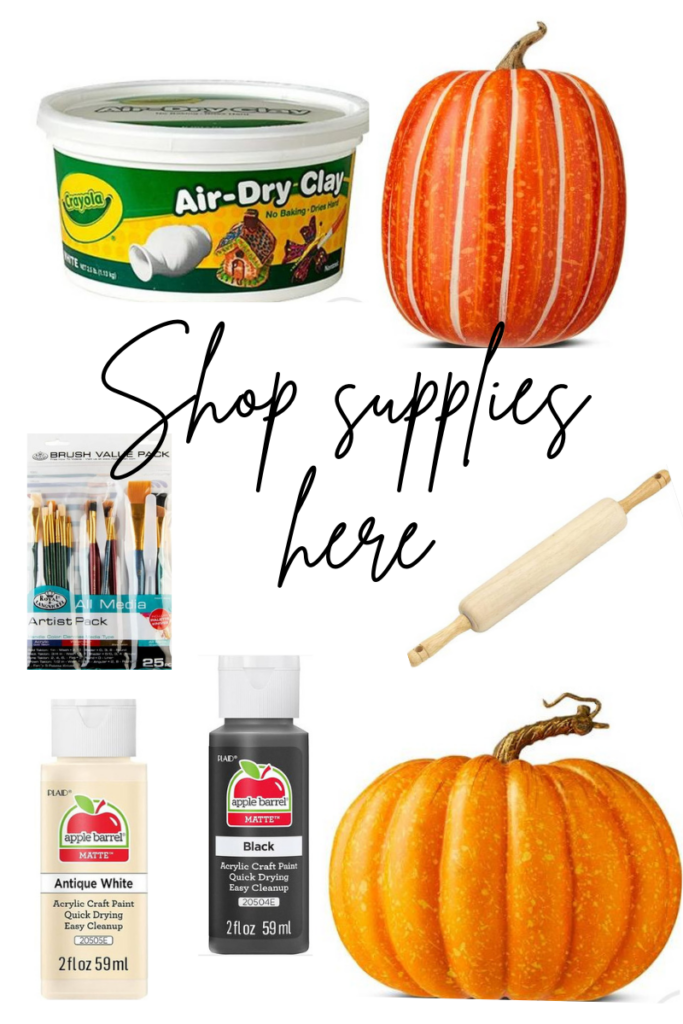
Materials Needed:
Pumpkin of any size (I used one from the dollar store)
Air-dry clay
White acrylic paint
Black acrylic paint
Paintbrushes (small and medium)
Water for smoothing the clay
Rolling pin
Step-by-Step Instructions:
1. Prepare Your Pumpkin
Start with a small pumpkin, which can be plastic, foam, or ceramic. These are inexpensive and easy to find at dollar stores during the fall season.
Tip: Make sure the surface is clean and free of any dust, so the clay adheres well!
2. Cover the Pumpkin with Air-Dry Clay
Roll out a large piece of air-dry clay, about ¼ inch thick, to cover the pumpkin. Once it’s rolled out, drape the clay over the top of the pumpkin like a ghostly blanket.
Gently press the clay into the crevices of the pumpkin to capture its shape while keeping the surface smooth.
Use your fingers dipped in water to smooth out any cracks or imperfections.
Tip: Don’t worry if the clay doesn’t cover the bottom perfectly—focus on making the top look ghostly!
3. Add the Ghostly Details
Let your pumpkin dry for at least 24 hours or until the clay feels completely firm.
Once dry, it’s time to transform your pumpkin into a spooky ghost! Using white acrylic paint, paint the entire surface of the pumpkin to give it a clean, ghostly appearance.
Tip: You may need two coats of paint to fully cover the clay.
4. Paint the Ghost Eyes
Now it’s time to give your ghost pumpkin some personality! Use black acrylic paint to create two large, oval-shaped eyes in the middle of the pumpkin.
You can make the eyes as big or as small as you like—it’s fun to play around with different expressions for your ghost.
Display Your Ghost Pumpkins!
Once the paint and sealer are completely dry, your ghost pumpkin is ready to display! Set it on your porch, mantel, or even as part of a spooky tablescape.
This simple craft is a great way to repurpose dollar store pumpkins and create festive, handmade décor for the Halloween season. Plus, it’s a project that’s perfect for kids to join in on, making it a fun family activity!
Have you made your own ghost pumpkins? Share your creations in the comments—I’d love to see how spooky yours turned out!
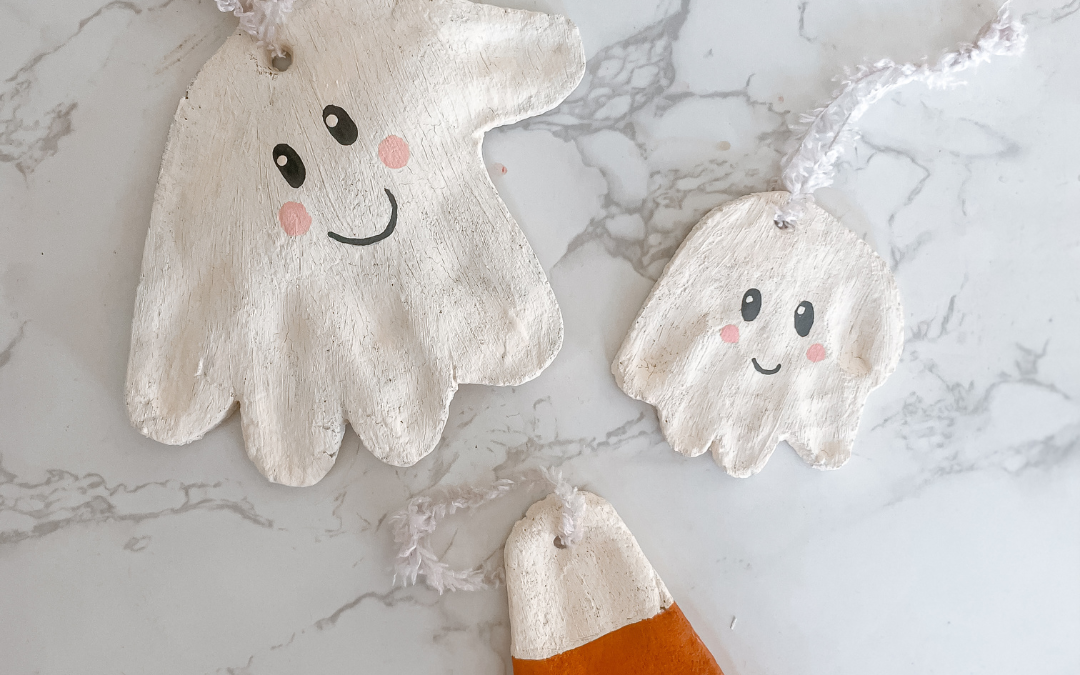
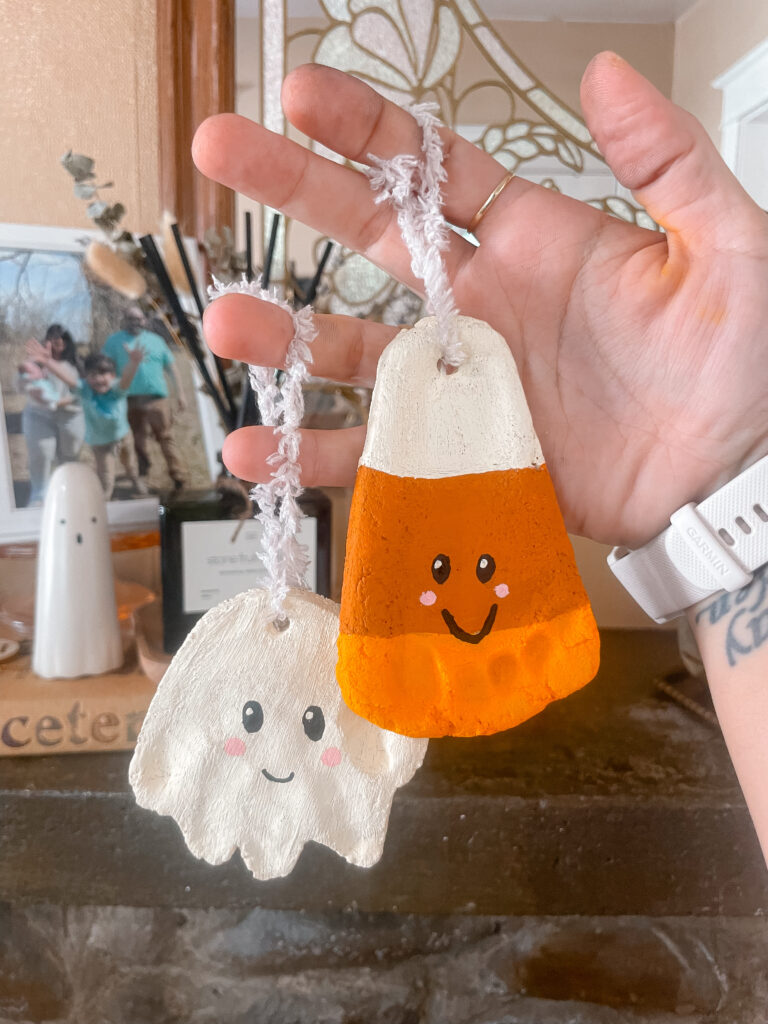
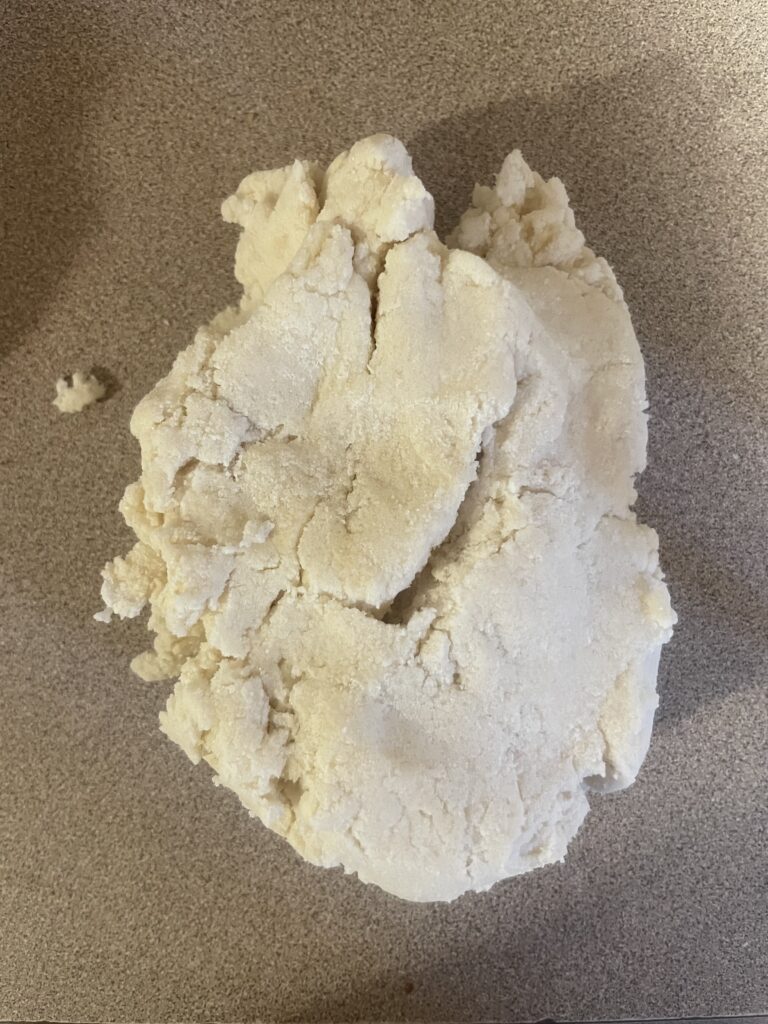
If you’re looking for a fun and easy way to celebrate Halloween with your little ones, spooky salt dough keepsakes are the perfect project! They are simple to make and double as cherished mementos you’ll love pulling out year after year.
As a mom with an 8-year-old, I sometimes miss the days when we did these cute crafts together all the time. But let’s be real—he’ll never be too old for me! He’s stuck doing these projects until he’s an adult. It’s definitely fun, though, to keep these traditions alive with my younger son. Making handprint ghosts and candy corn footprint keepsakes together has become a sweet way to continue the fun memories and pass them down.
Ingredients
For the Salt Dough:
1 cup of all-purpose flour
1/2 cup of salt
1/2 cup of water
For Decorating:
White, black, orange, and yellow acrylic paint
Paintbrushes
Clear varnish or Mod Podge (optional)
Ribbon or string for hanging
A straw (for creating holes in the dough)
Step-by-Step Instructions
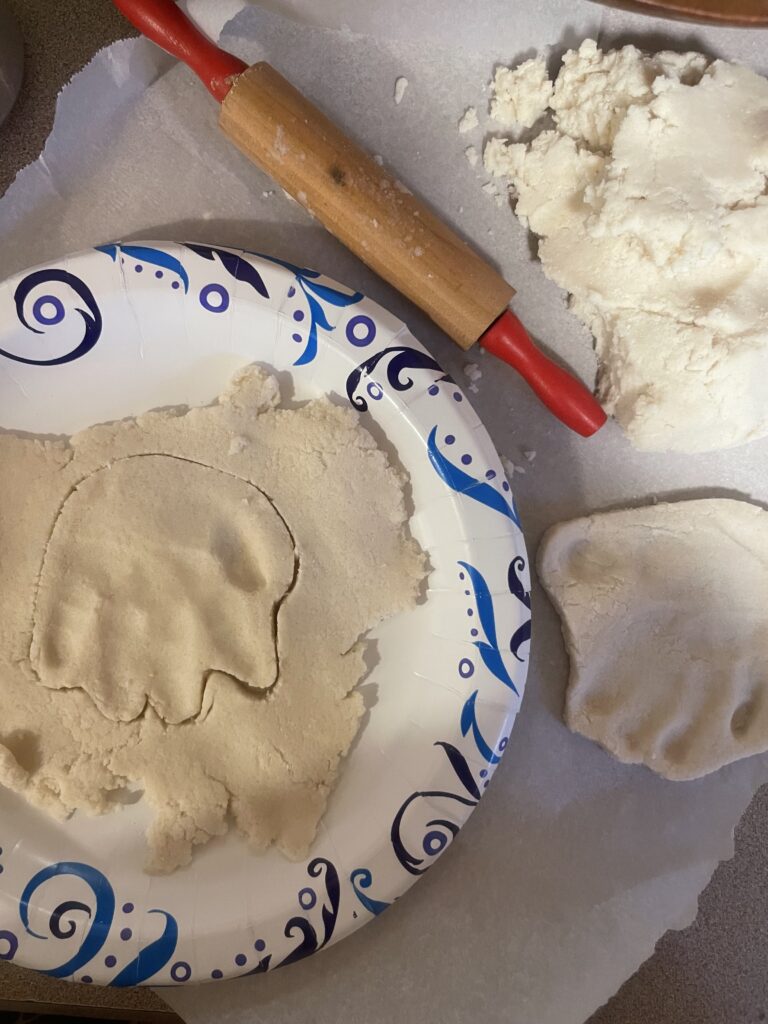
Prepare the Dough: Combine the flour and salt in a large mixing bowl. Gradually add water while stirring until a dough forms. Knead the dough on a floured surface until it’s smooth and pliable.
Shape the Keepsakes:
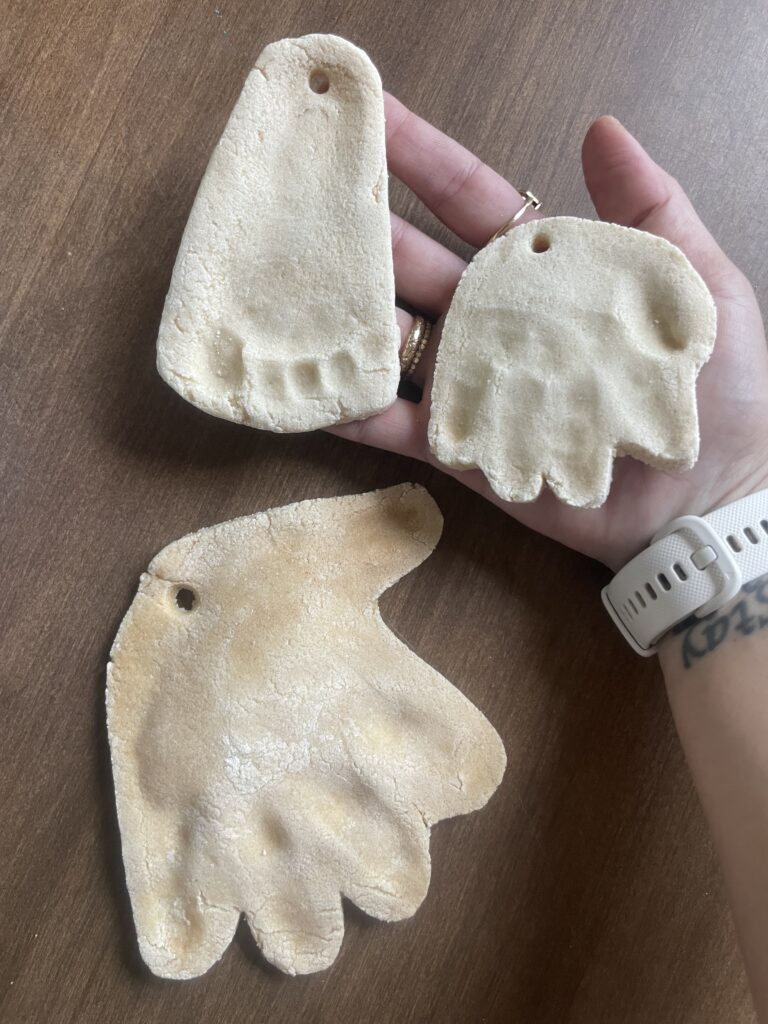
Handprint Ghosts: Roll out the dough to about 1/4-inch thickness. Help your child press their hand into the dough to create a handprint. Cut around the print, leaving a small border. Use a straw to poke a hole at the top for hanging.
Candy Corn Footprints: Roll out the dough and help your child press their foot into it to create a footprint. Cut around the print, leaving a small border. Use a straw to make a hole at the top of each piece if you plan to hang them.
Bake: Preheat your oven to 250°F (120°C). Place the shapes on a parchment-lined baking sheet and bake for 2-3 hours or until fully dry and hardened. Let them cool completely.
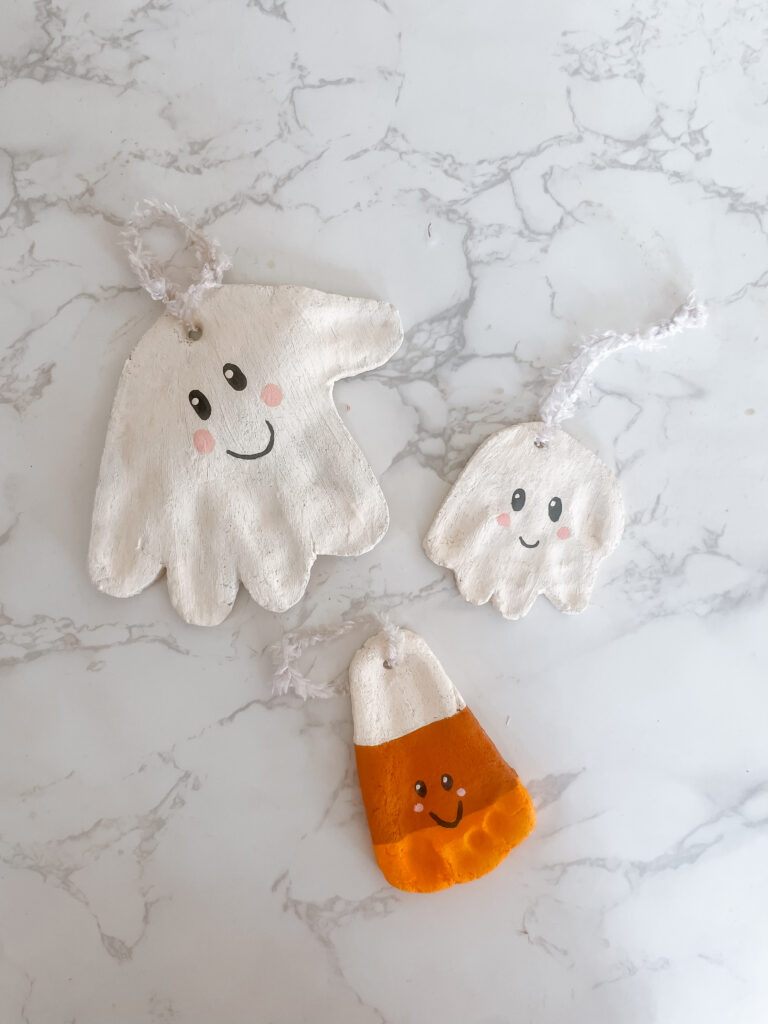
Decorate the Keepsakes:
Handprint Ghosts: Paint the entire handprint white. Once dry, use black paint to add eyes and a mouth for a ghostly face.
Candy Corn Footprints: To resemble candy corn, paint the heel of the footprint white, the middle section orange, and the toes yellow. Let the paint dry thoroughly.
Seal and Hang: Once your paint is dry, apply a clear varnish or Mod Podge coat to protect your keepsakes. Thread ribbon or string through the holes, and your spooky salt dough keepsakes are ready to display!
Frequently Asked Questions
How do I store salt dough keepsakes? To prevent fading or cracking, store them in a cool, dry place away from direct sunlight. Wrapping them in tissue paper before storing can also help preserve them.
Can I use other shapes for these keepsakes? Of course! Get creative with Halloween-themed cookie cutters like pumpkins, bats, or witches’ hats.
What if my dough is too sticky or crumbly? If the dough is too sticky, add a little more flour. If it’s crumbly, gradually add water until it reaches the right consistency.
Can I make these with a baby or toddler? Yes! Just keep in mind that you’ll need to help them press their hands or feet into the dough and handle the paint. Supervision is key, especially during the baking and painting stages.
Are salt dough keepsakes safe around pets? NO, salt dough can be very dangerous if eaten by pets due to its high salt content. Be sure to keep these keepsakes out of reach of curious animals.
These spooky salt dough keepsakes are more than just Halloween decorations—they’re a way to capture memories with your kids. Remember to keep them out of reach of your furry friends!
If motherhood has you stressed and you feel like you’ve lost your creativity, I am here to help! Here you will find easy recipes, simple DIY’s, affordable styles, and what to read next. I believe we all have a creative side, some of us just need a little help to find it. I will help inspire you to have creative expression without standards.