

Looking for a fun, affordable way to spruce up your Halloween decor? Crafting terracotta-style jack-o’-lantern planters using cheap Halloween buckets, acrylic paint, and baking soda is a perfect DIY project. These planters will give your home a spooky yet charming look, and they can be used for real plants or artificial flowers for a low-maintenance option.
Materials You’ll Need:
Before diving into the crafting process, make sure you have the following materials ready:
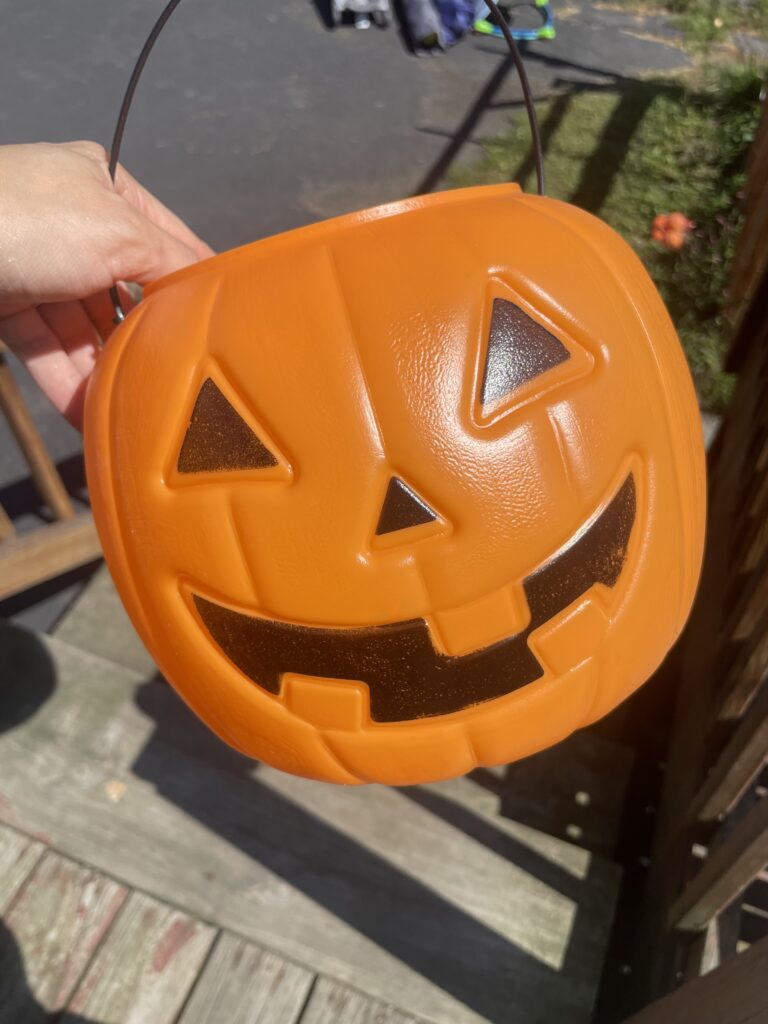
- Plastic Halloween Buckets: These can be found at most dollar stores or seasonal sections of larger retailers. Pick ones with the classic jack-o’-lantern face.
- Spray Paint Primer– This will help the acrylic paint go on smoothly and provide full coverage.
- Acrylic Paint: Choose shades of orange, tan, or terracotta to give the planter an authentic clay look. White or cream for detailing.
- Baking Soda: This is the magic ingredient that will help create a textured, ceramic-like finish.
- Paint Brushes: Medium-sized brushes work best for covering large surfaces, while smaller brushes will help with detailed work.
- Artificial Flowers: Choose artificial fall flowers like mums, marigolds, or dried wheat for an autumn look.
- Sandpaper (optional): For a smooth finish or to distress the bucket for a vintage look.
- Potting Soil and Real Plants: Optional, if you want to use real plants.
Step-by-Step Instructions
Step 1: Prepare Your Work Area
Before you begin, lay down some newspaper or plastic to protect your workspace. Acrylic paint can be messy, so it’s always a good idea to have everything covered. Gather all your materials to ensure they’re within arm’s reach.
Step 2: Clean and Prep the Halloween Buckets
Wash and dry the plastic Halloween buckets thoroughly to remove any dust or grime. If they have handles, you can remove them to make painting easier. You may want to sand the buckets lightly if they’re too smooth, as this will help the paint adhere better.
Step 3: Create the Terracotta Paint Mixture
To achieve the faux terracotta look, you’ll need to mix your acrylic paint with baking soda. Here’s how to do it:
- Spray 1-2 layers of primer all over the Paul. Let is fully dry.
- Pour your acrylic paint into a disposable container. Orange, beige, or terracotta shades work best.
- Add baking soda to the paint at a 1:1 ratio (for every cup of paint, add a cup of baking soda). This will give the paint a thick, textured consistency that mimics real terracotta.
- Stir the mixture until it’s smooth and slightly gritty.
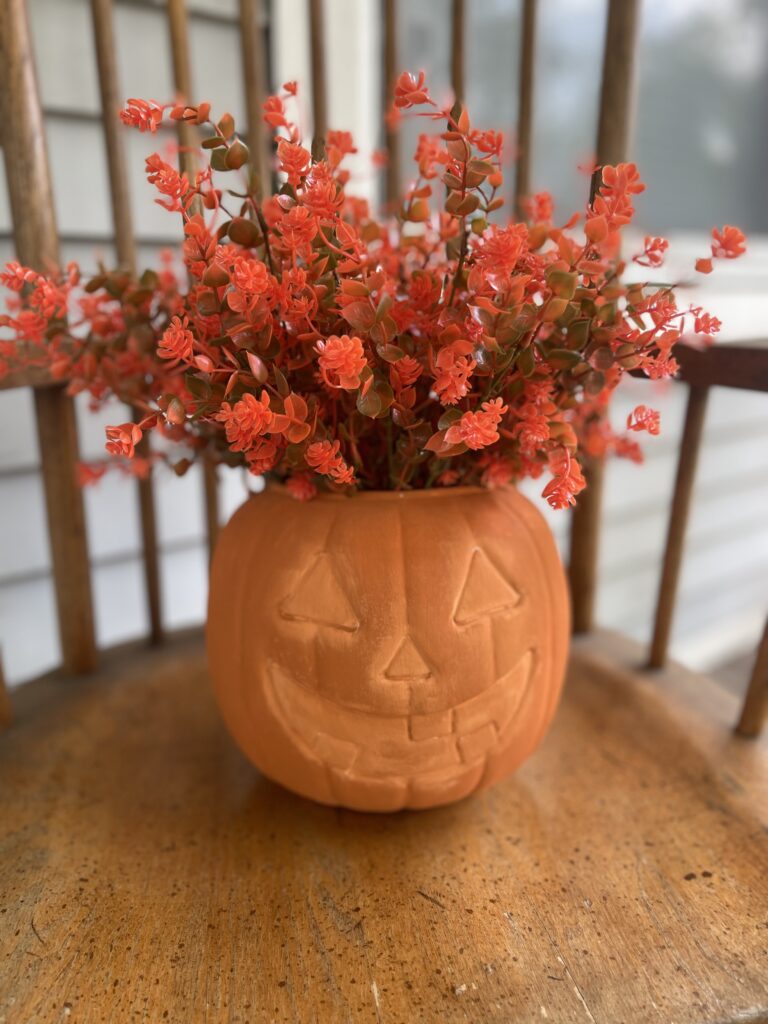
The baking soda gives the paint a rough, clay-like finish that will make your plastic bucket look just like a real ceramic planter.
Step 4: Paint the Buckets
Using your medium paintbrush, apply the baking soda-acrylic mixture to the outside of the bucket. Don’t worry if the first coat isn’t perfect; you’ll likely need two to three coats to get full coverage.
- Paint in even strokes, covering the entire surface of the bucket.
- Allow each coat to dry completely before adding the next one. This usually takes about 30-45 minutes, depending on the thickness of the paint and the humidity.
- For added character, consider leaving brushstrokes visible or creating extra texture by dabbing the paint in certain areas.
Step 5: Add a Second Coat and Texture
Once the first coat has dried, you can add a second or even third coat of paint for a thicker, more textured finish. You can also use your brush to create additional texture by stippling or dabbing the paint for a more rustic look.
If you want to distress the bucket for a vintage effect, lightly sand certain areas after the paint has dried to expose some of the original surface.
Step 7: Let the Paint Dry Completely
Once you’ve achieved your desired look, allow the bucket to dry completely. This may take a few hours, depending on how many coats you’ve applied.

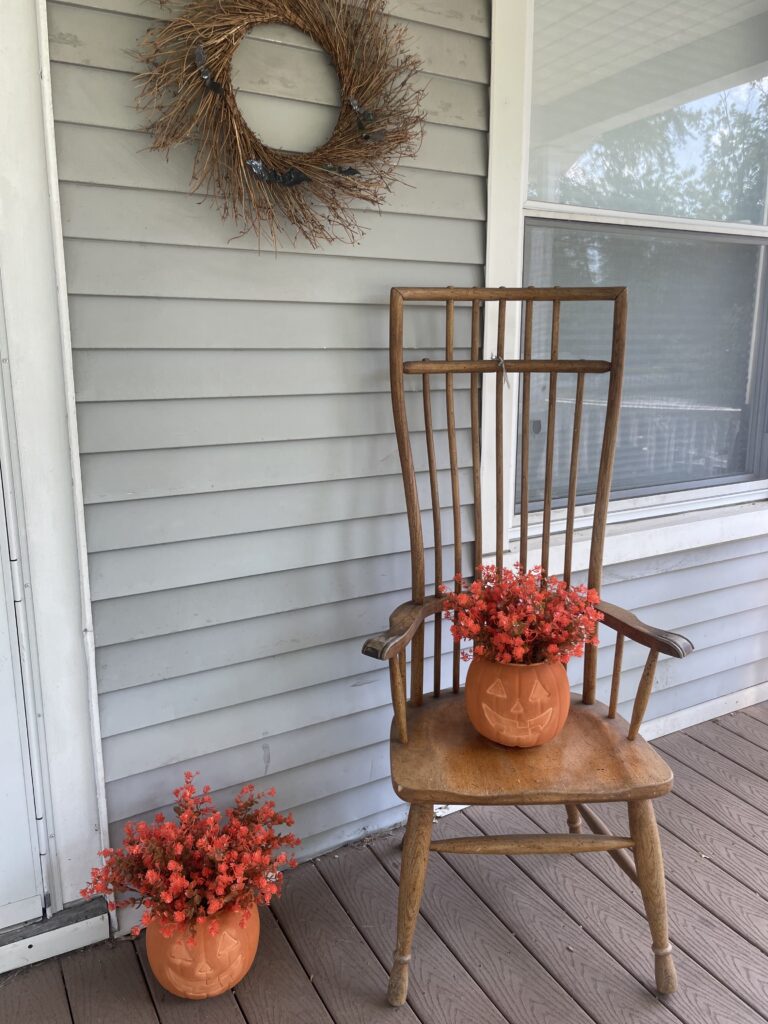
Step 8: Choose Your Flowers—Real or Artificial
Now it’s time to decide what you want to put inside your newly crafted terracotta planter. You can go with real plants, artificial flowers, or a combination of both for a versatile, low-maintenance option.
- Artificial Flowers: If you prefer an easy-care option, artificial fall flowers like sunflowers, marigolds, or dried wheat can add a festive touch without any upkeep. You can find these at craft stores, and they’re perfect for creating a long-lasting display that won’t wilt. Simply arrange them in the planter, and if necessary, use floral foam or rocks to keep them securely in place.
- Real Plants: If you love the look of living greenery, fill your planter with potting soil and plant some autumnal favorites like mums, pansies, or ornamental cabbages. If you’re using the planter outdoors, drill small drainage holes in the bottom to prevent water buildup.
Step 9: Final Touches
Once your flowers or plants are in place, you can add some decorative touches, like faux cobwebs or tiny Halloween figurines, to enhance the festive look. If you plan to keep the planter outside, consider applying a clear sealer to protect the paint from moisture and fading.
Extra Tips for Success:
- Seal the Planter: If you plan to use the planter outdoors, applying a clear sealer can help protect the paint and keep the planter looking fresh throughout the season.
- Distressed Look: For a more rustic, aged appearance, lightly sand the bucket once the paint has dried to expose bits of the original plastic surface.
- Custom Colors: Don’t be afraid to experiment with different colors. Try white, black, or even spooky purple to create a unique jack-o’-lantern look that fits your Halloween theme.
Shop Supplies

I would love to see your DIY terracotta jack-o’-lantern planters! Tag me on social media @thenicoleroseblog to share your creations and inspire others!
0 Comments